Riello RL 28/1 Скачать руководство пользователя страница 8

7

HYDRAULIC SYSTEM

FUEL SUPPLY

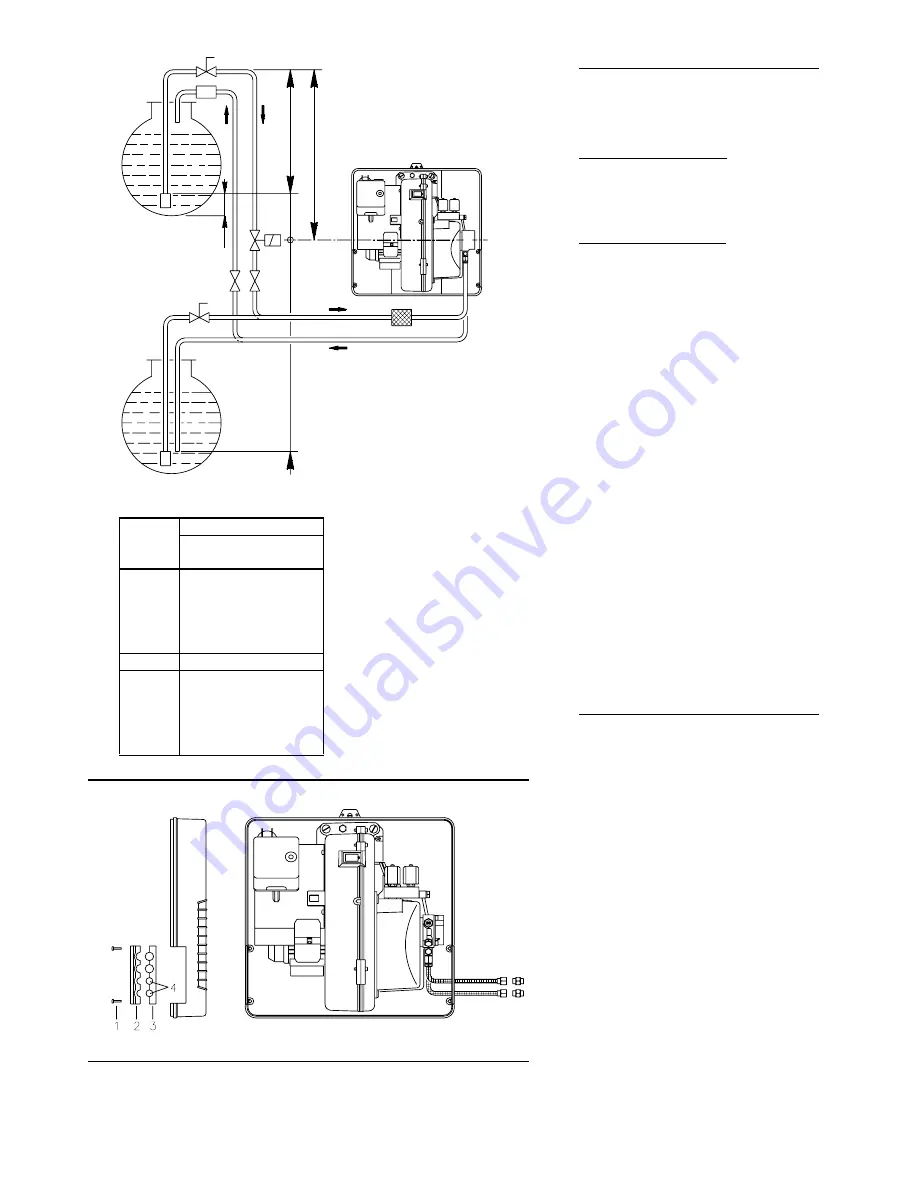
Double-pipe circuit (A)

The burner is equipped with a self-priming pump
which is capable of feeding itself within the limits
listed in the table at the side.
The tank higer than the burner

 A

The distance "P" must not exceed 10 meters in
order to avoid subjecting the pump's seal to ex-
cessive strain; the distance "V" must not exceed
4 meters in order to permit pump self-priming
even when the tank is almost completely empty.
The tank lower than the burner

 B

Pump depression values higher than 0.45 bar
(35 cm Hg) must not be exceeded because at
higher levels gas is released from the fuel, the
pump starts making noise and its working life-
span decreases.
It is good practice to ensure that the return and
suction lines enter the burner from the same
height; in this way it will be less probable that the
suction line fails to prime or stops priming.

The loop circuit

A loop circuit consists of a loop of piping departing
from and returning to the tank with an auxiliary
pump that circulates the fuel under pressure. A
branch connection from the loop goes to feed the
burner. This circuit is extremely useful whenever
the burner pump does not succeed in self-priming
because the tank distance and/or height differ-
ence are higher than the values listed in the table.

Key (A)

H =

Pump/Foot valve height difference

L =

Piping length

Æ =

Inside pipe diameter

1 =

Burner

2 =

Pump

3 =

Filter

4 =

Manual on/off valve

5 =

Suction line

6 =

Foot valve

7 = Rapid closing manual valve remote con-

trolled (only Italy)

8 = On/off solenoid valve (only Italy)
9 =

Return line

10 = Check valve (only Italy)

HYDRAULIC CONNECTIONS (B)

The pumps are equipped with a by-pass that
connects return line with suction line. The pumps
are installed on the burner with the by-pass
closed by screw 6)(B)p.11.
It is therefore necessary to connect both hoses
to the pump.
The pump will break down immediately if it is run
with the return line closed and the bj-pass screw
inserted.
Remove the plugs from the suction and return
connections of the pump.
Insert the hose connections with the supplied
seals into the connections and screw them
down.
Take care that the hoses are not stretched or
twisted during installation.
Route the hoses through the holes in the plate,
preferably using those on the rh side, fig. (B):
unscrew the screws 1), now divide the insert
piece into its two parts 2) and 3) and remove the
thin diaphragm blocking the two passages 4).
Install the hoses where they cannot be stepped
on or come into contact with hot surfaces of the
boiler.
Now connect the other end of the hoses to the
supplied nipples, using two wrenches, one to
hold the nipple steady while using the other one
to turn the rotary union on the hose.

(A)

(B)

9

10

7

5

8

4

7

9

5

3

2

1

6

6

10 cm

+ H

V

P

- H

B

A

+ H

- H

(m)

L (m)

Æ (mm)

8

10

12

+ 4,0

52

134

160

+ 3,0

46

119

160

+ 2,0

39

104

160

+ 1,0

33

89

160

+ 0,5

30

80

160

0

27

73

160

- 0,5

24

66

144

- 1,0

21

58

128

-  2,0

19

43

96

-  3,0

15

28

65

- 4,0

-

12

33

D3264

D3265

Содержание RL 28/1

Страница 1: ...nimiento Instruções de Instalação Funcionamento e Manutenção Bruciatori di gasolio Quemadores de gasóleo Queimadores a gasóleo One stage operation Funcionamiento a una llama Funcionamento a uma chama 2916092 0 CODE CÓDIGO MODEL MODELO TYPE TIPO 3472080 RL 28 1 657 T80 3472081 RL 28 1 657 T80 GB E P ...

Страница 2: ...aintenance 12 Burner start up cycle diagnostics 13 Resetting the control box and using diagnostics 13 Fault Probable cause Suggested remedy 14 Status optional 15 N B Figures mentioned in the text are identified as follows 1 A part 1 of figure A same page as text 1 A p 3 part 1 of figure A page number 3 NOTE In conformity with Efficiency Directive 92 42 EEC the application of the burner on the boil...

Страница 3: ...ing unit characteristics Burner delivery 80 kg h max Light oil pressure 0 7 bar max Ambient temperature 40 C max Light oil temperature 40 C max Attachment connectors 1 4 inch MODEL RL 28 1 TYPE 657 T80 OUTPUT 1 DELIVERY 1 kW 178 332 153 286 15 28 Mcal h kg h FUEL LIGHT OIL Net calorific value kWh kg Mcal kg 11 8 10 2 10200 kcal kg Density kg dm3 0 82 0 85 Viscosity at 20 C mm2 s max 6 1 5 E 6 cSt ...

Страница 4: ... reset hold the pushbutton down for between 1 and 3 seconds PACKAGING WEIGHT B Approximate measurements The burner is shipped in cardboard boxe with the maximum dimensions shown in table B The weight of the burner complete with pack aging is indicated in table B MAX DIMENSIONS C Approximate measurements The maximum dimensions of the burner are giv en in C Bear in mind that inspection of the combus...

Страница 5: ...TE area values have been ob tained considering a surrounding temperature of 20 C and an atmospheric pressure of 1000 mbar approx 100 m above sea level and with the combustion head adjusted as shown on page 6 TEST BOILER B The firing rate was set in relation to special test boilers in accordance with the methods defined in EN 267 standards Figure B indicates the diameter and length of the test comb...

Страница 6: ...ed after having protected the thread with antiscruffing products high tempera ture grease compounds graphite The burner boiler seal must be airtight CHOICE OF NOZZLES Choose the couple of nozzles among those giv en in table C Use nozzles with a 60 spray angle at the recom mended pressure of 12 bar When the burner fires only the first nozzle works Its delivery is higher than that of the second noz ...

Страница 7: ... necessary to change a nozzle with the burner already fitted to the boiler proceed as outlined below Retract the burner on its slide bars as shown in fig B p 5 Remove the nuts 1 D and the disk 2 Use spanner 3 D to change the nozzles COMBUSTION HEAD SETTING The setting of the combustion head depends ex clusively on the delivery of the burner in other words the combined delivery of the two nozzles s...

Страница 8: ...pipe diameter 1 Burner 2 Pump 3 Filter 4 Manual on off valve 5 Suction line 6 Foot valve 7 Rapid closing manual valve remote con trolled only Italy 8 On off solenoid valve only Italy 9 Return line 10 Check valve only Italy HYDRAULIC CONNECTIONS B The pumps are equipped with a by pass that connects return line with suction line The pumps are installed on the burner with the by pass closed by screw ...

Страница 9: ...9 Control deviceTL LAYOUT C RL 28 1 burner electrical connection Cable section not indicated 1 5 mm2 Key to layout C h1 Hourcounter IN Manual burner stop switch S Remote lock out signal TL Limit control device system this shuts down the burner when the boiler tempera ture or pressure exceeds the setpoint value TS Safety control device system this oper ates when TL is faulty X7 7 pole plug NOTE The...

Страница 10: ...p can be considered to be primed when the light oil starts coming out of the screw 3 Stop immediately the burner and tighten the screw 3 The time required for this operation depends upon the diameter and length of the suction tub ing If the pump fails to prime at the first starting of the burner and the burner locks out wait ap prox 15 seconds reset the burner and then re peat the starting operati...

Страница 11: ... not be altered unless the delivery of the burner is changed Pump pressure 12 bar This is the pressure calibrated in the fac tory which is usually sufficient for most purposes Sometimes this pressure must be adjusted to 10 bar in order to reduce fuel delivery This ad justment is possible only if the surrounding tem perature remains above 0 C 14 bar in order to increase fuel delivery or to en sure ...

Страница 12: ... it comes into contact with the spark This is the ignition flame 29 s The ignition transformer switches off 36 s The solenoid valve 11 opens the fuel passes through the piping 13 and filter 14 and is then sprayed out through the 2nd noz zle This is the operating flame The starting cycle comes to an end STEADY STATE OPERATION When the boiler temperature or pressure increases until control device TL...

Страница 13: ...ies are observed inside the pump use a separate pump to lift any water and other impurities that may have deposited on the bottom of the tank Then clean the insides of the pump and the cov er sealing surface Fan Check to make sure that no dust has accumulat ed inside the fan or on its blades as this condi tion will cause a reduction in the air flow rate and provoke polluting combustion Combustion ...

Страница 14: ...the malfunction according to the coding system indicated in the table on page 14 SOFTWARE DIAGNOSTICS Reports burner life by means of an optical link with the PC indicating hours of operation number and type of lock outs serial number of control box etc To view diagnostics proceed as follows Hold the button down for more than 3 seconds once the red LED burner lock out remains steadily lit A yellow...

Страница 15: ...sted head Adjust see page 6 fig F 30 Poorly adjusted or dirty firing electrodes Adjust see page 6 fig B 31 Poorly adjusted fan air gate too much air Adjust 32 1st nozzle is too big pulsation Reduce 1st nozzle delivery 33 1st nozzle is too small flame detachment Increase 1st nozzle delivery 34 1st nozzle dirty or deformed Replace 35 Inappropriate pump pressure Adjust Uneven fuel supply 36 Check if ...

Страница 16: ...seconds after stage 5 the code I I I I will appear on the read out this indicates that the starting phase is terminated WITH CONTROL DEVICE TR OPEN 1 Burner off TL open 2 Control device TL closed 3 Motor start seconds count starts on read out V 4 Ignition valve energized 7 30 seconds after stage 4 seconds count stops on read out V 8 10 seconds after stage 7 the code I I I I will appear on the read...

Отзывы: