2861
10
GB
6.
WORKING
6.1
COMBUSTION ADJUSTMENT
In conformity with Efficiency Directive 92/42/EEC the application of the burner on the boiler, adjustment and
testing must be carried out observing the instruction manual of the boiler, including verification of the CO
and CO
2
concentration in the flue gases, their temperatures and the average temperature of the water in the
boiler. To suit the required appliance output, choose the proper setting of the combustion head, and the air
damper servomotor.
6.2
COMBUSTION HEAD SETTING,
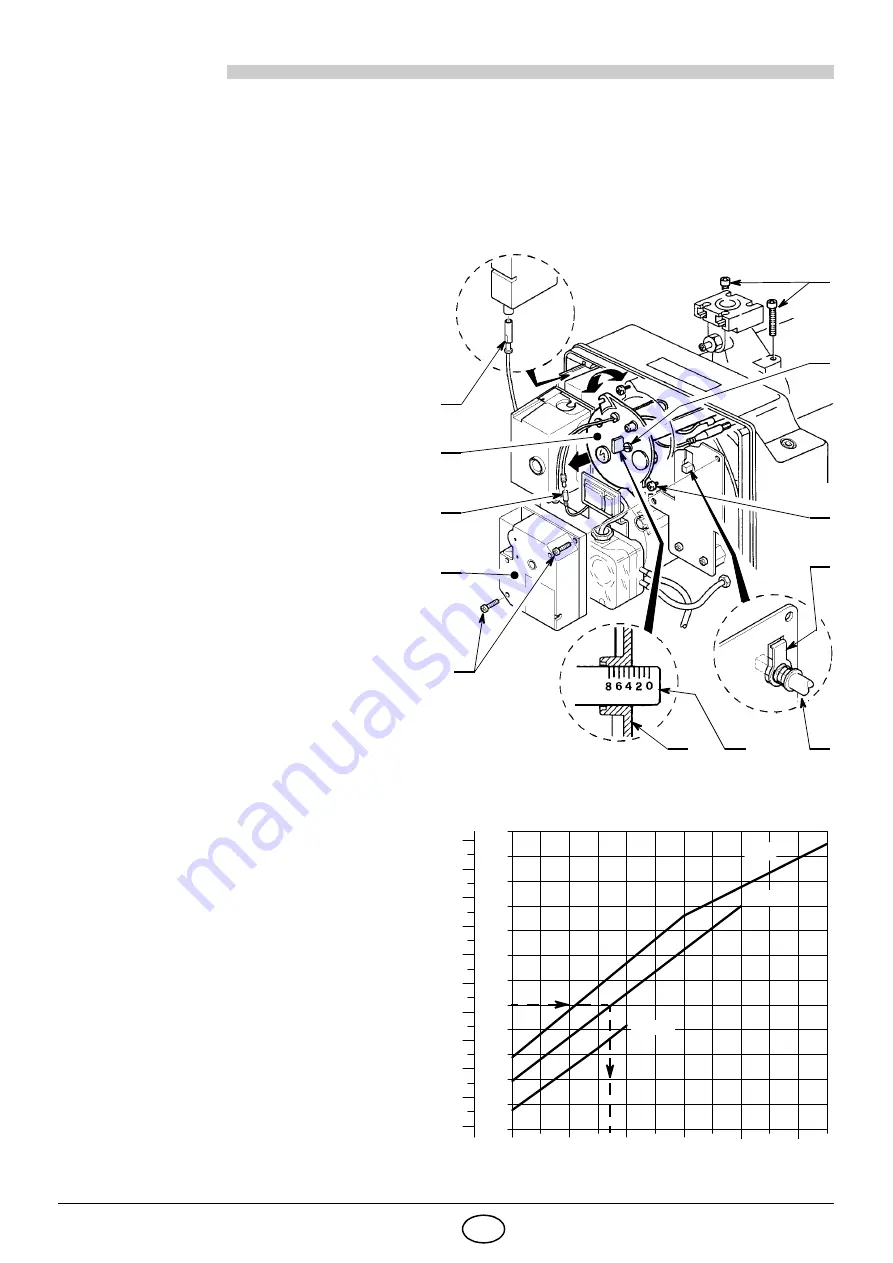
(see fig. 9)
Combustion head adjustment varies depending
on burner delivery.
It is carried out by rotating clockwise or counter-
clockwise the setting screw (6) until the set-
point marked on the regulating rod (2) is level
with the outside plane of the head assembly (1).
In figure 9, the head’s regulating rod is set to set-
point 3.5.
Example for burner type 917M:
The diagram is orientative and indicates com-
bustion head setting depending on required ther-
mal power. To assure a good working of the
burner, we suggest to adjust the combustion
head according to the boiler.
The burner is installed in a 100 kW boiler. con-
sidering an efficiency of 90%, the burner will
have to deliver about 110 kW; for this output, ad-
justment should be made to setpoint 3.5.
HEAD ASSEMBLY REMOVING
To remove the head assembly, carry out the fol-
lowing operations:
³
Make sure servomotor (7) is in the closing po-
sition (
CAM II = 0
).
³
Disconnect the connections (3 and 5).
³
Loosen the screws (4) and remove the servo-
motor (7).
ATTENTION
Rotation shaft (10) managed by the servomo-
tor (7) features a safety mechanism (11) that
prevents it turning accidentally whilst main-
tenance work is in progress.
³
Loosen the screw (9), loosen screws (8) and
remove head-holder assembly (1) by rotating
slightly to the right.
Take care not to alter the regulating rod-el-
bow (2) position while disassembling.
REASSEMBLY OF THE HEAD SYSTEM
Refit following the above procedure in the
reverse order, restoring the head assembly (1) to
its original position.
ATTENTION
³
Tighten
the screws
(9)
(without locking them)
completely
;
then lock them with a torque wrench
setting of 3 - 4 Nm.
³
Control that, during the working, there are not
gas losses coming from the screws
.
Set point
E9223
Fig. 9
10
9
1
6
11
1
2
4
7
3
5
8
170,000
50,000
130,000
90,000
10,000
kcal/ h
kW
0
8
2
4
6
210
10
50
70
110
130
150
170
190
916M
30
90
230
250
10
91
8M
D4456
210,000
917M


