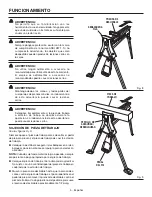
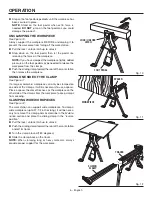
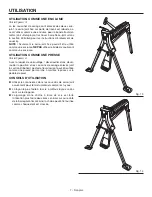
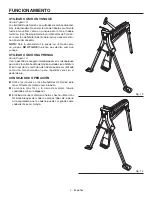
RIDGID AC9955 Скачать руководство пользователя страница 7

7 - English

Fig. 13

USING AS AN ANvIL

See Figure 13.

When the rubber clamp pads are removed from both clamps, 
the fixed clamp on the work station is strong enough to use 
as an anvil for strip metal work. (See “Replacing the Clamp 
Pads” in the 

Maintenance

 section for pad removal instruc-

tions.)

NOTE: 

Only the fixed clamp may be used as an anvil. 

DO 

NOT

 use the sliding clamp as an anvil.
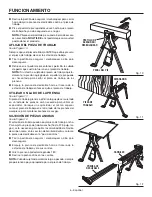
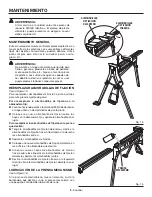
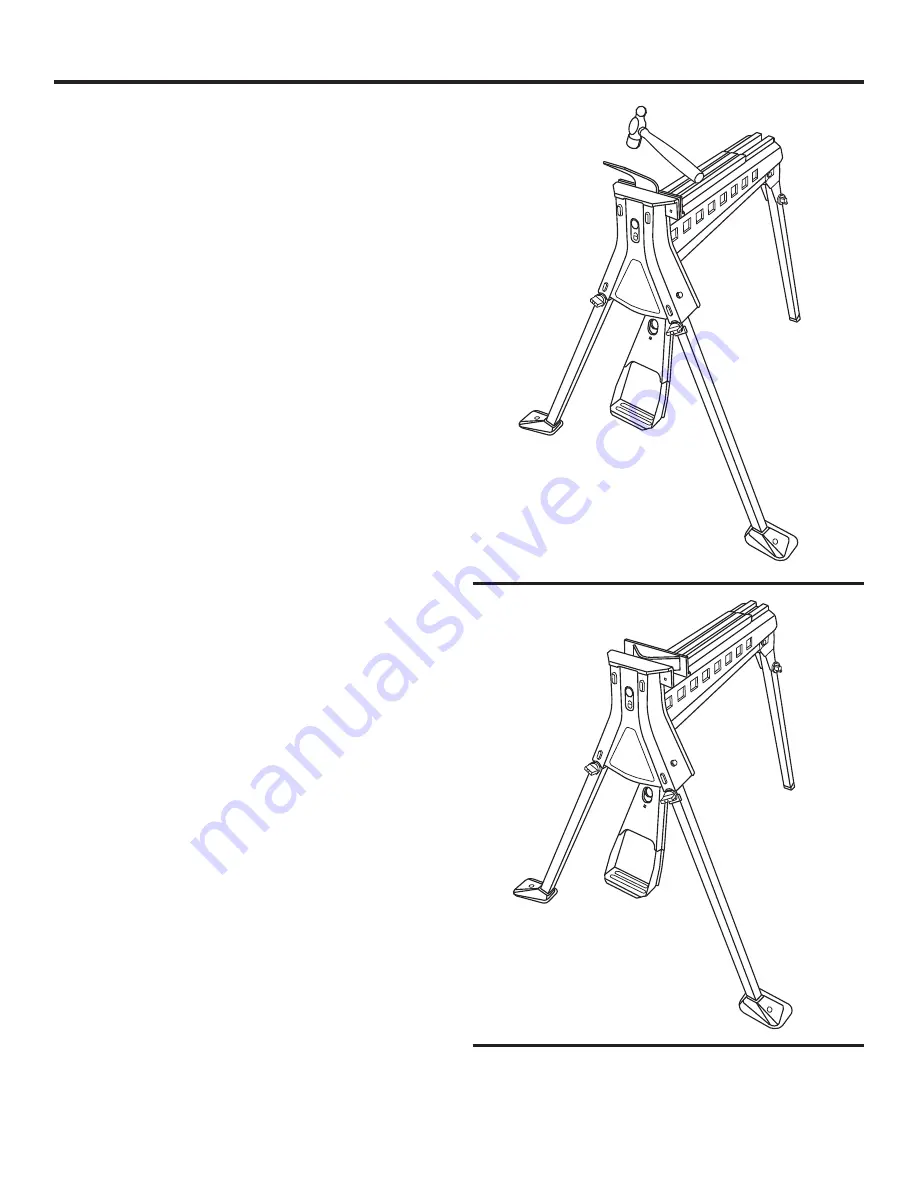
USING AS A PRESS

See Figure 14.

With the lock / unlock latch in the unlock position and the 
rubber clamp pads removed (see 

Maintenance

 section), the 

work station can be used as a press by stepping repeatedly 
on the foot pedal.

OPERATING TIPS

 

Use  the  grooves  in  the  clamp  pads  to  securely  hold  
material such as tubing.

 

The  easiest  way  to  hacksaw  square  tubing  is  on  the  
diagonal.

 

Sharpening a chain saw blade is made easier using two 
wooden blocks on either side of the bar thus ensuring 
the chain can be rotated as each tooth is filed.

OPERATION

Fig. 14

Содержание AC9955

Страница 1: ...ompris ne pas utiliser ce produit Su producto ha sido dise ado y fabricado de conformidad con nuestras estrictas normas para brindar fiabilidad facilidad de uso y seguridad para el operador Con el deb...

Страница 2: ...rk on the work station outside the width of the front legs Doing so may cause the work station to become unbalanced and tip CHECK THAT ALL SCREWS AND KNOBS are tight and legs are securely locked befor...

Страница 3: ...rage position n Lift the leg slightly then slide the leg toward the front of the work station n Raise the leg and slide into place before tightening the rear lock knob securely n Lift the foot pedal a...

Страница 4: ...rests on the housing n Repeat with the right front lock knob and right front leg n Place a finger in the foot pedal release and pull up to unlock the foot pedal n Lower the foot pedal until it rests...

Страница 5: ...es when operating Failure to do so could result in possible serious injury clamping the workpiece See Figures 8 9 Always support the workpiece before releasing the foot pedal to prevent the workpiece...

Страница 6: ...rkpiece USing one side of the clamp See Figure 11 If a large or awkward workpiece can only be clamped on one side of the clamps it will be necessary to use a spacer Place a spacer the same thickness a...

Страница 7: ...as an anvil USing AS A PRESS See Figure 14 With the lock unlock latch in the unlock position and the rubber clamp pads removed see Maintenance section the work station can be used as a press by stepp...

Страница 8: ...em for greater clamp ing range To replace the clamp pad on the fixed clamp n Pry off the fixed clamp pad using a flathead screw driver n Place a new clamp pad over the holes in the fixed clamp and pre...

Страница 9: ...pieds de devant Faire peut causer si porte de travail pour devenir mal quilibr et la pointe VERIFIER QUE TOUTES VIS ET LES BOUTONS sont des tendus et jambes sont assur ment verrouill es avant fonction...

Страница 10: ...rs le devant de poste de travail n Relevez la pied et la chute sa place avant resserrer le bouton verrouillage arri re solidement n Soulever la p dale de pied et la tirer vers le devant de poste de tr...

Страница 11: ...ter avec le bouton de verrouillage avant droit et la pied avant droit n Placer un doigt dans le p dale de pied de d gagement et tirer pour d verrouiller la p dale de pied n Abaisser la p dale de pied...

Страница 12: ...er ou le poste de travail bouge Ne pas prendre cette pr caution peut entra ner des blessures graves FIXATION DE pi ce Voir les figures 8 et 9 Toujours soutenir la pi ce avant que rel cher la p dale de...

Страница 13: ...poste de travail enl ve alors la pi ce UTILISATION d un c t du bride Voir la figure 11 Si une grand ou gauche pi ce peut tre seulement serr e sur un c t des brides ce sera n cessaire d utiliser un plu...

Страница 14: ...OMME UNE PRESSE Voir la figure 14 Avec la loquet de verrouillage d verrouiller dans d ver rouiller la position et les coussins de serrage enlev s voit la section Entretien poste de travail serrant peu...

Страница 15: ...de serrage sur le serre joint fixe n Enlever en faisant le coussinet de serrage fixe de serre joint utilisant un tournevis lame plate n Placer un nouveau coussinet de serrage sur les trous dans le se...

Страница 16: ...delanteras Hacer as puede causar que la estaci n de trabajo llegue a ser desequilibrada y la punta VERIFIQUE QUE TODOS TORNILLOS Y las PERIL LAS son apretados y las patas son cerradas firmemente antes...

Страница 17: ...rna hacia la delantero de la estaci n de trabajo n Levante la pata y el resbaladero en el lugar antes de apretar el trasero que cierra perilla firmemente n Soulever el pedal de pie y tir n hacia la de...

Страница 18: ...miento n Repita con la perillla de fijaci n delantero derecho y pata delantero derecho n Coloque un dedo en la afloje de pedal de pie y arr nquese para desbolquear el pedal de pie n Baje el pedal de p...

Страница 19: ...durante la operaci n La inobservancia de esta advertencia puede causar lesiones serias SUJECI N DE PIEZA DE TRABAJO Vea las figuras 8 y 9 Siempre apoye el pieza de trabajo antes de soltar el pedal de...

Страница 20: ...estaci n de trabajo entonces quita el pieza de trabajo UTILIZAR un lado de la prensa Vea la Figura 11 Si pieza de trabajo grande o dif cil s lo puede ser sujetado en un lado de las prensas ser necesa...

Страница 21: ...ILIZAR COMO UNA PRENSA Vea la Figura 14 Con la pestillo de asegurar desbolquear en el desbolquea posici n y las almohadilla de fijaci n quitados vea Manten imiento secci n el estaci n de trabajo puede...

Страница 22: ...n Levante haciendo palanca la almohadilla fija de abrazad era que utiliza un destornillador de punta plana n Coloque una nueva almohadilla de fijaci n sobre los hoyos en la abrazadera fija y apriete...

Страница 23: ..._____________________________________________________ ____________________________________________________________________________________________________________ _____________________________________...

Страница 24: ...mod le se trouve sur une plaquette fix e sur la p dale de pied Noter le num ro de s rie dans l espace ci dessous Lors de toute commande de pi ces d tach es fournir les informations suivantes No de mo...

Отзывы: