
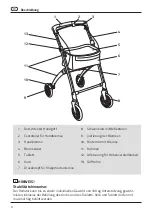


16
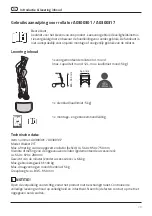
1.2
1.4
1.3
1.2
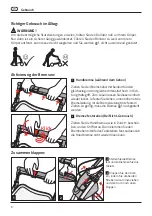
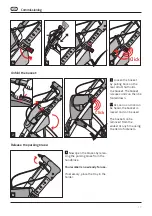
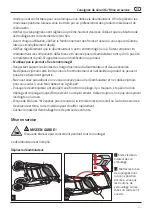
Pull the brake
lever towards the
handle and enclose it
with the locking.
1.3
Now insert the
handle tubes into the
tubes of the frame.
1.4
Finally, pull the front and rear
wheels apart as far as possible until
the frame clicks into place. A click is
heard.
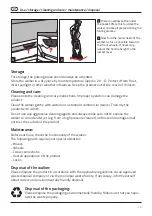
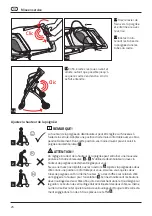
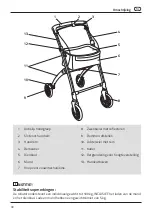
adjust the handle height:
NOTE!
i
The handle height of the walker can be adjusted in 5 levels using the lock. Assu-
me an upright but comfortable position with your arms hanging loosely. In this
position, your hands should be able to grip the handle of the walker .
WARNING!
!
Incorrect handle height adjustment can lead to poor posture and other injuries
+ . Only use the walker with the handle height that is correctly set for you.
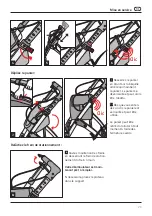
If you have not already done so, open the lock . Adjust the handle on both
sides to a position that is comfortable for you. Make sure that both handle
tubes are at the same height. There are numbers on the tube next to the height
adjustment for orientation . Now close the locking buttons on both sides so
that they snap into the designated hole on the handlebar. The locking button
must click into place at the same number on both sides.
Please note that the locking button must always be properly engaged in one of
the 5 holes provided for it .
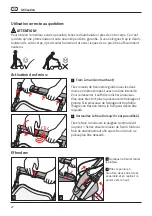
1
2
4
5
6
3
Commissioning
Click
Click
Содержание A0300301
Страница 1: ...Gepr ft nach DIN EN ISO 11199 2 Montageanleitung User Manual Mode d Emploi GEBRUIKSAANWIJZING...
Страница 2: ......
Страница 39: ......


