background image

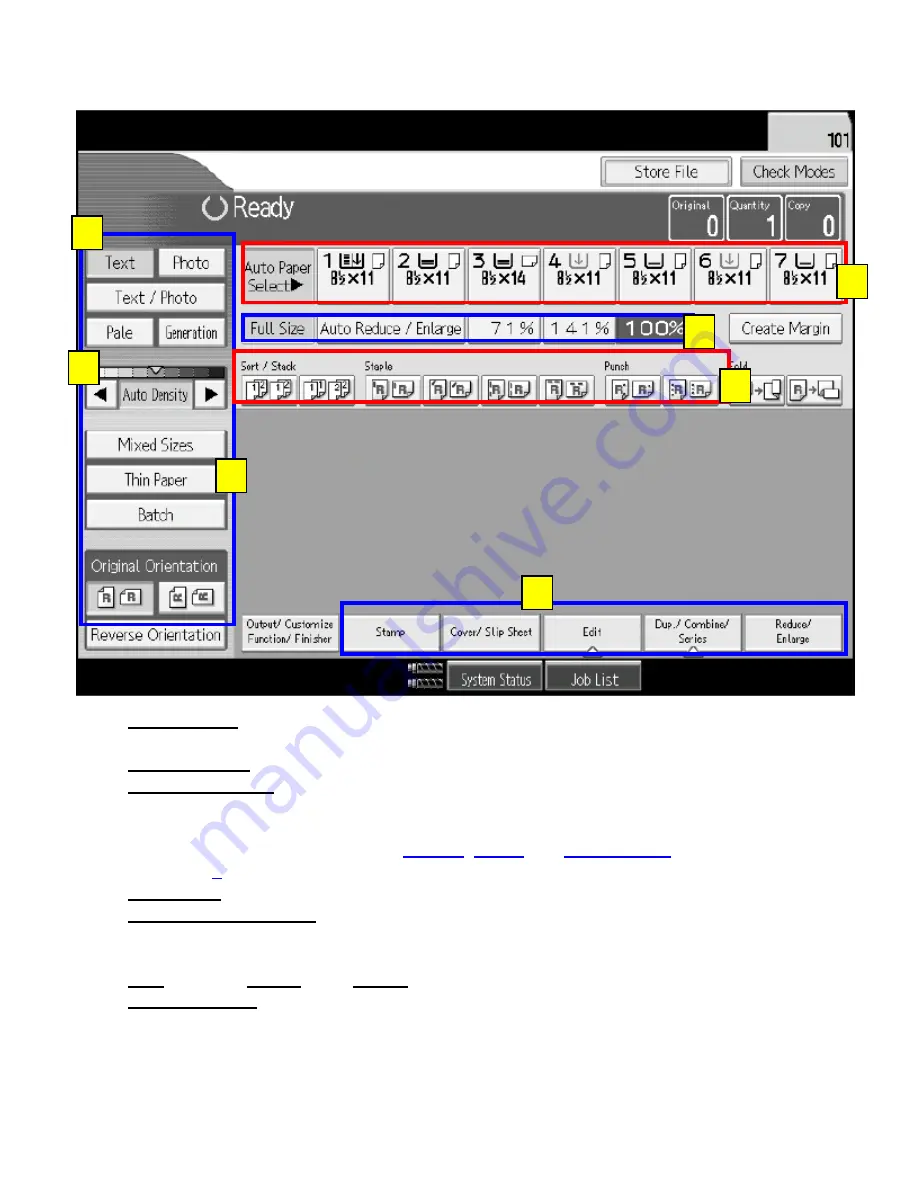
STANDARD DISPLAY SCREEN

1.

Original type

Text

Photo

Text/Photo

Pale 

(for light originals), 

Generation

(for 2

nd

generation originals)

2.

Image Density

(darken or lighten copies by pressing the arrow keys)

3.

Special Originals: 

Mixed Sizes

(two different size originals)

Batch

(use to combine large files or bound documents in a specific order for multiple 

quantities).  Must press the BATCH, SORT and input quantity to start then end with 
the # key to complete the batch function.

4.

Paper Tray

selections

5.

Preset reduce/enlarge

buttons

Full size

(100%), 

Auto Reduce/Enlarge

(will adjust size of the original to the size of the 

paper tray selected, and 

preset percentage keys

for reducing or enlarging.

6.

Sort

(Collate), 

Staple

, Hole 

Punch

functions

7.

Select function

key to display the menu

Reduce/Enlarge 

(preset reduction and enlargement keys and number key to choose the 

specific percentage)

Dup/Combine/Series

(for 1 sided to 2 sided copies, combining several pages to 1 page, 

copy from book and creating a mini book)

Edit

(use to erase borders, adjust margins, center documents, repeat images)

Stamp

(use this function to stamp preset stamps, date, page numbers and stamp text onto 

copies)

1

4

5

6

7

2

3

Содержание Pro1106X

Страница 1: ...Pro1106X COPIER GUIDE...

Страница 2: ...ace down 2 Input copy quantity using the blue number key pad 3 Optional Choose your settings such as sort collate staple hole punch or duplex 1 2 sided 2 2 sided or press the PROGRAM key to find prepr...

Страница 3: ...s 5 Preset reduce enlarge buttons Full size 100 Auto Reduce Enlarge will adjust size of the original to the size of the paper tray selected and preset percentage keys for reducing or enlarging 6 Sort...

Страница 4: ...Paper Tray selection Auto Select is the default 2 Reduce Enlarge selections Use Auto R E to automatically reduce or enlarge original to the paper size 3 Duplex Combine shortcut keys 1 Sided to 2 Side...

Страница 5: ...ect paper trays 1 thru 7 to set the type of paper and size In this window a specific tray can be selected for a designated sheet front and back cover and slip sheet Select the Paper Type tab to set th...

Страница 6: ...Press Start key to store your file Print a file 4 Highlight the file s 5 Press To Printing Screen for more options 6 Enter the quantity of copies using the number keypad Press Start key Additional Doc...

Страница 7: ...print job until it is manually released at the printer E Store Print Stores print job allowing the job to reprint at the printer under the print jobs F Document Server Sends files directly to the Docu...

Страница 8: ...tray for your prints 4 MFP Icon Select the input tray or output tray directly on the image 5 Print On Allows you to print on different sizes of paper Utilize the Fit To Print Size option to automatica...

Страница 9: ...t Text Displays watermark in the background On First Page Only Watermarks will be printed on the first page As Outline Only Prints the outline of the watermark 3 Watermark Presets Choose preset waterm...

Страница 10: ...ngs changes the default Text selection Choose from B W or Color Settings 2 Original Feed Type allows for scanning 2 sided originals and Batch scanning 3 File Name Type is used to assign a file name an...

Страница 11: ...er completely as shown Close RIGHT side of drawer so you only have left side open see below Load paper into LEFT hand side FIRST as shown Red lines indicate max paper Close drawer completely Wait unti...

Страница 12: ...s Corporation All rights reserved MODEL _________ SERIAL NUMBER _____________ 1 800 432 9787 RICOH SERVICE SUPPLY www ricohdirect com SUPPORT WEBSITE www ricoh usa com support FOR KNOWLEDGE BASE Q A A...

Отзывы: