background image

Bin Capacity:

Sorting:
50 sheets
(64 ~ 82 g/m

2

, 17.1 ~ 21.8 lb, smaller than B4,

8

1/2

" x 14")

25 sheets
(64 ~ 82 g/m

2

, 17.1 ~ 21.8 lb, smaller than A3,

11" x 17" and the paper size other than the size
described in "Paper size" section)

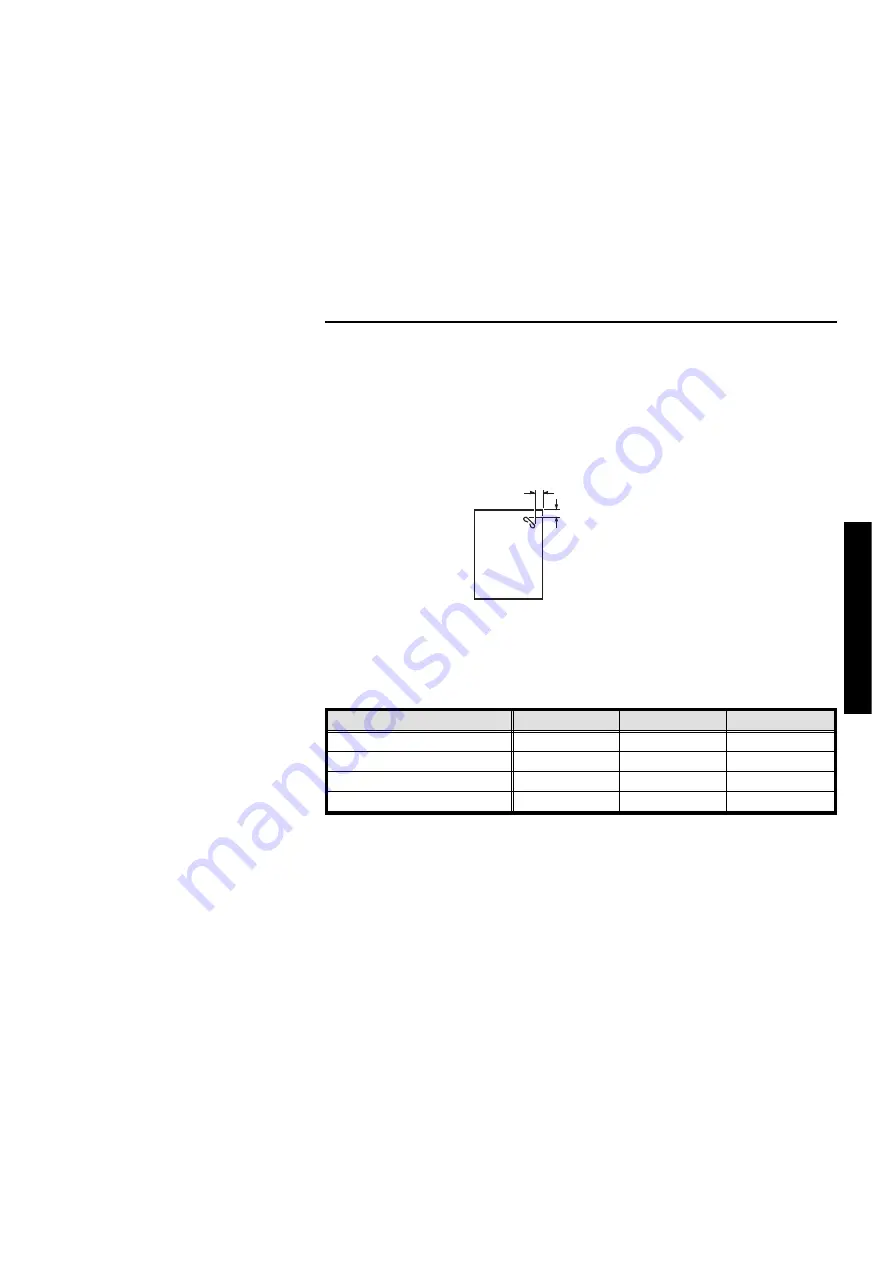
Stapling Position: 

Stapler Capacity:

50 sheets (64 g/m

2

, 17.1 lb)

40 sheets (80 g/m

2

, 20 lb)

42 sheets (75 g/m

2

, 20 lb) 

Staple replenishment:

Cartridge exchange (5,000 pieces/cartridge)

Dimensions (only sorter stapler):

Width

Depth

Height

Stored one sorter stapler

908 mm, 35.8"

597 mm, 23.6"

926 mm, 36.5"

Set up one sorter stapler

908 mm, 35.8"

597 mm, 23.6"

1,082 mm, 42.6"

Stored two sorter staplers

1,507 mm, 59.4"

617 mm, 24.3"

926 mm, 36.5"

Set up two sorter staplers

1,507 mm, 59.4"

617 mm, 24.3"

1,082 mm, 42.6"

Weight:

57.5 kg, 127 lb (One sorter stapler)
106.5 kg, 235 lb (Two sorter staplers)

Power Source:

AC 120 V, 60 Hz, 3.0 A
(1st sorter stapler)
DC 24 V
(2nd Sorter Stapler, from the 1st Sorter Stapler)

a = 5 

±

 2.5 mm, 0.2" 

±

 0.1"

b = 5 

±

 2.5 mm, 0.2" 

±

 0.1"

b

a

SPECIF

ICAT

IONS

SPECIFICATIONS 

221

Содержание Priport VT 6000

Страница 1: ...m Environmental Conditions 9 Environments To Avoid 9 Access To The Machine 10 Power Connection 10 OPERATION 12 Printing Paper 12 Originals 13 Preparation For Printing 14 Standard Printing 19 Restoring...

Страница 2: ...rinting Of Secret Documents Security Mode 69 OPTIONAL FUNCTIONS 70 Printing Using The Optional 20 Originals Or 50 Originals Document Feeder 70 Printing Using The Optional Sorter Stapler 78 Printing Us...

Страница 3: ...Paper Feed Table 164 Non sort Tray Optional Sorter Stapler 164 TROUBLESHOOTING 165 When The Misfeed Indicator Y Blinks 172 When The Open Cover Unit Indicator k Blinks 193 When The Supply Exchange Indi...

Страница 4: ...ATION CHART 214 SPECIFICATIONS 215 Main Frame 215 20 Originals Document Feeder 218 50 Originals Document Feeder 218 Large Capacity Tray LCT 219 20 Bin Sorter Stapler 220 Consumables 222 TABLE OF CONTE...

Страница 5: ...T PROBLEMS SAFETY INFORMATION When using your machine the following safety precautions should always be followed Safety During Operation In this manual the following important symbols are used WARNING...

Страница 6: ...laser systems direct or indi rect reflected eye contact with the laser beam may cause serious eyes damage When the machine needs to be checked adjusted or repaired contact your serv ice representative...

Страница 7: ...l outlet to avoid fire or electric shock When the machine will not be used for a long time unplug the power cord E When you pull out the plug from the socket grip the plug to avoid damaging the cord a...

Страница 8: ...consult a doctor Keep the ink or ink container out of reach of children If ink is ingested force vomiting by drinking a strong saline solution and consult a doctor immediately Be careful not to cut y...

Страница 9: ...Section 1 eu 1 v...

Страница 10: ...GUIDE TO COMPONENTS Machine Exterior GUIDE TO COMPONENTS 1 2 3 4 5 6 7 8 9 10 11 12 GUIDE TO COMPONENTS 1...

Страница 11: ...Feed Table Set paper on this table for printing 7 Separation Roller Pressure Levers Use to adjust the separation roller pressure to prevent double feed 8 Feed Roller Pressure Lever Use to adjust the c...

Страница 12: ...Machine Interior GUIDE TO COMPONENTS 1 2 3 4 5 6 9 10 11 12 13 14 15 7 8 GUIDE TO COMPONENTS 3...

Страница 13: ...ze End Plate Prop When the prints A4 81 2 x 11 or smaller are not delivered properly set this prop 8 Wing Guide Release Lever Push it up when you print on A3 11 x 17 or larger paper 9 Ink Holder Set t...

Страница 14: ...een brown yellow purple navy and maroon Tape Dispenser Key Counter Cabinet If you have sorter staplers and you want to have a document feeder the 50 originals document feeder should be equipped with y...

Страница 15: ...page 39 11 Sort key for the optional sorter stapler Press to select Sort Staple Sort or Class Sort mode See page 81 12 Reduce Enlarge key Press to reduce or enlarge the image See page 28 13 Direction...

Страница 16: ...am key Press to input or recall user programs See page 62 25 Stop key Press to stop the machine operation 26 Proof key Press to make proof prints 27 Print Start key Press to start printing 28 Master M...

Страница 17: ...of prints entered While printing it shows the number of prints remaining 6 Memory Class indicator Shows the number entered in Memory mode or Class mode 17 81 2 1 4 7 Directional Magnification Up Down...

Страница 18: ...If it topples over it could cause injury Optimum Environmental Conditions Temperature 10 30 C 50 86 F Humidity 20 90 RH A strong and level base a sturdy desk and cabinet etc The machine must be level...

Страница 19: ...ly connect the machine to the power source de scribed on page 217 of this manual Avoid multi wiring as it could cause an electric shock or a fire WARNING Avoid using an extension cord More than 20 cm...

Страница 20: ...g from the socket grip the plug to avoid damaging the cord and causing fire or electric shock Caution When the machine will not be used for a long time unplug the power cord Make sure the plug is firm...

Страница 21: ...1 4 x 16 2 Select Reduce mode when you want to print the entire image of an A3 11 x 17 original Correct curls in the paper before setting it in the machine When you cannot correct the paper curl stack...

Страница 22: ...is 307 x 432 mm 12 x 17 If you use paste up originals make sure the pasted parts hold firmly to the base sheet If the thickness of the paste up original is more than 0 2 mm 2 250 and the space between...

Страница 23: ...paper in the optional paper cassette for LCT Loading paper 1 Carefully open the paper feed ta ble 2 Adjust the side plates to match the paper size 3 Place the paper on the paper feed table Correct th...

Страница 24: ...ion indicator of the actual paper size set on the paper feed table is lit Setting up the paper delivery table 5 Open the paper delivery table 6 Lift the paper delivery end plate and move it to match t...

Страница 25: ...re lease lever 8 Lift the paper delivery side plates and adjust them to the paper size 9 If you want to use A4 81 2 x 11 or smaller paper lift the small size paper delivery end plate and move it to m...

Страница 26: ...mm in side of the proper paper size When printing on paper thicker than 81 4 g m2 21 6 lb do not lift up the guides When printing on paper smaller than A4 81 2 x 11 set the small paper end plate prop...

Страница 27: ...roperly set the small size end plate prop to the small size paper delivery end plate 1 Set the small size end plate prop to the small size paper delivery end plate as shown in the illustra tion 2 Slid...

Страница 28: ...d according to the size marks on the left scale 3 Lower the platen cover 4 Enter the number of prints re quired using the Number keys Up to 9999 prints can be entered at one time To change the number...

Страница 29: ...nting is completed the same number of prints is automatically set for the next job If you want to stop the machine dur ing a print run press the Stop key 8 Remove the prints from the paper delivery ta...

Страница 30: ...r 2 Turn off the main switch 3 Push the paper feed plate down and close the paper feed table 4 Push the small size paper deliv ery plate to the left then lower it if necessary Return the left and righ...

Страница 31: ...s then lower them Make sure that the side plates do not touch the small size paper delivery end plate 6 Move the end plate until the plate handle is flush with the end of the table 7 Lower the end pla...

Страница 32: ...gin more than 5 mm 0 2 at the leading edge If there is no margin paper might wrap around the drum and cause a misfeed The right or left Image Position keys shift the image about 0 5 mm 1 50 each time...

Страница 33: ...out 10 mm 2 5 each way Each division on the scale is 2 mm 0 08 If your machine is equipped with the optional sorter stapler the image po sition is shifted to 3 mm 0 12 for each division on the scale 2...

Страница 34: ...mes the lighter the printing density is If you want darker prints de crease the printing speed If you use the Sort Staple Sort or Class Sort function the setting should be Setting 1 ode Contrast Norma...

Страница 35: ...ute Setting 2 75 sheets minute Setting 3 90 sheets minute Setting 4 105 sheets minute Setting 5 120 sheets minute When the main switch is turned on Setting 3 is selected The faster the printing speed...

Страница 36: ...hen you want to change the number of prints en tered or check the completed prints 1 Press the Stop key 2 Change the number of prints or check the completed prints When you change the number of prints...

Страница 37: ...in size by using the Reduce Enlarge key Metric version Inch version Reduction Ratio Original Size Print Size 93 87 A3 B4 A4 B5 82 B4 A4 B5 A5 71 A3 A4 A4 A5 B4 B5 Select this ratio when you make prin...

Страница 38: ...optional document feeder 4 Press the Master Making key Check the image position of the trial or proof print If the image position is not correct adjust it using the Image Position keys see page 23 or...

Страница 39: ...A5 A4 B5 B4 B6 B5 122 A4 B4 A5 B5 115 B4 A3 B5 A4 B6 A5 Some part of the image on the trailing edge might not appear To print the entire image adjust the enlargement ratio with the Zoom up down keys...

Страница 40: ...optional document feeder 4 Press the Master Making key Check the image position of the trial or proof print If the image position is not correct adjust it using the Image Position keys see page 23 or...

Страница 41: ...dly to increase the ratio in 1 steps 2 Make sure that the original and the print paper are the correct size 3 Set your originals on the expo sure glass or in the optional document feeder 4 Press the M...

Страница 42: ...ou can make prints Depending on the reproduction ratio and print paper size some part of the image might not be printed or you might get prints with a lot of margins When you enter the reproduction ra...

Страница 43: ...ginal on the exposure glass or in the optional document feeder 8 Press the Master Making key Check the image position of the trial or proof print If the image position is not correct adjust it using t...

Страница 44: ...and press the Enter key 4 Enter the vertical length of the print paper using the Number keys and press the Enter key 5 Enter the horizontal length of the print paper using the Number keys and press th...

Страница 45: ...the optional document feeder 8 Press the Master Making key Check the image position of the trial or proof print If the image position is not correct adjust it using the Image Position keys see page 23...

Страница 46: ...he margins will change depending on the reduction ratios Shadows near the book edge might not be erased completely If the shapes of the originals are as below shadows might appear on the prints In thi...

Страница 47: ...t or move the machine If you set the original on the exposure glass as shown below the screened im age below may not be printed Lines or solid images that run from the screened image below onto the or...

Страница 48: ...your prints Erasing Margins If you want to erase edge margins of a book original follow the steps below 1 Set the original on the exposure glass 2 Enter the number of prints re quired using the Numbe...

Страница 49: ...you reach the desired pa per size and direction press the Enter key 6 Press the Master Making key Check the image position of the trial or proof print If the image position is not correct adjust it us...

Страница 50: ...to the Thick paper position When you use paper heavier than 64 g m2 17 lb and lighter than 157 0 g m2 41 7 lb position the pressure lever A to the standard position In the case of paper smaller than...

Страница 51: ...3 Push the pressure levers B down There are two pressure levers B Make sure that both levers are down If dog eared or wrinkled prints are delivered push the levers up 4 If printing on A3 11 x 17 or l...

Страница 52: ...Image Mode key Alternatively use the Make up function to specify Line mode for text areas and Photo mode for photograph areas You can set the machine to print text areas darker in Line Photo mode wit...

Страница 53: ...ent feeder 5 Press the Master Making key Check the image position of the trial or proof print If the image position is not correct adjust it using the Image Position keys see page 23 or the side plate...

Страница 54: ...glass or in the optional document feeder 3 Press the Master Making key Check the image position of the trial or proof print If the image position is not correct adjust it using the Image Position key...

Страница 55: ...ery table This marks the end of each printing group 1 Set the original face down on the exposure glass or in the optional document feeder You can set up to 20 originals into the optional 20 originals...

Страница 56: ...t originals into the optional document feeder originals are fed and prints are completed automat ically 7 Repeat steps 1 through 3 until all originals are printed when you set originals on the exposur...

Страница 57: ...t strips of paper which sepa rate the printing groups on the paper delivery table Up to 99 sets of prints can be selected for one original 1 Press the Memory Class key to light the Class indicator 2 S...

Страница 58: ...nter key 5 With the Number keys enter the desired number of sets The maximum number of sets that can be made is 99 6 Turn on the power switch of the optional tape dispenser 1 4 7 2 5 8 0 3 6 9 Stop Pr...

Страница 59: ...is fed out to the paper delivery table the tape dispenser drops a strip of paper on the top of the paper stack If the power switch of the optional tape dispenser is turned off or the tape dispenser is...

Страница 60: ...tape dispenser automatically feeds out strips of paper which sepa rate the printing groups on the paper delivery table 1 Press the Memory Class key to light the Memory indicator 2 With the Number key...

Страница 61: ...he number of prints for the second original 5 Press the Enter key This stores the number of prints to be made for the second original in memory 2 6 Repeat steps 4 and 5 for each original The number of...

Страница 62: ...l or proof print If the image position is not correct adjust it using the Image Position keys see page 23 or the side plate fine adjusting dial see page 24 A Turn on the power switch of the optional t...

Страница 63: ...e dis penser drops a strip of paper on the top of the paper stack D After the first set is completed set the second original on the ex posure glass and press the Mas ter Making key E Repeat step D unt...

Страница 64: ...e used when combining two images Metric version A4 B5 A5 B6 A6 A3 100 115 141 163 200 B4 87 100 122 141 173 A4 71 82 100 115 141 B5 61 71 87 100 122 A5 50 57 71 82 100 Inch version 81 2 x 11 51 2 x 81...

Страница 65: ...nations that can be used when combining 4 images Metric version A3 B4 A4 B5 A5 B6 A6 A3 50 58 71 82 100 115 141 B4 50 61 71 87 100 122 A4 50 58 71 82 100 B5 50 61 71 87 A5 50 58 70 B6 50 61 A6 50 Inch...

Страница 66: ...2 to the leading edge of the first original will not be printed Also any image closer than 4 mm 0 16 to the leading edge of the second original will not be printed When the image is too close to the...

Страница 67: ...g part of the print 2 Enter the number of prints using the Number keys 3 Check the print paper size and the reproduction ratio 4 Then press the Multi Copy key either Once to select the Combine 2 Image...

Страница 68: ...operating side 7 Press the Master Making key Check the image position of the trial or proof print If the image position is not correct adjust it using the Image Position keys See page 23 or the side...

Страница 69: ...paper longer than 432 mm 17 0 completed prints will not be delivered to the paper delivery table properly so lower the end plate and receive completed prints by hand 1 Set your original on the exposu...

Страница 70: ...tion of the trial or proof print If the image position is not correct adjust it using the Image Position keys see page 23 or the side plate fine adjusting dial see page 24 5 Make your prints Stop Mast...

Страница 71: ...umbers already containing a pro gram are displayed on the guidance display 3 Enter 0 using the Number key 4 Press the Enter key The program numbers 1 to 8 will be displayed in the guidance display If...

Страница 72: ...ayed on the guidance display using the Number keys Make sure that the previous job set tings stored under the selected pro gram number are overwritten 6 Press the Enter key 1 4 7 2 5 8 0 3 6 9 Stop Pr...

Страница 73: ...a pro gram are displayed on the guidance display 2 Using the Number keys enter the number of the program that you want to access 3 Press the Enter key All stored job settings are recalled Program 2 3...

Страница 74: ...4 Set your originals on the expo sure glass or in the optional document feeder 5 Press the Master Making key Stop Master Making Print Start Proof OPERATION OPERATION 65...

Страница 75: ...and Stop key simultaneously press the Program key 2 Enter 1 using the Number key 3 Press the Enter key The numbers of the programs which are not protected will be displayed in the guidance display 1...

Страница 76: ...4 Using the Number keys enter the number of the program that you wish to protect 5 Press the Enter key 1 4 7 2 5 8 0 3 6 9 Stop Proof C Clear Enter OPERATION OPERATION 67...

Страница 77: ...rogram number is protected the machine returns to the ready condition 4 Using the Number keys enter the number of the program that you wish to remove protection from 5 Press the Enter key 1 4 7 2 5 8...

Страница 78: ...ody can access that master again 1 Make your prints 2 While pressing the CS Mode key press 1 using the Number key If you press the Proof key or the Print Start key after finishing one print job the be...

Страница 79: ...t to have a document feeder the optional 50 originals document feeder should be equipped with your machine ADF Unit Open Lever Use to open the ADF unit Original Tray Originals used to make masters are...

Страница 80: ...6 Originals larger than 307 mm x 432 mm 12 0 x 17 0 Folded curled creased originals Bound stapled or clipped originals If you use paste up originals make sure the pasted parts hold firmly to the base...

Страница 81: ...ert the originals face down in the document feeder until it stops Do not insert different size originals at the same time Approximately 20 originals 64 g m2 17 lb can be inserted at one time in the 20...

Страница 82: ...ts using the Proof key to check the image posi tion again When you set originals in the 50 originals document feeder the last original original set on the top of the original stack in the document fee...

Страница 83: ...2 originals face down tops towards the paper delivery table When you use the optional 20 origi nals document feeder the bottom original will be printed on the leading part of print When you use the o...

Страница 84: ...it using the Image Position keys see page 23 or the side plate fine adjusting dial see page 24 After the first original is on the mas ter the second original is fed If you set only one original the b...

Страница 85: ...fed from the bottom of the stack Make sure that the originals are set in the correct sequence with the first original on the bottom When you use the optional 50 origi nals document feeder the original...

Страница 86: ...automatically after a trial print is de livered 6 Press the Print Start key After the last page of each set is fed out to the paper delivery table the tape dispenser drops a strip of paper on the top...

Страница 87: ...chine Sorter staplers and a tape dispenser cannot be equipped together When you use the Sort Staple Sort or Class Sort function set the speed to Setting 1 Before printing make sure that the wing guide...

Страница 88: ...or Class Sort mode the prints are delivered to the non sort tray 1 Lift the side plates of the non sort tray and move them to match the paper size 2 Lift the end plate of the non sort tray and adjust...

Страница 89: ...B4 A4 B5 A5 Paper weight 64 82 g m2 Maximum capacity of bins Paper sizes described above with exception of A3 A3 and paper sizes other than the sizes described above 50 sheets 25 sheets Maximum number...

Страница 90: ...in the same stack Buckled or curled paper Short grain paper Print sets over the maximum number of sets are delivered to the non sort tray When you set originals on the exposure glass 1 Press the Sort...

Страница 91: ...Master Making key Check the image position of the trial or proof print If the image position is not correct adjust it using the Image Position keys see page 23 or the side plate fine adjusting dial s...

Страница 92: ...proof print 9 Make your prints A Repeat steps 7 through 9 until you have finished printing When you set originals in the optional 50 originals docu ment feeder 1 Follow steps 1 and 2 on page 81 2 Set...

Страница 93: ...nts are deliv ered to the non sort tray If you press the Auto Cycle key all sets of prints are delivered to the bins automatically after pressing the Print Start key In this case you cannot make proof...

Страница 94: ...he illustration For Stapling the following limitations apply Metric version Paper size A3 B4 A4 B5 Paper weight 64 82 g m2 Stapler capacity 64 g m2 2 50 sheets 75 g m2 2 42 sheets 80 g m2 2 40 sheets...

Страница 95: ...of sets are delivered to the non sort tray Setting stapling before printing Auto Staple mode This function can be used only when your machine is equipped with the optional 50 originals document feede...

Страница 96: ...the Image Position keys see page 23 or the side plate fine adjusting dial see page 24 The trial and proof prints are deliv ered to the non sort tray If you press the Auto Cycle key all sets of prints...

Страница 97: ...ts master automatically 7 Repeat step 6 until you have fin ished printing After all prints are delivered to the bins the machine starts stapling To cancel Staple Sort mode press the Staple key on the...

Страница 98: ...ginals in the op tional document feeder follow steps 1 through 6 on pages 83 and 84 2 When you use 2 or more origi nals the Staple key on the sorter stapler will be lit Press the Sta ple key To cancel...

Страница 99: ...n make sure that no prints remain on any of the bins For stapler capacity see page 85 or 86 1 Set the stack of paper you want to staple on the first bin Make sure that the Staple key on the sorter sta...

Страница 100: ...apply Metric version Paper size A3 B4 A4 B5 A5 Paper weight 64 82 g m2 Capacity of bins Paper sizes described above with exception of A3 A3 and paper sizes other than the sizes described above 50 she...

Страница 101: ...aper that cannot be used Roughly cut paper Paper of different thickness in the same stack Buckled or curled paper Short grain paper 1 Press the Sorter key to light the Stack indicator 2 S Set the spee...

Страница 102: ...2 5 Press the Master Making key Check the image position of the trial or proof print If the image position is not correct adjust it using the Image Position keys see page 23 or the side plate fine adj...

Страница 103: ...6 Make your prints When you want to make prints using another original remove prints from the bins Then repeat steps 3 through 6 Print Start Proof OPTIONAL FUNCTIONS 94...

Страница 104: ...tray components To install the large capacity tray the LCT cabinet is required Paper Cassette for LCT LCT Cover Open to load paper or remove misfed paper LCT image position Switch Press to shift the...

Страница 105: ...ng paper Maximum paper capacity is as follows 4 000 sheets 64 g m2 17 lb 3 000 sheets 80 g m2 20 lb 1 Open the LCT cover 2 Push the slide cover in 3 Load 500 sheets of paper at a time OPTIONAL FUNCTIO...

Страница 106: ...4 Press the Down key 5 Repeat steps 3 and 4 until you have finished loading paper 6 Close the slide cover and LCT cover OPTIONAL FUNCTIONS OPTIONAL FUNCTIONS 97...

Страница 107: ...B5 A5 Inch version 11 x 17 81 2 x 14 81 2 x 11 1 Press the Change Paper key with the LCT cover closed 2 After the beeper sounds open the LCT cover and push the slide cover in 3 Remove paper from the L...

Страница 108: ...g m2 49 lb leave a space less than 0 5 mm between side plates and pa per stack When you use thick 186 to 209 3 g m2 49 to 55 6 lb paper leave a space at lease 1 mm between side plates and paper stack...

Страница 109: ...9 Press the Down key A Repeat steps 8 and 9 until you have finished loading paper B Close the slide cover and LCT cover OPTIONAL FUNCTIONS 100...

Страница 110: ...chine is equipped with the optional sorter stapler the image position is shifted to 3 mm 0 12 for each division on the scale Shifting the image to the right 1 Press the LCT image position switch as sh...

Страница 111: ...tte for LCT Maximum paper capacity is as follows 500 sheets 64 g m2 17 lb 400 sheets 80 g m2 20 lb If you use small and thick paper 186 to 209 3 g m2 49 to 55 6 lb the prints may be curled In this cas...

Страница 112: ...sure that there is no misfed paper in the paper feed section Make sure that the Paper Size And Direction indicator of the actual paper size set in the cassette is lit 6 Close the slide cover and LCT...

Страница 113: ...the release lever on the left guide adjust the left and right side guides to match the paper size When you use paper less than 186 g m2 49 lb leave a space less than 0 5 mm between side guides and pap...

Страница 114: ...4 Set the end plate to match the paper size as shown in the illus tration 5 Load paper in the cassette OPTIONAL FUNCTIONS OPTIONAL FUNCTIONS 105...

Страница 115: ...uivalent paper sizes are as following Metric version Indicators Paper size A3 A3 B4 B4 A4 A4 A4R A4 B5 B5 B5R B5 A5R A5 A6R A6 Inch version Indicators Paper size 11 x 17 11 x 17 81 2 x 14 81 2 x 14 11...

Страница 116: ...8 Push the cassette forward until it stops 9 Close the slide cover and LCT cover OPTIONAL FUNCTIONS OPTIONAL FUNCTIONS 107...

Страница 117: ...sary for each color Making color prints 1 Make sure that the Color Print indicator is lit 2 Press the Master Making key Check the image position on the trial or proof print If the image position is no...

Страница 118: ...Make sure that the lamp of the drum rotation button is green If this lamp is red press the drum rotation button until the beeper sounds and the lamp turns green 3 Lift the lock lever until it locks i...

Страница 119: ...tation button is green push the drum unit handle then pull out the drum unit 5 Hold the rail on the drum and slide out the drum while pulling the release towards you 6 Remove the drum unit from the ma...

Страница 120: ...m unit until it locks in position 9 Lower the drum unit lock lever A Close the front door Make sure that the Cover Open indi cator turns off and the Color Drum indicator lights OPTIONAL FUNCTIONS OPTI...

Страница 121: ...n the exposure glass 2 Enter the number of prints using the Number keys 3 Press the Master Making key Check the image position of the trial or proof print If the image position is not correct adjust i...

Страница 122: ...on them again to let the ink dry If the prints are not dry the paper feed roller may become dirty In this case wipe off the roller with a cloth 6 Exchange the drum unit See page 109 7 Set the second o...

Страница 123: ...RH Max 290 mm x 412 mm 11 4 x 16 2 with A3 drum Max 290 mm x 204 mm 11 4 x 8 0 with an optional A4 drum Master cut length A3 drum 320 mm x 540 mm 12 5 x 21 2 226 masters roll Optional A4 drum 320 mm x...

Страница 124: ...ove keys from the begin ning The SP mode display appears on the guidance display 2 Using the Number keys enter the desired service program num ber SP No For the SP No refer to page 133 3 When you want...

Страница 125: ...ll be displayed at the end of the sec ond line on the guidance display If you designate the wrong SP No press the Clear Modes key Then re enter the desired SP No 2 Enter the desired value or mode usin...

Страница 126: ...you want to leave the Service Program mode press the Clear Modes key op Master Making n Line Clear Modes C CHANGING DEFAULT SETTINGS SERVICE PROGRAM MODE CHANGING DEFAULT SETTINGS SERVICE PROGRAM MOD...

Страница 127: ...e 9 service programs can be registered in the CS Mode key When you recall registered service pro grams using the CS Mode key the setting is changed and you can make prints How to register SP modes in...

Страница 128: ...3 Press the Clear Modes key p Master Making Line Clear Modes C CHANGING DEFAULT SETTINGS SERVICE PROGRAM MODE CHANGING DEFAULT SETTINGS SERVICE PROGRAM MODE 119...

Страница 129: ...ow steps 2 to 5 on pages 48 and 49 and 7 and 8 on page 50 When you select Memory mode follow steps 2 to 9 on pages 51 52 and 53 and B to E on pages 53 and 54 1 4 7 2 5 8 0 3 6 9 ory ss ine ine Photo P...

Страница 130: ...ess the Master Making key Check the image position of the trial or proof print If the image position is not correct adjust it using the Image Position keys see page 23 or the side plate fine adjusting...

Страница 131: ...ress the Master Making key Check the image position of the trial or proof print If the image position is not correct adjust it using the Image Position keys see page 23 or the side plate fine adjustin...

Страница 132: ...3 Enter the number of prints using the Number keys 4 Press the Master Making key 5 Make your prints 1 4 7 2 5 8 0 3 6 9 mory ass Line Line Photo Photo Reset Auto Cycle Program Image Mode C Clear Enter...

Страница 133: ...r Once to select Combine 2 Im ages mode or Twice to select Combine 4 Im ages mode 4 Enter the number of prints using the Number keys 5 Press the Master Making key 6 Make your prints 1 4 7 2 5 8 0 3 6...

Страница 134: ...n the exposure glass or in the optional document feeder 2 While pressing the CS Mode key press the Number key you have registered as Memory Stack mode 3 Press the Memory Class key to light the Memory...

Страница 135: ...ter key 6 With the Number keys enter the number of prints for the next set of prints 7 Press the Enter key 1 4 7 2 5 8 0 3 6 9 Stop Proof C Clear Enter 7 8 0 9 Proof C ear Enter 1 4 7 2 5 8 0 3 6 9 St...

Страница 136: ...ecessary to press the Enter key A Turn on the power switch of the optional tape dispenser B Press the Master Making key Check the image position of the trial or proof print If the image position is no...

Страница 137: ...your prints After the first set is fed to the paper delivery table the tape dispenser drops a strip of paper on the top of the paper stack Print Start Proof CHANGING DEFAULT SETTINGS SERVICE PROGRAM M...

Страница 138: ...fol low the steps 3 to 5 on page 49 When you select Memory mode follow the steps 2 to 7 on pages 51 and 52 1 4 7 2 5 8 0 3 6 9 mory ass Line Line Photo Photo Reset Auto Cycle Program Image Mode C Clea...

Страница 139: ...key 6 Make your prints The machine stops printing for 2 sec onds after the first set is fed to the paper delivery table Stop Master Making Print Start Proof Print Start Proof CHANGING DEFAULT SETTINGS...

Страница 140: ...r the number of prints using the Number keys 4 Press the Master Making key 5 Make your prints 1 4 7 2 5 8 0 3 6 9 ory ss Line Line Photo Photo Reset Auto Cycle Program mage Mode C Clear Enter CS Mode...

Страница 141: ...Making key Check the image position of the trial or proof print If the image position is not correct adjust it using the Image Position keys see page 23 or the side plate fine adjusting dial see page...

Страница 142: ...cation Ratio Adjustment Adjusts a fixed magnification ratio metric version from A4 to A3 inch version from 51 2 x 81 2 to 81 2 x 14 Default metric version 141 inch version 155 Adjustment value 50 to 2...

Страница 143: ...11 Default metric version 93 inch version 74 Adjustment value 50 to 200 17 Adjusts a fixed magnification ratio metric version from A3 to B4 inch version from 11 x 17 to 81 2 x 11 Default metric versi...

Страница 144: ...functions that are registered in the CS Mode key is returned to the default setting by pressing the Clear Modes key Default 1 Adjustment value 0 No 1 Yes 29 Photo Background Correct When you make prin...

Страница 145: ...d when the Make up key is pressed Default 0 Adjustment value 1 to 40 51 to 90 101 to 140 151 to 190 0 No background pattern 50 Directional Magnification Mode Selection You can select whether you can i...

Страница 146: ...set the Quality Start function to be Yes you can also select how many times the Quality Start mode is carried out for each master making Also when you set the Quality Start function to be Yes the bold...

Страница 147: ...rs 3 Adjustment value Auto Quality Start mode 0 No 1 Yes 0 to 6 hours 0 to 10 times 6 to 32 hours 0 to 10 times 32 to 72 hours 0 to 10 times If you use the Quality Start function before 6 hours have p...

Страница 148: ...prints in Auto Multi Copy mode see page 124 You cannot set an original in the optional document feeder in Auto Multi Copy mode 87 Memory Stack mode In Memory mode you set several originals each of whi...

Страница 149: ...ng Reproduce tint image Default 0 Adjustment value 0 No 1 Yes 113 Resettable Total Master Copy Counter Used to display the total number of masters and prints M Total number of masters P Total number o...

Страница 150: ...aking prints on non standard paper and the original image does not entirely appear on the print set paper size detection to off When you set the paper size detection to off you can also select whether...

Страница 151: ...ch version 208 x 275 mm SP No 163 A4 or 81 2 x 11 Default metric version 289 x 206 mm inch version 271 x 212 mm SP No 164 B5 or 51 2 x 81 2 Default metric version 174 x 253 mm inch version 132 x 212 m...

Страница 152: ...des and then black out the codes from this manual How to enable user code mode 120 The following procedure explains how to enable User Code mode This must be done before a user code can be input 1 Pre...

Страница 153: ...ired setting using the Number keys and press the En ter key 5 Press the Clear Modes key to leave Service Program mode 1 4 7 2 5 8 0 3 6 9 oto Stop Proo Mode C Clear Enter 1 4 7 2 5 8 0 3 6 9 Stop Proo...

Страница 154: ...e Clear Modes key This prevents others from using your user code to make prints If you do not follow this step the ma chine will not request the next user for their codes unless the auto reset time ha...

Страница 155: ...nd prints made under the user code 382 will be displayed in the guidance display 3 Continue pressing the Enter key to display the number of masters and prints made under your user code 4 Press the Cle...

Страница 156: ...key until desired user code is displayed 4 Enter 1 using the Number key and press the Enter key 5 Press the Clear Modes key to leave Service Program mode 1 4 7 2 5 8 0 3 6 9 Stop Master Making Print...

Страница 157: ...ss the Enter key The total number of masters and prints made under all user codes will be displayed in the guidance display 3 Press the Clear Modes key to leave Service Program mode 1 4 7 2 5 8 0 3 6...

Страница 158: ...ber key and press the Enter key 4 Press the Clear Modes key to leave Service Program mode 1 4 7 2 5 8 0 3 6 9 Stop Master Making Print Start Proof Auto Cycle Program On Line Clear Modes C C Clear Ente...

Страница 159: ...optional paper cassette for LCT see page 102 Replenishing paper 1 Press the Stop key This step is necessary only if you want to pause a print run to replenish paper 2 Press the Lower Paper Feed Ta bl...

Страница 160: ...the pads of the feed side plates before loading paper Reset the pads after paper is set Correct paper curl before setting the paper 4 Press the Print Start key to re sume printing REPLENISHING SUPPLIE...

Страница 161: ...ed side plates to match the paper size 3 Place the paper on the paper feed table Correct any paper curl before setting the paper Make sure that the side plates con tact the paper lightly 4 Adjust the...

Страница 162: ...octor Caution Keep the ink out of reach of children Caution If ink is ingested force vomiting by drinking a strong saline solu tion and consult a doctor immediately Caution This machine has been teste...

Страница 163: ...he new cartridge into the ink holder Return the ink holder to its original position until it clicks Always supply ink of the same color 5 Close the front door 6 Press the Reset key The machine will st...

Страница 164: ...the direction of the arrow to re lease the feed roller pressure 3 Remove the used master roll and pull out both spools Then insert both spools into a new master roll When the Master End indicator lig...

Страница 165: ...e master directory master may be creased and it causes poor print image 5 Tear the paper band by holding the instruction label and remove it by pulling the label 6 Insert the paper edge of the mas ter...

Страница 166: ...roll will rotate Do not touch the master roll You may be in jured 9 After the beeper sounds open the transparent cover and remove the cut off portion of the master roll Remove the cut off master com...

Страница 167: ...the tape dis penser 2 As shown put the roll in the dis penser Make sure that the tape is installed in the proper direction If it is not in the correct direction the tape dispenser will not work correc...

Страница 168: ...4 Turn on the power switch of the tape dispenser 5 Press the manual cut button to trim off the leading edge of the tape REPLENISHING SUPPLIES REPLENISHING SUPPLIES 159...

Страница 169: ...un out of staples Do not remove the staple cartridge from the stapler except for adding staples Do not remove staple plate It should remain in the stapler unit when you remove the empty staple cartrid...

Страница 170: ...he by pass feed stapling see page 90 When you cannot staple documents even if you try 4 or 5 times follow the steps below Reset the staple cartridge Then retry stapling If the stapler unit does not wo...

Страница 171: ...the exposure glass with a damp cloth and wipe it with a dry cloth If you do not clean the exposure glass marks on the glass will be printed Platen Cover Clean the platen cover with a damp cloth and wi...

Страница 172: ...l Document Feeder Clean the sheet with a damp cloth and wipe it with a dry cloth If you do not clean the sheet marks on the sheet will be printed Paper Size Detection Sensors Paper Feed Table Wipe off...

Страница 173: ...ght not light when paper runs out Paper Feed Roller Paper Feed Table Wipe off the paper dust on the paper feed roller with a damp cloth then wipe it with a dry cloth If you do not clean the paper feed...

Страница 174: ...Reset PAPER FEED JAM REMOVE JAMMED PAPER 175 Y C Reset MASTER FEED JAM REMOVE JAMMED MASTER 181 Y E Reset PAPER WRAP JAM REMOVE JAMMED PAPER 183 Y E B Reset PAPER WRAP JAM REMOVE JAMMED PAPER 186 Y F...

Страница 175: ...main switch while removing the misfed items When the open cover unit indicator k blinks Monitor Guidance Display and Action Page k CLOSE THE COVER 193 Close the original table unit Close the front do...

Страница 176: ...on the exposure glass or in the optional document feeder Then press the Master Making key c SET THE KEY COUNTER The optional color drum unit is set A ORIGINAL IN ADF CLOSE PLATEN COVER Originals are s...

Страница 177: ...sized paper when you use Auto Staple or Manual Staple mode Make prints on the same sized paper or staple prints using the Bypass Feed Staple function STAPLE NOT AVAILABLE OVER LOADED FLOWING Sheets of...

Страница 178: ...mode Change the number of prints The minimum number of prints that can be entered is specified by the Service Program mode Change the number of prints The maximum enlargement ratio that can be entere...

Страница 179: ...n A4 with the A4 drum unit this message is displayed You can make prints if you press the Mas ter Making key again Security mode is set If you make the next master Security mode is canceled You can re...

Страница 180: ...e If a service code appears on the guidance display after you turn the main switch off and on a few times do not continue turning it on and off Leave the machine off E04 might be displayed when you ma...

Страница 181: ...ator Y Blinks After clearing misfeeds Press the Reset key to reset the error indicators P ress the Reset key to reset error in dicators Do not turn off the main switch when removing misfeeds Reset 1 1...

Страница 182: ...ument feeder 1 Press the ADF unit open lever and open the ADF unit 2 Pull out the original gently 3 If you cannot remove the misfed original pull out the original from the side of the original tray an...

Страница 183: ...amaged originals Originals with glue on them Originals perforated for ring binders Folded curled or creased originals Bound stapled or clipped originals Originals larger than 307 mm x 432 mm 12 0 x 17...

Страница 184: ...Y B Paper misfeed in the paper feed section When you load paper on the paper feed table 1 Remove the misfed paper TROUBLESHOOTING TROUBLESHOOTING 175...

Страница 185: ...When you load paper in the optional large capacity tray 1 Open the LCT cover and push the slide cover in 2 Remove misfed paper 3 Close the LCT cover and the slide cover TROUBLESHOOTING 176...

Страница 186: ...n you load paper in the paper cassette for LCT 1 Open the LCT cover 2 Push the slide cover in 3 Remove the cassette from the large capacity tray 4 Remove misfed paper TROUBLESHOOTING TROUBLESHOOTING 1...

Страница 187: ...5 Push the cassette forward until it stops 6 Close the slide cover and the LCT cover TROUBLESHOOTING 178...

Страница 188: ...2 Is the separation roller pressure properly adjusted The standard position of the separa tion pressure levers is the lower posi tion If dog eared or wrinkled prints are delivered push the levers up...

Страница 189: ...n When paper edges stick together shuffle the paper as shown When you use post cards and thick paper lower the printing speed to setting 2 or 1 See page 26 ensity hter mal ker 1 ker 2 Speed Slow Fast...

Страница 190: ...eed section 1 Open the original table Lift the original table release lever and slide the original table all the way to the left 2 Open the transparent cover 3 Pull the misfed master up and remove it...

Страница 191: ...out the drum unit see page 109 5 If the original misfeeds in the op tional document feeder press the ADF open lever and open the ADF unit to remove the misfed sheet 6 Return the original table to its...

Страница 192: ...it open button and open the master eject unit 2 Remove the misfed paper 3 If the paper is completely wrapped around the drum peel off the edge of the paper Then close the master eject unit and press t...

Страница 193: ...the misfed paper pull out the drum unit after confirming that the lamp is green and remove the misfed paper from the drum 5 Close the master eject unit If you followed step 3 or 4 close the front doo...

Страница 194: ...curl as shown If you cannot correct the paper curl stack the paper with the curl face down as shown When the leading edge margin of the original is less than 5 mm 0 2 or there is a solid image on the...

Страница 195: ...y sharp edges when you reach inside the machine to remove misfed sheet of paper or masters Misfeed in the paper feed section 1 Slowly but firmly pull out the pa per Paper is wrapped around the drum 1...

Страница 196: ...green again so the paper can be peeled off easier And then open the mas ter eject unit and remove the mis fed paper 4 If you cannot remove the misfed paper pull out the drum unit after confirming the...

Страница 197: ...rect the curl as shown If you cannot correct the paper curl stack the paper with the curl face down as shown When the leading edge margin of the original is less than 5 mm 0 2 or there is a solid imag...

Страница 198: ...master is Remove the misfed master as follows When a master misfeed occurs in the master eject sec tion 1 Open the master eject container cover Then pull out the master eject box 2 Remove the misfed...

Страница 199: ...pull out the unit For how to remove the drum unit see page 109 2 Grasp the drum unit handle and remove the master from the drum 3 Pull the master out of the master clamp 4 Re insert the drum unit unti...

Страница 200: ...e misfed sheets of paper or masters 1 Push the button to open the mas ter eject unit 2 Remove the misfed paper 3 Close the master eject unit Check the following adjustment before restart operation Is...

Страница 201: ...Open the non sort tray If you cannot remove misfed paper re move the paper under the non sort tray Even if you can remove misfed paper in step 1 you should open the non sort tray 3 While lifting the...

Страница 202: ...at the following door units are closed Original Table Slide the original table until it locks in position Front Door Close the front door completely Master Eject Unit Close the master eject unit until...

Страница 203: ...ADF unit until it locks in position LCT Cover Option Close the slide cover and LCT cover completely Make sure that the drum is completely set in position Set the drum completely until it locks in pos...

Страница 204: ...Make sure that the paper feed table and the paper delivery table are open Open the paper feed table Open the paper delivery table TROUBLESHOOTING TROUBLESHOOTING 195...

Страница 205: ...ove obstacles from the non sort tray Non sort tray While lifting the non sort tray lower the knob to the right Then close the non sort tray Stapler unit cover Close the stapler unit cover Non sort tra...

Страница 206: ...ge 150 Reset Load new ink cartridge See page 153 e Load new master roll See page 155 i H Set the new staple cartridge See page 160 Reset Empty master eject box Set the master eject box 1 Open the mast...

Страница 207: ...n turn the master eject box upside down on it to remove the used masters Then throw away the masters 3 Reinstall the master eject box Push in the box until it touches the inside bracket 4 Close the co...

Страница 208: ...original on the exposure glass and press the Master Mak ing key c Set the key counter The key counter option is not set Insert the key counter Color Color drum unit is installed Stop Master Making Pr...

Страница 209: ...rs do not blink If the stapler unit does not work properly a staple jam might occur 1 Open the stapler unit cover 2 Loosen the screw by turning it counterclockwise Then remove the stapler unit 3 While...

Страница 210: ...staples 5 Close the stapler unit cover by pushing the knob to the other side 6 Return the stapler unit to its origi nal position and secure the screw 7 Close the stapler unit cover TROUBLESHOOTING TRO...

Страница 211: ...ry stapling 5 or 6 times 9 When you use Auto staple or Manual Staple mode Make sure that the Staple key is green Press the Staple key When you use Bypass Feed Sta pling Reset documents in the bin Make...

Страница 212: ...plate prop to the small size paper delivery end plate 2 Reduce the printing speed by pressing the key When The Prints Are Not Delivered In A Neat Stack Set the small size end plate prop to the small s...

Страница 213: ...irty background prints When you use postcards and the like the background might be dirty because postcards do not absorb ink well You might get prints with dirty background when printing at high speed...

Страница 214: ...clean cloth remove any ink that has accumulated on the trailing edge of the drum unit 5 Insert the drum unit until it locks in position then lower the drum unit lock lever 6 Close the front door 7 Tur...

Страница 215: ...ding edge Otherwise the paper exit pawl might become dirty and cause black lines on prints Check the following parts and clean them if they are dirty Platen cover See page 162 Exposure glass See page...

Страница 216: ...e paper feed side plates contact the paper lightly Make sure that the Paper Size And Direction indicator of the ac tual paper size set on the paper feed table is lit When you use the optional docu men...

Страница 217: ...form the following procedure 1 Pull out the drum unit Refer to page 109 for the details 2 Remove the master from the drum 3 Remove paper that is stuck to the drum 4 Insert the drum unit until it locks...

Страница 218: ...back side Keep at least 5 mm 0 2 margin at the leading edge of the back side of the printing paper Press the Proof key to perform a test print as the first few prints may be light The top sheet might...

Страница 219: ...g with soap and water Also be careful not to get any ink on your clothing while emptying the master eject box or while loading a new ink cartridge The image density varies according to the printing sp...

Страница 220: ...e Keep corrosive liguids such as acid off the machine Open and close the door and covers softly Do not put anything except originals or command sheets on the machine Do not spill liquid on the machine...

Страница 221: ...llowing conditions the machine might not detect the original on the exposure glass If you press the Master Making key again the machine will start making a master anyway When you set a dark original o...

Страница 222: ...p prints delivered to the bins might be dirty if the back of the previous bin is dirty In this case reduce the number of prints delivered to the bins or clean the back of the bins Optional Large Capac...

Страница 223: ...used together means that some functions in these modes cannot be used together 1 2 3 4 5 6 7 8 9 10 11 12 13 14 15 16 1 Reduction 2 Enlargement 3 Zoom 4 Auto Cycle 5 Memory Class 6 Multi Copy 7 Direc...

Страница 224: ...77 74 65 Metric version 93 87 82 71 Enlargement Ratios Inch version 155 129 121 Metric version 141 122 115 Zoom From 50 to 200 in 1 steps Directional Magnification Vertical From 50 to 200 in 1 steps...

Страница 225: ...20 mm 0 39 0 79 Side 10 mm 0 39 for either side Paper Feed Table Capacity Table mode 1 000 sheets 80 g m2 20 lb Paper Delivery Table Capacity 1 000 sheets 66 3 g m2 17 6 lb 1 000 sheets 80 g m2 20 lb...

Страница 226: ...nsumption Master Making Less than 0 36 kW Printing Less than 0 28 kW Optional Equipment Drum unit Color Drum A3 11 x 17 red blue green brown yellow purple navy and maroon A4 81 2 x 11 black red blue g...

Страница 227: ...11 Original Capacity 20 sheets 66 g m2 17 6 lb 18 sheets 80 g m2 20 lb 1 8 mm 0 07 height 50 Originals Document Feeder Original Type Sheet Original Weight 40 7 g m2 to 127 9 g m2 10 8 lb to 34 lb Ori...

Страница 228: ...following size can be set in the cassette for LCT A6 Paper Capacity LCT 4 000 sheets 64 g m2 17 lb 3 000 sheets 80 g m2 20 lb Cassette 500 sheets 64 g m2 17 lb 400 sheets 80 g m2 20 lb Power Source D...

Страница 229: ...81 2 x 11 in Class mode Maximum 300 x 432 mm 11 9 x 17 1 A3 B4 A4 B5 A5 11 x 17 81 2 x 14 81 2 x 11 51 2 x 81 2 Paper Weight on non sort tray 47 210 g m2 12 6 55 8 lb in Sort mode 64 82 g m2 17 1 21...

Страница 230: ...tridge Dimensions only sorter stapler Width Depth Height Stored one sorter stapler 908 mm 35 8 597 mm 23 6 926 mm 36 5 Set up one sorter stapler 908 mm 35 8 597 mm 23 6 1 082 mm 42 6 Stored two sorter...

Страница 231: ...e per roll Ink Black 1 000 ml pack 600 ml pack 5 packs case Environmental conditions 5 40 C 10 95 RH Ink Red 600 ml pack 5 packs case Ink Blue 600 ml pack 5 packs case Ink Green 600 ml pack 5 packs ca...

Страница 232: ...Section 2 i...

Страница 233: ...Outline 7 How To Make A Command Sheet 8 HOW TO USE IMAGE MAKE UP MODE 15 Saving And Deleting Modes One Command Sheet 15 Outline Mode One Command Sheet 17 Photo Mode One Command Sheet 19 Pattern Modes...

Страница 234: ...y customize your prints Main Features The use of command sheets allows you to create special effects without cutting and pasting up to 4 commands can be given for an original By combining image make u...

Страница 235: ...Delete mode Original Print Image Pattern mode Original Print WHAT IS IMAGE MAKE UP 2...

Страница 236: ...Area Pattern mode Original Print Image Outline and Area Pattern mode Original Print WHAT IS IMAGE MAKE UP WHAT IS IMAGE MAKE UP 3...

Страница 237: ...Area Command sheet Original Closed area method Print Closed area method Diagonal line method 1 Line mode Fn 1 Fn 11 2 Outline mode Fn 2 Fn 12 3 Delete mode Fn 3 Fn 13 4 Photo mode Fn 4 Fn 14 5 Image P...

Страница 238: ...e signated areas is printed in Line mode Fn 1 2 Outline mode The area outside designated areas is printed in outline mode Fn 2 3 Delete mode The area outside the designated areas is deleted Fn 3 4 Pho...

Страница 239: ...pattern elements at twice the size and 90 rotations of all the basic and enlarged patterns The basic patterns are numbered 1 to 40 The patterns with enlarged elements are numbered 51 to 90 The rotate...

Страница 240: ...paper and should be the same size as the original Poor quality paper such as newsprint recycled paper etc should not be used for command sheets because any dark spots or streaks will be read as desig...

Страница 241: ...ing to what you want to edit 1 Put the command sheet on top of the original 2 Draw a line using a felt tip pen black red or blue with a thick ness of at least 2 mm 0 08 making sure there is no break i...

Страница 242: ...The line marking the designated area should be more than 2 mm 0 08 from any neighboring im age PREPARING IMAGE MAKE UP PREPARING IMAGE MAKE UP 9...

Страница 243: ...blue felt tip pen draw a line around the area to designate The line should have a thickness of at least 2 mm 0 08 Make sure there is no break in the line OK NG No good Draw the line at least 2 mm 0 0...

Страница 244: ...g the designated area should be more than 2 mm 0 08 from any neighboring im age Neighboring im age Image within the designated area Line marking the designated area PREPARING IMAGE MAKE UP PREPARING I...

Страница 245: ...e of at least 2 mm 0 08 in front of the area surrounded by 3 sides relative to the feed direction Double line pattern Only the outer line is recognized Make a gap of at least 2 mm 0 08 in width The de...

Страница 246: ...e method on the same command sheet You can designate many areas on one sheet and there is no limit to the number of areas you can designate If designated areas on two or more command sheets overlap th...

Страница 247: ...line method is easy to use for designating rectangular areas It is also more precise but it is difficult to use for designating complex areas When drawing a command sheet using a closed line Command...

Страница 248: ...command number was entered previously and is still in memory press the Clear key The commands entered previously are stored in memory until the main switch is turned off or the Clear Modes key is pre...

Страница 249: ...essing the En ter key to display the modes on the guidance display one at a time 7 Set the command sheet face down on the exposure glass and press the Master Making key 8 The beeper sounds after the c...

Страница 250: ...emory press the Clear key The commands entered previously are stored in memory until the main switch is turned off or the Clear Modes key is pressed 4 Press the Enter key again Screen Contrast Normal...

Страница 251: ...he En ter key to display the modes on the guidance display one at a time 7 Set the command sheet face down on the exposure glass and press the Master Making key 8 The beeper sounds after the command s...

Страница 252: ...umber was entered previously and remains in memory press the Clear key The commands entered previously are stored in memory until the main switch is turned off or the Clear Modes key is pressed 4 Pres...

Страница 253: ...4 has been specified for the outside area To check the modes that you have entered press the Make up key twice and then keep pressing the En ter key to display the modes one at a time on the guidance...

Страница 254: ...after the command sheet is scanned Set the original face down on the ex posure glass and press the Mas ter Making key Stop Master Making Print Start Proof HOW TO USE IMAGE MAKE UP MODE HOW TO USE IMA...

Страница 255: ...for the desig nated area See page 4 Fn5 or Fn15 Image pattern mode Fn6 or Fn16 Area Pattern mode Fn7 or Fn17 Image outline and area pattern mode 3 Press the Enter key Screen Contrast Normal Fine Coars...

Страница 256: ...re stored in memory until the main switch is turned off or the Clear Modes key is pressed 6 Press the Enter key again 7 Using the Number keys select the Image Make up mode for the outside area See pag...

Страница 257: ...one at a time 9 Set the command sheet face down on the exposure glass and press the Master Making key A The beeper sounds after the command sheet is scanned Set the original face down on the ex posur...

Страница 258: ...e up key again 2 Using the Number keys select the Image Make up mode for the first command sheet See page 4 3 Press the Enter key Screen Contrast Normal Fine Coarse Normal LightTone DarkTone Over lay...

Страница 259: ...eys See page 6 6 Press the Enter key 7 Using the Number keys select the Image Make up mode to be applied to the next command sheet See page 4 CS Mode 1 2 3 4 Photo Mode Screen Contrast Normal Fine Coa...

Страница 260: ...you have entered press the Make up key twice and then keep pressing the En ter key to display the modes on the guidance display one at a time D Set the first command sheet face down on the exposure gl...

Страница 261: ...E Repeat step D until all command sheets are done F Set the original face down on the exposure glass and press the Master Making key Stop Master Making Print Start P f HOW TO USE IMAGE MAKE UP MODE 28...

Страница 262: ...When using coated paper or transparent paper as a command sheet set the command sheet and original separately into the document feeder With the optional document feeder you can designate areas to be...

Страница 263: ...e that the original is set un der the command sheets when you use the 50 originals document feeder 4 Press the Master Making key If a command sheet or an original misfeeds remove the misfed com mand s...

Страница 264: ...MAKE UP SAMPLES 1 Command Sheet No 1 Designated area Fn3 2 Outside area Fn1 3 Print Original Command sheet No 1 Print MAKE UP SAMPLES MAKE UP SAMPLES 31...

Страница 265: ...80 2 Command Sheet No 2 Designated area Fn 6 Pattern No 67 3 Outside area Fn1 4 Print Original Command sheet No 1 Command sheet No 2 Print A A BB C A C C B B B C C C B C B B B B C C C C AB C B C B C...

Страница 266: ...is 2 Change the drum unit for color printing 3 Command Sheet No 1 Designated area Fn6 Pattern No 89 4 Outside area Fn3 5 Print Original Command sheet No 1 Print BIRTHDAY PARTY BIRTHDAY PARTY MAKE UP...

Страница 267: ...ted area Fn17 Pattern No 85 3 Command Sheet No 3 Designated area Fn3 4 Outside area Fn1 5 Print 6 Change the drum unit for color printing 7 Command sheet No 1 Designated area Fn7 Pattern No 61 8 Outsi...

Страница 268: ...MAKE UP SAMPLES MAKE UP SAMPLES 35...

Страница 269: ...y 213 Cautions about sorter stapler 213 Change drum size 114 Change Paper key 2 98 Change paper size in LCT 98 Change paper size of cassette for LCT 104 Change paper size on the paper feed table 152 C...

Страница 270: ...n Button 4 Drum Unit 4 Drum Unit Lock Lever 4 E E XX 171 Economy Mode key 45 Enable user code mode 143 Enlargement 30 Environment 9 Erase margins adjustment area 142 Erasing Margins 39 Example Symbols...

Страница 271: ...5 Manual Staple mode 89 Margin Erase key 39 Master Cut Button 4 Master Eject Container Cover 4 Master Eject indicator 197 Master Eject Unit Open Button 4 Master is not wrapped around the drum 199 Mast...

Страница 272: ...sette for LCT 102 Paper Delivery End Plate 4 Paper Delivery Side Plates 4 Paper Delivery Table 4 Paper drum misfeed 183 186 189 Paper exit misfeed 191 Paper Feed misfeed 175 Paper Feed Side Plates 2 P...

Страница 273: ...ze Paper Delivery End Plate 4 Sort key 81 Sort mode 80 Sorter Stapler 78 sorter stapler paper misfeed 192 SP Mode 115 Special Feature indicator 8 SPECIFICATIONS 215 222 Speed keys 25 26 Standard print...

Страница 274: ...3 F misfeed 189 G misfeed 191 H Reset indicators 200 H misfeed 192 20 originals document feeder 72 20 originals document feeder specifications 218 20 bin sorter stapler specifications 220 50 originals...

Отзывы: