background image

English

19

English

Introduction

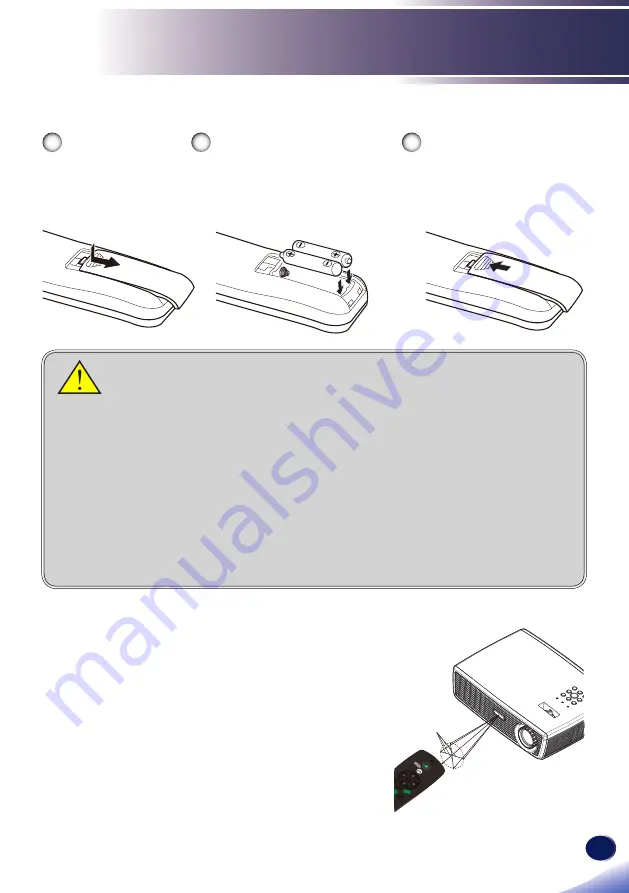
Remote Control Battery Installation

Press firmly and 

slide the battery 

cover off.

1

Slip the cover back over the 

batteries until it snaps into 

place. Do not mix different 

types of batteries or new and 

old batteries.

3

Install new batteries (AAA/

R03). Ensure that you have 

the batteries’ polarity (+/–) 

aligned correctly.

2

To ensure safe operation, please observe the following precautions :

  Use AAA/R03 type battery.

  Avoid contact with water or liquid.

  Do not expose the remote control to moisture or heat.

  Do not drop the remote control.

  If the battery has leaked in the remote control, carefully wipe the case clean and 

install new battery.

  Risk of an explosion if battery is replaced by an incorrect type.

  Dispose of used battery according to the instructions.

  Remove batteries from remote control when not using for extended periods.

  The remote control may fail to operate if the infrared remote sensor is exposed to 

bright sunlight or fluorescent lighting.

Remote Control Operating Range

Point the remote control 

toward the projector (Infra-

red Remote Receiver) when 

pressing any button. Maxi-

mum operating range for 

the remote control is about 

23.0’ (7m) and ±15° in front 

of the projector.

23.0’ (7m) 

Approx.15°

Enter

Menu

AVM

ute

Free

ze

Eco

Volume

Pow

er

Input

Содержание PJ S2130

Страница 1: ...For safe and correct use be sure to read the Usage Notice before using the projector User s Manual ...

Страница 2: ...ing On Off the Projector 22 Powering On the Projector 22 Powering Off the Projector 23 Warning Indicator 24 Adjusting the Projected Image 25 Adjusting the Height of Projector Image 25 Adjusting the Projector Zoom and Focus 26 Adjusting Projection Image Size 26 User Controls 28 On Screen Display OSD 28 How to operate 28 Image Adjustment 29 Image Adjustment Position 31 Display Settings 32 Default Se...

Страница 3: ...projector will detect the life of the lamp itself Please be sure to change the lamp when it shows warning messages Warning When switching the projector off please ensure the cooling cycle has been completed before disconnecting power Allow 60 seconds for the projector to cool down Warning Do not use lens cap when projector is powered on Warning Turn on the projector first and then the signal sourc...

Страница 4: ...ay result in an electrical shock or damage to the unit Caution Never push objects of any kind into this product through openings as they may touch dangerous voltage points or short out parts that could result in a fire or electric shock Never spill liquid of any kind on the product Caution Do not place or keep the projector within the reach of the children It may fall or tip over pos sibly causing...

Страница 5: ...ive for repair service Avoid any broken pieces of glass since they may cause injury In the unlikely event that the lamp ruptures thoroughly clean the area around the projector and discard any edible items placed in that area since they may be contaminated Caution Do not place anything in front of the lens while the projector is operating Things placed in front of the lens may overheat and burn or ...

Страница 6: ...s or solvents to clean the unit Use under the following conditions Extremely heat cold or humidity In areas susceptible to excessive dust and dirt Near any appliance generating a strong magnetic field In direct sunlight Caution Do not use the product in a closed installation location Do not place the product in a box or in any other closed installation location Otherwise it may overheat which coul...

Страница 7: ...ok into the lens while the lamp is on The strong light from the lamp may cause damage to your eyesight 3 Do not place anything in front of the lens while the projector is operating Things placed in front of the lens may overheat and burn or start a fire If you want to temporarily stop the projected image use the AV mute on the remote control or the keypad 4 To replace the lamp unplug the power cor...

Страница 8: ...e limits for a Class B digital device pursuant to Part 15 of the FCC rules These limits are designed to provide reasonable protection against harmful interference in a residential installation This device generates uses and can radiate radio frequency energy and if not installed and used in accordance with the instruc tions may cause harmful interference to radio communications However there is no...

Страница 9: ...thority which is granted by the Federal Communications Commission to operate this projector LAMP S INSIDE THIS PRODUCT CONTAIN MERCURY AND MUST BE RECYCLED OR DISPOSED OF ACCORDING TO LOCAL STATE OR FEDERAL LAWS Notice Canadian users This Class B digital apparatus complies with Canadian ICES 003 Remarque à l intention des utilisateurs cana diens Cet appareil numerique de la classe B est conforme a...

Страница 10: ...TTERIES Warning Never throw batteries into a fire Using the batteries improperly may cause them to explode or leak and may result in seri ous injury If battery leaking fluid contacts skin wash the fluid off immediately with clean water and consult a doctor If the fluid spills on an instrument avoid contact and wipe it off using tissue paper Then dispose of the used tissue paper as flammable garbag...

Страница 11: ...um Cd defined in the Battery Directive 2006 66 EC then the chemical symbols for lead Pb mercury Hg and or cadmium Cd will appear below the crossed out wheeled dust bin symbol By participating in separate collection of batteries you will help to assure the proper disposal of products and batteries and thus help to prevent potential negative consequences for the environment and human health For more...

Страница 12: ...les that may infringe the copyright of protected materials Broadcasting images or movies for commercial purposes Modifying images or movies using functions such as freeze magnify or zoom to broadcast images for commercial purposes or public viewing Varying the aspect ratio of images or movies using a func tion that changes the screen size to broadcast images for commercial purposes or public viewi...

Страница 13: ...SECAM B D G K K1 L and SDTV 480i 576i EDTV 480p 576p HDTV 720p 1080i 1080p compat ible Multi Auto functions Auto detection Auto image and Auto saving the adjustments Full function remote control User friendly multilingual on screen display Advanced digital keystone correction and high quality full screen image re scaling Built in mono 2 Watt speaker UXGA WXGA SXGA SXGA XGA compression and VGA re s...

Страница 14: ... Due to the differ ence in applications for each country some regions may have dif ferent accessories Note Documentation CD ROM User s Manual User s Manual Batteries for Remote Control AAA R03 Status Enter Computer1 Computer2 Video Menu AV Mute Freeze Keystone Picture Aspect Eco Volume Power S Video HDMI Input AutoSet Magnify Status Enter Computer1 Computer2 Video Menu AVMute Freeze Keystone Pictu...

Страница 15: ...n 1 Control panel 2 Zoom lever 3 Ventilation inlet 4 Speaker 5 Focus ring 6 Ventilation outlet 7 Infrared remote sensor 8 Lens 9 Lens cap 10 Connection ports 11 Adjustable feet Product Overview 1 7 3 8 9 5 4 6 2 6 3 10 11 11 ...

Страница 16: ...uction Connection Ports 1 HDMI terminal 2 COMPUTER IN COMPONENT IN terminal 3 S VIDEO IN terminal 4 VIDEO IN terminal 5 SERVICE Port 6 MONITOR OUT terminal 7 AUDIO IN Jack 8 AC IN socket 9 Anti theft lock hole 2 3 4 5 7 8 9 6 1 ...

Страница 17: ...ss Input to choose RGB Compo nent S Video HDMI and Composite sources 7 Menu Press Menu to launch the Onscreen display OSD back to the top level of OSD for the OSD main menu opera tion 8 Enter Confirm your section of items in sub menu operation 9 Volume Increase speaker volume 10 AV Mute Momentarily turn off on the audio and video 11 Four Directional Select Keys Use or or or to select items or make...

Страница 18: ...me S Video HDMI Input AutoSet Magnify Remote Control 1 Infrared trans mitter Sends signals to the projector 2 Indicator 3 Enter Confirm your section of items in sub menu operation 4 Four Directional Select Keys Use or or or to select items or make adjustments to your selection 5 AV Mute Momentarily turn off on the audio and video 6 Freeze Pause the screen image Press again to resume the screen ima...

Страница 19: ...of OSD for the OSD main menu opera tion See page 28 15 Input Press Input to choose RGB Compo nent S Video HDMI and Composite sources 16 Auto Set Automatically synchronize the projec tor to the input source 17 Picture Select the Image mode from Bright Standard and Natural 18 Keystone Adjust the image to compensate for distortion caused by tilting the projec tor 19 Computer1 Press Computer1 to choos...

Страница 20: ...ote control If the battery has leaked in the remote control carefully wipe the case clean and install new battery Risk of an explosion if battery is replaced by an incorrect type Dispose of used battery according to the instructions Remove batteries from remote control when not using for extended periods The remote control may fail to operate if the infrared remote sensor is exposed to bright sunl...

Страница 21: ...ming of the display mode is compatible with your projector See pages 46 48 Use the cables that come with the projector 1 Power cord supplied 2 HDMI DVI cable 3 RGB cable supplied 4 Audio Cable 5 Monitor out cable Make sure that the power plug is fully inserted into both the projector AC inlet and the wall outlet The AC outlet must be near this equipment and must be easily ac cessible Note 1 2 3 5 ...

Страница 22: ...ode is compatible with your projector 1 Power cord supplied 2 Component RGB Cable 3 3 RCA Component Cable 4 Composite video cable 5 Audio Cable 6 S Video cable 7 HDMI cable S Video Output DVD player Set top Box HDTV receiver Make sure that the power plug is fully inserted into both the projector AC inlet and the wall outlet The AC outlet must be near this equipment and must be easily ac cessible N...

Страница 23: ...puter2 Video Menu AV Mute Freeze Keystone Picture Eco Volume Power S Video HDMI Input AutoSet Magnify Enter Computer1 Computer2 Video Menu AVMute Freeze Keystone Picture Eco Volume S Video HDMI Input AutoSet Magnify Power 1 2 OR CAUTION Do not look into the lens while the lamp is on The strong light from the lamp may cause damage to your eyesight Do not block the air intake or exhaust Doing so cou...

Страница 24: ...o operate for about 60 seconds for cooling cycle and the Power indicator will flash red When the light stop flashing the projector has entered standby mode If you wish to turn the projector back on you must wait until the projector has completed the cooling cycle and has entered standby mode Once in standby mode simply press Power to restart the projector 4 Disconnect the power cord from the elect...

Страница 25: ...ays on screen the projector has detected that the lamp is approaching its end of life Please change the lamp as soon as possible or contact your local dealer or our service center When the Temp indicator flashes red 0 5 sec on 0 5 secs off and the message below displays on screen it indicates the fan failed Stop using the projector and disconnect the power cord from the electrical outlet then cont...

Страница 26: ...r Image The projector is equipped with adjustable feet to raise and lower the image to fill the screen To raise lower the image 1 Use to fine tune the display angle You can raise the projector front up to 8 degrees by rotating the adjustable feet Note Front Adjustable feet 1 Maximum Length 20mm ...

Страница 27: ...will focus at distanc es from 3 93 to 42 98 feet 1 2 to 13 1 meters PJ WX2130 series The projector will focus at distances from 3 28 to 36 09 feet 1 0 to 11 0 meters Adjusting Projection Image Size Zoom Lever Width Height Diagonal Side View Projection Distance D Screen Screen H Offset Hd PJ S2130 PJ X2130 Projection Image Size from 30 to 300 0 7 to 7 6 meters PJ WX2130 Projection Image Size from 3...

Страница 28: ...4 25 8 0 30 1 4 250 5 08 3 81 200 0 150 0 9 9 10 9 32 5 35 8 0 42 1 9 300 6 10 4 57 239 9 180 0 11 9 13 1 39 0 43 0 0 50 2 3 PJ S2130 PJ X2130 Diagonal length inch size of 16 10 Screen Screen Size W x H Projection Distance D Offset Hd m inch m feet Width Height Width Height wide tele wide tele m feet 30 0 65 0 40 25 4 15 9 1 0 1 1 3 3 3 6 0 05 0 2 40 0 86 0 54 33 9 21 2 1 3 1 5 4 4 4 8 0 07 0 2 60...

Страница 29: ...sub menu 3 Use keys to select the desired item in the sub menu and press Enter to adjust the settings by or key To exit from adjusting the item press Enter again 4 If to setting word is shown in the setting you can press Enter to enter another sub menu Press Menu to close the sub menu after adjustment 5 After adjusting the settings press Menu to go back to the main menu 6 To exit press Menu again ...

Страница 30: ...brightness of the image Press the to darken image Press the to lighten the image Color Saturation Adjust a video image from black and white to fully saturated color Press the to decrease the amount of color in the image Press the to increase the amount of color in the image Sharpness Adjust the sharpness of the image Press the to decrease the sharpness Press the to increase the sharpness Noise Red...

Страница 31: ...Red signal level G level Use the or to adjust Green signal level B level Use the or to adjust Blue signal level RGB Input Range Adjust the range of the HDMI image data Auto Automatically detect RGB range Standard Process the input image as standard range data Full Select this when source is a computer or an instrument which output range is set to Full Auto Set Automatically synchronize the project...

Страница 32: ...just the number of total dots in one horizontal period Use the or to adjust number to match your PC image H position Horizontal Position Press the to move the image left Press the to move the image right V position Vertical Position Press the to move the image down Press the to move the image up Position is only supported in Analog VGA RGB signal Note ...

Страница 33: ...s available only for Video S Video and Y PB PR 480 576 input PJ S2130 PJ X2130 Display 4 3 center area of 16 9 signal If input signal is 4 3 signal displayed picture is stretched hori zontally PJ WX2130 Display 16 9 center area of 4 3 signal for letter box signal If input signal is 16 9 signal displayed picture is stretched vertically Native Displays an input image in the native resolution of the ...

Страница 34: ... Choose On to display icons as function guides Choose Off to hide icons Start up Screen Use this function to set the desired startup screen If changes are made they will take effect the next time the projector is powered on On Display the startup screen Off No logo is displayed User Logo Press Enter to capture an image of the picture currently displayed on screen It takes up to 90 seconds to captu...

Страница 35: ...r when the ON STANDBY button is pressed Manual or when the main power switch is turned on Auto Standby Energy Saving High Choose High to save standby power less than 0 5W Monitor Out port will be disabled Low Choose Low to return to normal standby mode and the Monitor Out port will be enabled Lamp Power Eco Choose Eco to dim the projector lamp which will lower power consumption and extend the lamp...

Страница 36: ...projector reverses the image so you can project behind a translucent screen Ceiling When you select this the projector turns the image upside down for ceiling mounted projection Rr Ceil Rear Ceiling When you select this the projector reverses and turns the image upside down at same time You can project from behind a trans lucent screen with ceiling mounted projection ...

Страница 37: ...ederal Com munications Commission FCC Off Select Off to turn off the closed captioning feature CC 1 CC 1 language including American English CC 2 CC 2 language including Spanish French Portuguese German and Danish depending on the TV channel of the user Due to the different broadcasting or signaling system it may not operate correctly in other regions or countries where TV programs do not support ...

Страница 38: ...English 37 English User Controls 3D Projection Refer to next page Reset All Return the adjustments and settings to the factory default values ...

Страница 39: ...or default frame contents Reverse Choose Reverse to invert left and right frame con tents Choose Reverse if viewing image is not natural or felt 3D incorrect Compatible 3D source 3D content and active shutter glasses are required for 3D viewing L R Reverse is only available when 3D is enabled and this mode 3D is for DLP link glass only This setting may need to change when re start running 3D movie...

Страница 40: ...Resolution Resolution in dots Picture Mode Display the setting of Picture mode Lamp Time Time of lamp use Total Time Total Time including Eco mode and Standard mode Lamp Reset Count Display the number of projector replacement lamps Firmware Version Display Firmware version ...

Страница 41: ...s not turned on Problem Partial scrolling or incorrectly displayed image Press Auto Set on the remote control If you are using a Notebook 1 First follow the steps above to adjust resolution of the comput er 2 Press the toggle output settings example Fn F3 If you experience difficulty changing resolutions or your monitor freezes restart all equipment including the projector Troubleshooting If you e...

Страница 42: ... from your computer Check and reconfigure the display mode of your graphic card to make it compatible with the product Problem Image is out of focus Adjust the Focus Ring on the projector lens Make sure the projection screen is between the required distance refer to pages 26 27 Problem The image is stretched when displaying 16 9 DVD Change Aspect by pressing the key on remote control or OSD menu t...

Страница 43: ...the projection direction Problem Lamp burns out or makes a popping sound When the lamp reaches its end of life it will burn out and may make a loud popping sound If this happens the projector will not turn on until the lamp module has been replaced To replace the lamp follow the procedures in the Replacing the Lamp ...

Страница 44: ...Flashing Red 0 5 sec Error Over temp On Event Blue Error Over temp On Standby Red Error Lamp failed On Event Blue Error Lamp failed On Standby Red Error Fan failed On Event Blue Flashing Error Fan failed On Standby Red Flashing Error Color Wheel fail Striking Lamp Fail On Event Blue Flashing Error Color Wheel fail Striking Lamp Fail On Standby Red Flashing Problem Indicator lighting message Steady...

Страница 45: ...ature the projector has exceeded its recommended operating temperature and must be allowed to cool down before it may be used Replacing the lamp the lamp is about to reach its maximum life time Prepare to replace it soon Fan failed the system fan is not working ...

Страница 46: ...eak handle with care to avoid injury due to broken pieces and contact your sales representative for repair service Lamp Replacing Procedure 1 Switch off the power to the projector by pressing the Power 2 Allow the projector to cool down at least 60 minutes 3 Disconnect the power cord 4 Use a screwdriver to remove the 2 screws from the cover 5 Push up and remove the lamp cover 6 Loosen the 2 screws...

Страница 47: ... 75 60 02 78 75 1024 x 768 85 68 67 94 50 1024 x 768 119 804 98 80 SXGA 1152 x 864 70 63 80 94 50 1152 x 864 75 67 50 108 00 1152 x 864 85 77 10 121 50 1280 x 1024 60 63 98 108 00 1280 x 1024 72 77 90 134 60 1280 x 1024 75 79 98 135 00 1280 x 1024 85 91 15 157 50 QuadVGA 1280 x 960 60 60 00 108 00 1280 x 960 75 75 00 126 00 SXGA 1400 x 1050 60 65 32 121 75 UXGA 1600 x 1200 60 75 00 162 00 PowerBoo...

Страница 48: ...4 31 47 576i 720 x 576 50 25 27 00 576p 720 x 576 50 31 25 720p 1280 x 720 60 45 00 720p 1280 x 720 50 37 50 1080i 1920 x 1080 60 30 33 75 1080i 1920 x 1080 50 25 33 75 1080p 1920 x 1080 60 67 50 1080p 1920 x1080 50 56 25 B HDMI Digital 1 HDMI PC Signal Same as DVI Modes Resolution V Frequency Hz H Frequency kHz Clock MHz VGA 640 x 480 60 31 47 25 18 640 x 480 72 37 86 31 50 640 x 480 75 37 50 31 ...

Страница 49: ...igital 2 HDMI Analog Extended Wide Modes Resolution V Frequency Hz H Frequency kHz Clock MHz WXGA 1280 x 768 60 47 78 79 50 1280 x 768 75 60 29 102 25 1280 x 768 85 68 63 117 50 1280 x 720 60 44 80 74 25 1280 x 800 60 49 60 83 50 1440 x 900 60 55 90 106 50 1680 x 1050 60 65 30 146 25 1366 x 768 60 47 74 85 50 1920 x 1080 RB 60 66 60 138 50 1920 x 1080 EIA 60 66 60 148 50 1024 x 600 60 37 30 50 40 ...

Страница 50: ...9 DDC 5V NC 2 Green G Y Input G Output 10 Ground Ver sync 3 Blue B Cb Input B Output 11 ICP download 4 ICP download NC 12 DDC Data NC 5 Ground Horiz sync 13 Horiz sync Input Output Composite H V sync Input 6 Ground Red 7 Ground Green 14 Vert sync Input Output 8 Ground Blue 15 DDC CLK NC 5 4 3 2 1 10 9 8 7 6 15 14 13 12 11 ...

Страница 51: ... F 2 50 2 67 f 21 86 mm 24 mm 1 1X Zoom Lens Lamp High pressure mercury lamp 200W Lamp Life 3000 hours typical Full Mode 4000 hours typical ECO Mode Projection screen size 30 300 inch Projection distance PJ S2130 PJ X2130 1 2 13 1m Focus range PJ WX2130 1 0 11 0m Focus range Speaker 2W Mono Connection terminal Computer In terminal Mini D sub 15 pin RGB Y PB PR dual use Monitor Out terminal Mini D ...

Страница 52: ...Internet Explorer and PowerPoint are either a registered trademark or trademark of Microsoft Corporation in the United States and or other countries MicroSaver is a registered trademark of Kensington Com puter Products Group a division of ACCO Brands HDMI the HDMI Logo and High Definition Multimedia Interface are trademarks or registered trademarks of HDMI Licensing LLC Other product and company n...

Страница 53: ... 2011 ...

Страница 54: ...USer s Manual Printed in China Y0206220 EN GB ...

Отзывы: