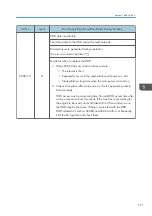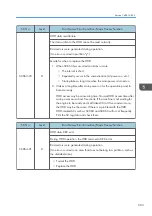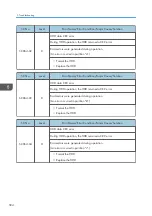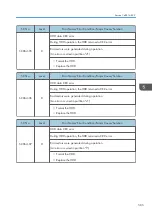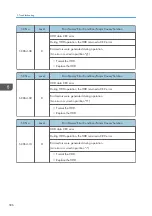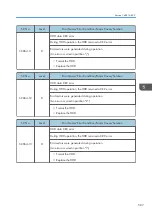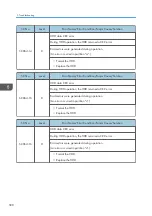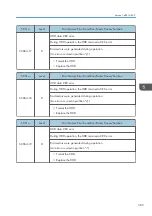
SC No.
Level
Error Name/Error Condition/Major Cause/Solution
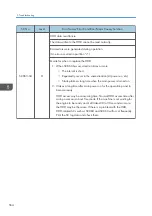
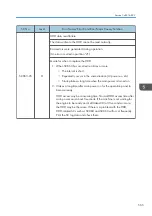
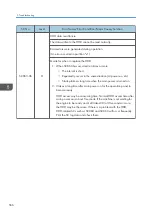
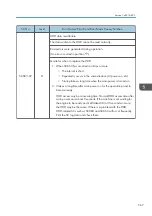
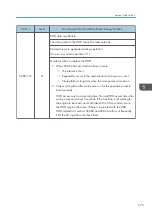
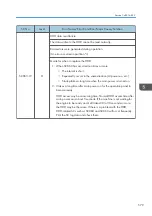
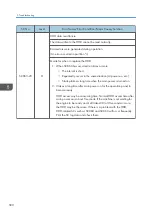
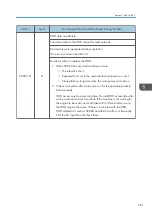
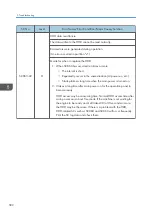
SC863-15
D
HDD data read failure
The data written to the HDD cannot be read normally.
Bad sectors were generated during operation.
(An error occurred in partition "n".)
Guide for when to replace the HDD
1. When SC863 has occurred ten times or more
• The interval is short.
• Repeatedly occurs in the same situation (At power-on, etc.).
• Startup takes a long time when the main power is turned on.
2. It takes a long time after main power on for the operation panel to
become ready.
HDD access may be consuming time. Normal HDD access time after
main power on is about 5 seconds. If the machine is not waiting for
the engine to be ready and it still takes 20 to 30 seconds or more,
the HDD may be the cause. If there is a problem with the HDD,
HDD-related SCs such as SC860 and SC863 will occur frequently.
Print the SC log data and check them.
Service Call 816-899
575
Содержание MET-C1
Страница 1: ...Model MET C1 Machine Code D176 D177 Field Service Manual September 2013 Subject to change ...
Страница 2: ......
Страница 22: ...20 ...
Страница 50: ...1 Product Information 48 ...
Страница 57: ...4 Input the password 5 Press OK Main Machine Installation 55 ...
Страница 58: ...6 Confirm the Password 7 Press OK 2 Installation 56 ...
Страница 59: ...8 Change the Administrator 1 login password 9 Input the password 10 Press OK Main Machine Installation 57 ...
Страница 60: ...11 Confirm the password 12 Press OK 13 Cycle the power OFF ON 2 Installation 58 ...
Страница 65: ...2 Remove the orange tape and retainers on the outside Main Machine Installation 63 ...
Страница 72: ... When moving the machine do not press against the ADF 2 Installation 70 ...
Страница 95: ...7 Upper left cover A 1 8 Left rear cover A 2 1 Bin Tray BN3110 93 ...
Страница 96: ...9 Inverter tray A tray support rod cover B 1 10 Paper output cover A 1 2 Installation 94 ...
Страница 102: ...3 Attach the part B to the shift tray A 4 Paper output tray A 2 Installation 100 ...
Страница 104: ...9 Paper output cover A 1 10 Attach the shift tray feeler A 2 Installation 102 ...
Страница 113: ...5 Upper left cover A 1 6 Left rear cover A 2 Internal Finisher SR3130 111 ...
Страница 115: ...10 Paper output cover A 1 11 Connector cover A 12 Paper output lower cover A 3 Internal Finisher SR3130 113 ...
Страница 116: ...13 Upper rear inner cover A 2 14 Install a screw A removed in step 12 2 Installation 114 ...
Страница 126: ...9 Attach the front right cover A provided inserting the claws 1 10 Insert the hopper A 2 Installation 124 ...
Страница 140: ...26 Attach the upper inside cover A and finisher B 27 Secure the finisher x 1 Accessory No 8 2 Installation 138 ...
Страница 149: ...15 Install the scanner heater A 2 16 Route the harness while inserting into the claw Anti Condensation Heater 147 ...
Страница 156: ...14 Re install the connecter cover 1 15 Reassemble the machine 2 Installation 154 ...
Страница 167: ...18 Close the right cover Smart Card Reader Built in Unit Type M2 D739 36 165 ...
Страница 216: ...5 Output the system setting list to make sure that the memory unit is recognized properly 2 Installation 214 ...
Страница 220: ...3 Preventive Maintenance 218 ...
Страница 227: ...2 Belt A 3 Front cover A Exterior Covers 225 ...
Страница 237: ...2 Waste Toner Cover A Reverse Tray 1 Reverse Tray A Exterior Covers 235 ...
Страница 243: ...3 Operation panel A 6 2 Board A 1 Operation panel page 240 2 Operation panel lower cover A 6 Operation Panel Unit 241 ...
Страница 244: ...3 Harness guide A 2 4 Bracket covers A B 4 Replacement and Adjustment 242 ...
Страница 250: ...Replacement procedure 1 Operation panel arm bracket page 240 2 Bracket A 6 5 USB 2 4 Replacement and Adjustment 248 ...
Страница 251: ...3 LCD panel unit A Operation Panel Unit 249 ...
Страница 258: ...2 SIO unit A 2 7 3 Bracket A 4 3 4 Replacement and Adjustment 256 ...
Страница 259: ...4 Spring A 5 Scanner motor unit A 2 1 6 Scanner motor A 2 Scanner Unit 257 ...
Страница 266: ...8 Wire clamp A 1 9 Wire fixing bracket A spring B 1 10 Wire pulley A 1 1 4 Replacement and Adjustment 264 ...
Страница 271: ...6 Rear frame A 6 7 Move to the set position of the fixing pin for the first carriage Scanner Unit 269 ...
Страница 272: ...8 Wire clamp A 1 9 Wire fixing bracket A spring B 1 10 Scanner drive gear A 1 4 Replacement and Adjustment 270 ...
Страница 284: ...3 Remove the PCDU cover A Y x 1 B M x 1 C C x 1 D K x 1 4 Replacement and Adjustment 282 ...
Страница 291: ...Imaging Temperature Sensor Thermistor 1 Open the controller box page 317 2 Connector A PCDU 289 ...
Страница 292: ...3 Imaging temperature sensor harness guide A and Imaging temperature sensor B 2 4 Replacement and Adjustment 290 ...
Страница 297: ...2 Image transfer front cover A 1 3 Release the lock A and open the right cover B Image Transfer Unit 295 ...
Страница 308: ...4 Replacement and Adjustment 306 ...
Страница 309: ...Fusing Entrance Sensor 1 Open the right cover page 293 Image Transfer Unit 307 ...
Страница 316: ...3 ITB contact and release sensor A 4 Replacement and Adjustment 314 ...
Страница 328: ...3 Harness guide A 2 4 Toner transport motor unit C A 1 5 Hopper C A 4 Replacement and Adjustment 326 ...
Страница 329: ...M 1 Controller box page 317 2 Harness guide A 2 3 Toner transport motor unit M A 3 Drive Unit 327 ...
Страница 330: ...4 Hopper M A Y 1 Harness guide page 327 2 Toner transport motor unit Y A 3 4 Replacement and Adjustment 328 ...
Страница 331: ...3 Hopper Y A Toner End Sensor 1 Hopper page 325 2 Toner end sensor A Drive Unit 329 ...
Страница 341: ...2 Transport screw unit for K A claw 1 Drive Unit 339 ...
Страница 347: ...2 Fusing lower cover A 4 Fusing Front Cover 1 Fusing unit page 340 Fusing Unit 345 ...
Страница 350: ...6 Left frame A 4 4 7 Side plate A 1 4 Replacement and Adjustment 348 ...
Страница 360: ...2 Fusing shield drive motor unit A 2 1 3 Fusing shield drive motor A 2 4 Replacement and Adjustment 358 ...
Страница 363: ...3 Harness A 1 3 4 Paper exit sensor unit A 1 1 Paper Exit 361 ...
Страница 365: ...3 Reverse sensor A Reverse Motor 1 Paper exit unit page 359 2 Gear A Paper Exit 363 ...
Страница 367: ...2 Fusing exit sensor unit A 1 1 1 3 Fusing exit sensor A Paper Exit 365 ...
Страница 369: ...3 Paper feed guide plate A 4 1st paper feed unit A 2 1 2nd Paper Feed Unit 1 Duplex unit page 383 Paper Feed 367 ...
Страница 370: ...2 Pull out the 2nd paper tray A 3 Transport guide A 1 4 Harness guide A 1 4 Replacement and Adjustment 368 ...
Страница 380: ...5 By pass tray A 4 3 4 4 Replacement and Adjustment 378 ...
Страница 381: ...By pass Paper End Sensor 1 Open the by pass tray A 2 By pass paper end sensor cover A By pass Tray Unit 379 ...
Страница 386: ...4 Open the 1st paper feed tray A and 2nd paper feed tray B 5 Cover A 1 4 Replacement and Adjustment 384 ...
Страница 388: ...2 Harness guide A 4 3 Duplex by pass motor unit A 3 1 3 4 Duplex By pass Motor A 2 4 Replacement and Adjustment 386 ...
Страница 391: ...2 Harness guide A 1 3 Duplex exit sensor unit A 1 Duplex Unit 389 ...
Страница 392: ...4 Duplex exit sensor A 1 4 Replacement and Adjustment 390 ...
Страница 405: ...4 Open the controller box A 6 5 Imaging IOB A 5 14 HVP_TTS 1 Open the controller box page 402 Electrical Components 403 ...
Страница 410: ...1 Power supply box page 405 2 HVP_CB A 4 1 4 Replacement and Adjustment 408 ...
Страница 412: ... There are two claws on the bracket A Release them in a downward direction 4 Replacement and Adjustment 410 ...
Страница 419: ...Power Box Cooling Fan 1 Rear cover page 230 2 Power box cooling fan A 2 Fans Filters 417 ...
Страница 446: ...5 Troubleshooting 444 ...
Страница 448: ...Controller self diagnosis flowchart 5 Troubleshooting 446 ...
Страница 449: ...Self Diagnostic Mode 447 ...
Страница 450: ...5 Troubleshooting 448 ...
Страница 451: ...Self Diagnostic Mode 449 ...
Страница 622: ...When SC549 is displayed Troubleshooting Flowchart 5 Troubleshooting 620 ...
Страница 628: ...When SC670 is displayed Troubleshooting Flowchart 5 Troubleshooting 626 ...
Страница 629: ...Jam Detection Jam Display When a jam occurs cause positions will blink Jam Detection 627 ...
Страница 630: ...Sensor Locations 5 Troubleshooting 628 ...
Страница 637: ...Image Quality When an abnormal image is generated Image Quality 635 ...
Страница 641: ... 4 TLC 8A N4 for EU AA CHN 5 DHB is a service option Fuse position Electrical Component Defects 639 ...
Страница 642: ...5 Troubleshooting 640 ...
Страница 647: ...Model MET C1 Machine Code D146 D147 D148 D149 D150 Appendices 8 April 2013 ...
Страница 648: ......
Страница 650: ...2 ...
Страница 687: ...MEMO 39 ...
Страница 688: ...MEMO 40 EN ...

