Ricoh IS450 Скачать руководство пользователя страница 64

6. Appendices

50

Section Area (Multi-area Settings)

This function permits the specification of up to four rectangular areas of any size within the
scanning area, each of which can be set as the scanning area.  When overlapping areas are set, the
area that was set last takes priority.
For example, when a single original contains both text and photos, specify rectangular areas for
each, and then set binary scanning mode for the text areas and halftone scanning mode for the
photographs.  This function allows each area to be scanned in its respective scanning mode in one
scan.

Limitation

During double-sided scanning, this function is valid only for the front side of the original.

Note

Note that scanning might not be performed in the specified manner if any of the four
rectangular areas overlap.  In this case, either decrease the number of rectangles, or
else reduce them in size.

This function is valid only when the optional Image Processing Unit Type A is installed.
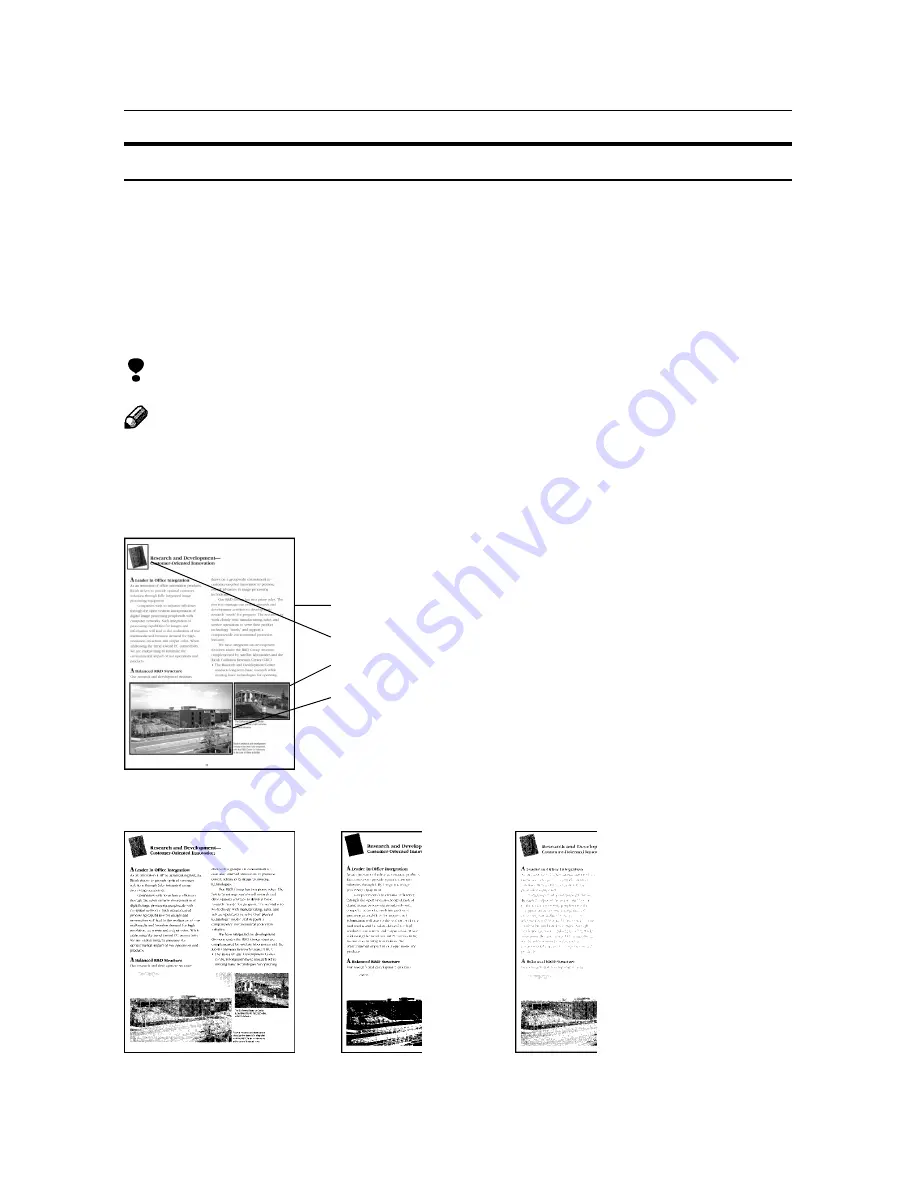
  k

1. Binary scanning is set for the whole page

2. Halftone scanning is set for this area

3. Halftone scanning is set for this area

4. Halftone scanning is set for this area

Original

Result of settings
described above

When entire original
was scanned through
binary scanning

When entire original was
scanned through halftone
scanning

When this function is not used

Содержание IS450

Страница 1: ...fore you use this product and keep it handy for future reference For safety please follow the instructions in this manual Printed in Japan EE GB G407 6657 Image Scanner OPERATING INSTRUCTIONS Image Sc...

Страница 2: ...tive When the machine is moved from a cold location to a warm location condensation will form on the inside of themashine Wait 1 hour or more before turning on the machine to allow the condensation to...

Страница 3: ...roperly shielded and grounded cables and connectors must be used for connections to host computer and or peripheral in order to meet EMC Directive 89 336 EEC emission limits In accordance with IEC417...

Страница 4: ...dealer or an experienced radio TV technician for help Declaration of Conformity Product Name Scanner Model Number RICOH IMAGE SCANNER IS450S IS450D IS450SE IS450DE Responsible party Ricoh Corporation...

Страница 5: ...noring this warning could cause serious injury or even death CAUTION Ignoring this caution could cause injury or damage to property Examples of Indications Symbol means a situation that requires you t...

Страница 6: ...ck When the machine needs to be checked adjusted or repaired contact your service representatives Do not take apart or attempt any modifications to this machine There is a risk of fire electric shock...

Страница 7: ...unplug the power cord from the wall outlet to avoid fire or electric shock When the machine will not be used for a long time unplug the power cord When you pull out the plug from the socket grip the...

Страница 8: ...a 3 wire grounding type plug a plug having a third grouding pin This plug will only fit into a grounding type outlet This is a safety feature If you are unable to insert the plug into the outlet conta...

Страница 9: ...erating instructions since improper adjustment of other controls may result in damage and will often required extensive work by a qualified technician to restore the machine to normal operation E If t...

Страница 10: ...ury when you misuse the machine without following the instructions under this symbol Be sure to read the instructions all of which are described in the Safety Information section The statements above...

Страница 11: ...ned documents optional 1 Space saving design 2 Supports both TWAIN and ISIS 2 Guide to the Scanner 3 Understanding the Indicators 5 2 Setting up the Scanner Preparing for Installation 7 Checking the S...

Страница 12: ...ral Scanning Method 25 Manual Scanning 26 5 Troubleshooting When Scanning Does Not Start 27 Error Indicators and Solutions 28 Procedures to Correct Errors in the ADF 29 When an Original is Jammed in t...

Страница 13: ...0 Image Processing Unit Type A 40 Red Lamp Unit Type A 40 Endorser Unit Type A Printing Function 41 Specifications 42 Scanner Electrical and Hardware Specifications 42 DIP Switches 43 Functions 44 Pre...

Страница 14: ...x...

Страница 15: ...sheet can be scanned simultaneously This capability eliminates the bother of having to flip document sheets over Direct operation using the buttons on the scanner Manual Scanning function If using a d...

Страница 16: ...ing elements such as a document tray This design allows the scanner to be set up next to a wall and permits office space to be used more effectively Supports both TWAIN and ISIS The scanner supports b...

Страница 17: ...order to clean the En dorser printing function or replace the ink 5 Output Table After a document has been scanned by the Auto Document Feeder ADF it is output here 6 Stopper This stops documents tha...

Страница 18: ...witch is used to set the SCSI ID 6 SCSI Connector Connect the SCSI interface cable here 7 Interface for Reverse Side Scan ning This is an extension interface for reverse side scanning Duplex Model onl...

Страница 19: ...When the power has just been turned on or the Resetswitchhasbeenpressed Thiscombination is displayed only for a few seconds When there is no document in the Auto Docu ment Feeder and no document is b...

Страница 20: ...1 Introduction 6...

Страница 21: ...Setup location Warning Make sure the wall outlet is near the machine and easily accessible so that in event of an emergency it can be unplugged easily Caution Keep the machine away from humidity and d...

Страница 22: ...ner in any of the types of locations listed below Doing so could cause the scanner to malfunction In a location exposed to direct sunlight In a location where the scanner will be subjected to blowing...

Страница 23: ...10 30 20 RH Recommended range Usable range TH2H061E C 50 F 80 80 6 F 80 77 F 70 77 F 30 89 6 F 54 89 6 F 15 50 F 15 59 F 30 59 F 70 80 60 40 20 50 80 90 60 70 RH Recommended range Usable range TH2H07...

Страница 24: ...isy chain share the same SCSI ID misoperation and data loss may result Set a unique SCSI ID for this scanner that does not duplicate the SCSI ID of any other de vice SCSI Connection Require ments for...

Страница 25: ...wer is on it is necessary to initialize the scanner Refer to P 16 Initializ ing the Scanner Connecting the SCSI Cable No Connection to Other Port A Turn off the host computer and all peripheral device...

Страница 26: ...connected through the SCSI interface B B B B B Use SCSI cables to connect the per sonal computer and the peripheral de vices in daisy chain fashion with this scanner in the middle of the daisy chain C...

Страница 27: ...it pull it hard or bend it more than necessary These actions could cause an electric shock or fire Do not plug or unplug the power cord with your hands wet Otherwise an electric shock might occur War...

Страница 28: ...14 B B B B B Push the power cable plug all of the way into the power connector on the scanner Note Use the power cable that was provided with this scanner C C C C C Plug the other end of the power cab...

Страница 29: ...sy chain away from the host computer and working towards the host computer Turn on the host computer last A A A A A Press the power switch so that it is in the Power On position as shown below Turning...

Страница 30: ...rder to put the new settings into effect To initialize the scanner either turn the power off and then back on again or else perform the procedure described below A A A A A Using an object with a thin...

Страница 31: ...lt in a paper jam or in damage to the original Such originals should be placed on the contact glass An original that does not fall within the Recommended Sizes and Weights of Origi nals An original th...

Страница 32: ...inal However the sizes of the following types of originals are difficult to detect properly even if using a scanner driver that supports automatic detection of the size of the original An original tha...

Страница 33: ...used overseas Irregular sizes A3 B 4 A4 A4 B 5 B 5 A5 A5 B 6 B 6 A6 11 x17 8 x14 8 x11 8 x5 8 x5 8 x5 Where original K K K L K L K L K L K DTL K LG K LT K LT L HLT K HLT K is placed Contact glass Aut...

Страница 34: ...A A A Open the Auto Document Feeder ADF B B B B B With the side to be scanned facing down place the original on the contact glass and align it with the home position and scale 1 Home position 2 Scale...

Страница 35: ...s e b m m 5 1 6 0 m g 5 0 1 2 b l 4 2 5 A 4 A T L H T L 0 1 1 3 A T L D 0 8 m g 4 6 2 b l 0 2 3 A 5 A 4 A T L D T L H T L 0 5 1 Limitation If there is a darkly colored image within about 40mm of the l...

Страница 36: ...de it back into the table and adjust the position Refer to the diagram below Important When the stopper is extended do not grasp the stopper when opening or closing the Auto Document Feeder ADF B B B...

Страница 37: ...up their edges D D D D D With the first page facing up on top place the originals in the Auto Document Feeder ADF and adjust the positions of the guides so that they touch the edges of the original 1...

Страница 38: ...3 Setting Originals 24...

Страница 39: ...that is TWAIN or ISIS compatible The method of operation depends on the software For details refer to the manual that was supplied with your software Limitation When using double sided scanning if th...

Страница 40: ...unications between the scanner and the personal computer are no longer needed in cases where it is necessary to set the original in the scanner one sheet at a time for example A A A A A Set the manual...

Страница 41: ...n whether this scanner is the last device in the SCSI daisy chain Refer to P 11 Connecting the SCSI Cable and set the DIP switches properly Are the SCSI cables connected securey If any cables are disc...

Страница 42: ...Feeder ADF There is a problem with the operation of the document table The Endorser printing function may have malfunctioned System error On Flashing Off Action Close theAuto Document Feeder ADF or t...

Страница 43: ...a original is jammed in the feed rollers grasp the leading edge of the original and gently pull it out in the direction of the ADF cover When an Original was Not Out putProperlyfromtheAutoDocu ment Fe...

Страница 44: ...printing becomes too light A A A A A Turn off scanner power and unplug the power cable from the power outlet B B B B B Flip open the Endorser cover located towards the rear of the output table and pul...

Страница 45: ...iagram D D D D D Raise the rear portion of the Endorser and then pull the Endorser out Important Do not pull on the Endorser s cord E E E E E Place the Endorser down with the printing section facing u...

Страница 46: ...er If paper scraps and dust accumulate in the vicinity of the printing section of the Endorser printing quality will be adversely affected If theprintingsectionbecomesdirty gentlywipe the portion show...

Страница 47: ...ck Periodic cleaning is required in order to maintain this scanner in good condition First wipe away any dirt with a dry soft cloth If the dirt cannot be removed with a dry cloth moisten a soft cloth...

Страница 48: ...utlet B B B B B Wipe these components with a soft dry cloth Cleaning the Feed Roller and Drum A A A A A Turn off scanner power and unplug the power cable from the power outlet B B B B B Open the ADF c...

Страница 49: ...eed roller after scanning an original that was written in pencil or with some other material that is not solidly fixed on the paper If you do not clean the feed roller it may dirty the next original t...

Страница 50: ...A A Turn off scanner power and unplug the power cable from the power outlet B B B B B Open the Auto Document Feeder ADF and pull off the white sheet which is held in place by cellophane tape C C C C...

Страница 51: ...on Note Make sure that the white sheet does not lie on the scales 1 Home position 2 Scales F F F F F Gently close the Auto Document Feeder ADF and press it down on it firmly G G G G G Open the Auto Do...

Страница 52: ...d from the wall outlet to avoid fire or electric shock When the machine will not be used for a long time unplug the power cord Caution When you pull out the plug from the socket grip the plug to avoid...

Страница 53: ...yourself carry the scanner to its new location Important When carrying the scanner try to keep it as level as possible Shipping the Scanner When shipping the scanner pack it in its original shipping...

Страница 54: ...scans each in a suitable scan mode Limitation During double sided scanning this function is valid only for the front side of the original Document Size Detection This function automatically detects t...

Страница 55: ...Endorser UnitTypeA printing function can print a symbol or number on originals that have been scanned by the Auto Document Feeder ADF The Endorser Unit Type A printing function settings are made throu...

Страница 56: ...pm A4K 200dpi binary 57ppm LTK 200dpi binary Duplex Model 86ipm A4K 200dpi binary 88ipm LTK 200dpi binary ipm images per minute Warm up time Max 15 seconds Interface SCSI 2 50 pin half pitch pin type...

Страница 57: ...I ID with the rotary switch If the daisy chain is too long or if a nonstandard SCSI cable is used misoperation may occur during synchronous transfer In this case set DIP switch 2 to ON SCSI synchronou...

Страница 58: ...rates according to the scanner driver settings but some scanner driv ers do not support all of the scanner functions In such a case the unsupported func tions are not available for use In addition the...

Страница 59: ...ning halftone scanning and multi value scanning Binary scanning This mode scans the original in black and white This mode is used to scan originals that consist only of text line drawings and other el...

Страница 60: ...d value should be set according to the intensity of the original For example setting a high threshold value when scanning faint text will produce text that is muchclearer Conversely setting a low thre...

Страница 61: ...only produce monochrome output such as a laser printer Because halftone scanning expresses pseudo halftones it does not require as much memory making it effective for filing a large volume of images T...

Страница 62: ...l be longer For example when an area is scanned using the 8 bit multi scan mode it requires eight times as much memory as when scanning the same area through binary scanning or halftone scanning Limit...

Страница 63: ...can just the photograph portion of the original shown below specify the area where the photograph is located The rectangular area is specified by specifying the coordinates of the upper left corner of...

Страница 64: ...one scan Limitation During double sided scanning this function is valid only for the front side of the original Note Note that scanning might not be performed in the specified manner if any of the fou...

Страница 65: ...and photos in halftone scanning mode This function allows you to scan an original that contains both text and photos just once while automatically scanning each type of area in the appropriate scanni...

Страница 66: ...when outputting a scanned image that is the same size as the original image set the same resolution as that of the output device Image quality will suffer if the resolution is less than that of the ou...

Страница 67: ...portion will also appear in the scanned image Conversely if the bright portions of an original become solid white in the scanned image lowering the brightness value will bring out the gradations in th...

Страница 68: ...original that is to be scanned and the output device Normal Emphasizes the contrast slightly resulting in a somewhat sharp scanned image Sharp Emphasizes the contrast resulting in a sharp scanned ima...

Страница 69: ...g Smoothing This filter is used to smooth out small bumps within an image Note This function is valid only when the optional Image Processing Unit Type A is installed Parameter Download This function...

Страница 70: ...the leading edge 5mm 0 2 of the original the size of the original might not be detected properly If the sheets of the original are not set in position properly the size of the original might not be de...

Страница 71: ...Background is disabled The dynamic range is set so that a white original D value 0 07 reaches maximum output When Erase Background is enabled During scanning the portion of the original that is close...

Страница 72: ...27 43 Document in Place 5 Document Size Detection 40 56 Document Table 3 29 Drum 34 Duplex Model 1 42 Dynamic Threshold 40 E Endorser 1 28 30 31 32 41 42 Endorser Cover 3 30 Erase Background 57 Error...

Страница 73: ...on 52 Rotary Switch 4 11 S Scale 20 SCAM 10 43 Scanner Indicators 3 Scanning Composition 45 SCSI 10 SCSI Board 10 SCSI Cables 10 11 27 39 SCSI Connector 4 SCSI ID 10 11 27 SectionArea Multi area Setti...

Страница 74: ...6 Appendices 60...

Отзывы: