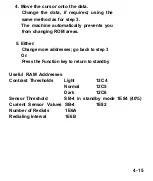
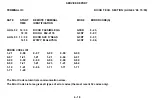


5) Sensor Threshold Initialization
1. Make sure that SB-4 is covered with paper and make sure that the Speed Dial LED is not lit.
2. Press the Voice Request key, then the Start key.
3. If a sensor is faulty, “NG” will be displayed followed by the faulty sensor.
If “SET VALUE OF SENSOR” is displayed, the sensors are all in good order and have been automatically
initialized.
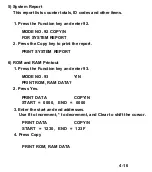
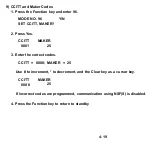
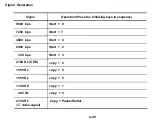
6) Tone Tests
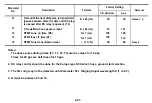
1.
2.
3.
4.
Press the Speed Dial key, then press Start.
DTMF TONE
Press the key corresponding to the desired tone (refer to the table given below).
Example: 697 Hz, push A
DTMF TONE 697HZ
Note:
The machine will return to standby if no key is pushed for 8 minutes.
Press Stop after testing this tone.
DTMF TONE
Either:
Return to standby – press Stop once more
Or:
Test another tone – go to step
2.
4 - 2 9
Содержание FAX07
Страница 4: ...SECTION 1 ...
Страница 8: ...SECTION 2 ...
Страница 12: ...SECTION 3 ...
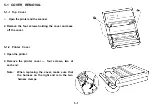
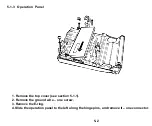
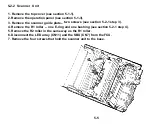
Страница 13: ...3 1 EXTERNAL Guide to Components 3 1 ...
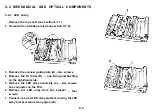
Страница 14: ...3 2 INTERNAL Optical and Mechanical Components 3 2 ...
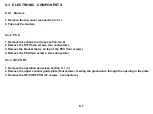
Страница 16: ... Electronic Components 3 4 ...
Страница 19: ...SECTION 4 ...
Страница 52: ...Paper Leading Edge 4 3 3 ...
Страница 54: ...SECTION 5 REMOVAL AND REPLACEMENT ...
Страница 67: ...SECTION 6 ...
Страница 74: ...SECTION 7 ...
Страница 77: ...SECTION 8 T R O U B LE S H O O T I N G ...
Страница 95: ......
Страница 96: ......
Страница 97: ......
Страница 98: ......
Страница 99: ......
Страница 100: ......
Страница 101: ......
Страница 102: ......
Страница 103: ......
Страница 104: ......
Страница 105: ......
Страница 106: ...A H ...
Страница 141: ...BIT No o 1 2 3 4 5 6 7 Function Detection time of 1300Hz Not used Remarks Japan and USA only A 35 ...
Страница 142: ... BIT SW 1C BIT No o 1 2 3 4 5 6 7 Function Remarks Not used Not used A 36 ...
Страница 145: ...APPENDIX C POINT TO POINT DIAGRAM I C 1 ...
Страница 146: ...APPENDIX D BLOCK DIAGRAMS 1 System Control D 1 ...
Страница 147: ...2 Video Data Path Transmission D 2 ...
Страница 148: ... Reception D 3 ...
Страница 149: ... Copying D 4 ...
Страница 150: ... Video Processing Circuit D 5 ...
Страница 151: ...3 Communication Control D 6 ...
Страница 152: ...4 Power Supply Distribution D 7 ...
Страница 153: ... PSU D 8 ...
Страница 154: ...APPENDIX E PCB LAYOUTS FCU 1 4 Parts Layout E 1 ...
Страница 155: ...FCU 2 4 Parts Side E 2 ...
Страница 156: ...FCU 3 4 Comp Side E 3 ...
Страница 157: ...FCU 4 4 Reverse E 4 ...
Страница 158: ...NIF 1 4 Parts Layout ...
Страница 159: ...NIF 2 4 Parts Side E 6 ...
Страница 160: ...NIF 3 4 Comp Side E 7 ...
Страница 161: ...NIF 4 4 Reverse E 8 ...
Страница 162: ...PSU 1 2 E 9 ...
Страница 163: ...PSU 2 2 Reverse E 10 ...
Страница 164: ...SBU 1 4 Parts Layout E 11 ...
Страница 165: ...SBU 2 4 Parts Side E 12 ...
Страница 166: ...SBU 3 4 ...
Страница 167: ...SBU 4 4 Reverse E 14 ...