background image

1. Using the Remote control

4

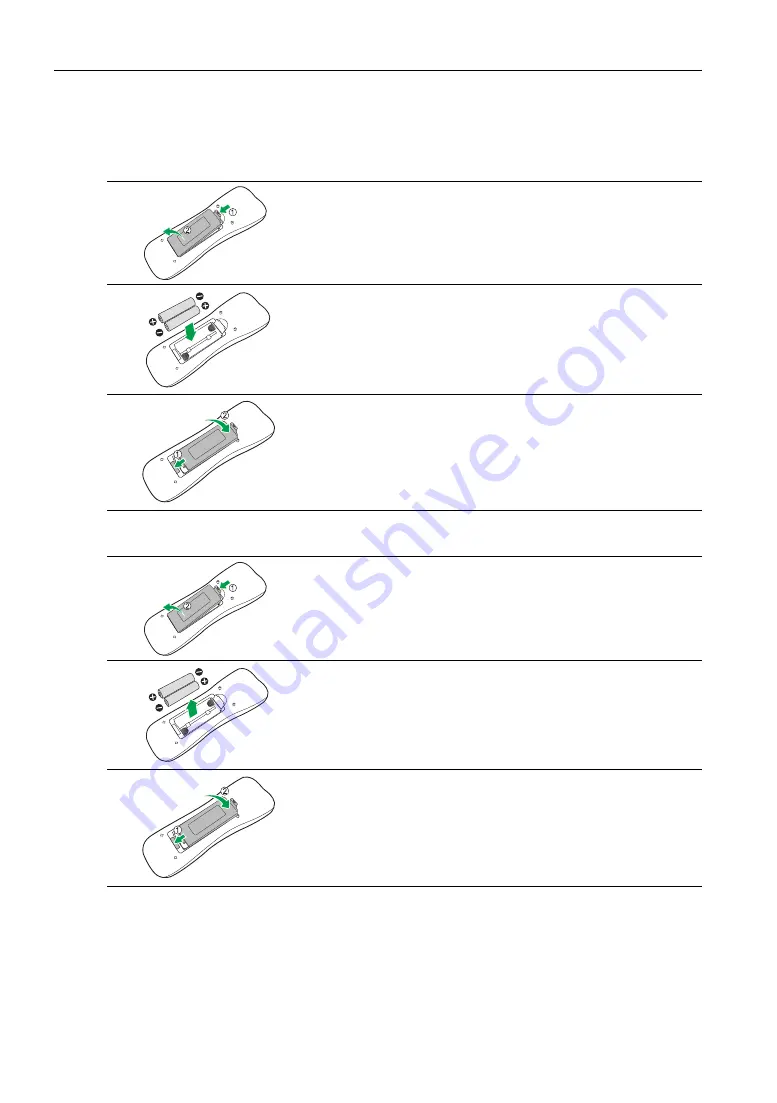
Installing the batteries into the remote control

• When batteries fail to function, replace them immediately.
• There may be local restrictions on the disposal or recycling of batteries. Consult your local 

regulations or waste disposal provider.

Removing the batteries from the remote control

1.

Open the remote control battery cover.

2.

Insert the supplied batteries ensuring that the positive 

and negative marked battery terminals match the (+) and 

(-) marks in the battery compartment.

Note

:

You should replace the supplied batteries as soon as possible.

3.

Refit the battery cover.

1.

Open the remote control battery cover.

2.

Remove the batteries.

3.

Refit the battery cover.

Содержание D8400

Страница 1: ...Operating Instructions For safe and correct use be sure to read the Safety Information in Read This First before using the machine...

Страница 2: ......

Страница 3: ...external speakers 8 Connecting multiple displays 9 3 Using the touch screen 10 Important instructions for using the touch screen 10 4 The On Screen Display menu 12 On Screen Display menu overview 12...

Страница 4: ...es whatsoever arising out of failures of this machine losses of the registered data or the use of this product and operation manuals provided with it Make sure that you always copy or have backups of...

Страница 5: ...d compliant with OPS Open Pluggable Specification standard is connected to this display MENU Opens or closes the On Screen Display menu PIP Turn on or off the PIP function Mute Scrolls through setting...

Страница 6: ...or waste disposal provider Removing the batteries from the remote control 1 Open the remote control battery cover 2 Insert the supplied batteries ensuring that the positive and negative marked battery...

Страница 7: ...remote control become wet or place it in humid environments like bathrooms If the display s remote control sensor window is exposed to direct sunlight or strong light the remote control may not opera...

Страница 8: ...grasp and pull the connectors at the end of the cable Ensure that all cables are fully inserted and firmly seated Connecting the VGA input 1 Connect the VGA Input jack on the display to the VGA output...

Страница 9: ...DVI D Input 2 jack on the machine using a DVI cable 2 If the DVI D connection is used connect the audio output jack of the device to the Audio Input VGA DVI jack on the machine using a suitable audio...

Страница 10: ...rs Connect external speakers to the Speaker R 8 12W Speaker L 8 12W jacks on the machine Note When connecting external speakers use speakers that support 8 output You can use the remote control or the...

Страница 11: ...gnal you use Note The RS 232C cable and DisplayPort cable are not supplied and should be purchased separately This RS 232C daisy chain application requires an RS 232C port equipped computer Use RS 232...

Страница 12: ...n standard is connected to the machine the USB port USB Type B For Touch on the lower back side of the machine is disabled The touch screen functions are controlled by the connected controller When us...

Страница 13: ...he screen surface or the body directly It may result in a short circuit to the touch screen Keep the touch screen out of direct sunlight or spotlights Windows is a registered trademark of Microsoft Co...

Страница 14: ...htness Chroma Phase Sharpness Color Temp Reset 15 Sound Treble Bass Balance Volume Mute Speaker Audio Source Reset 16 Screen PAP Setting Aspect Adjust Screen Touch Feature 17 Setting Language Power Sa...

Страница 15: ...o open the On Screen Display menu 2 In the On Screen Display menu press or to select an item 2 Press or to select an item 3 Press Enter Input to confirm selections 3 Press ENTER to confirm selections...

Страница 16: ...menu 14 5 Press Menu to return to the previous item Press Menu several times to return to the On Screen Display menu and press Menu again to close the On Screen Display menu 5 Press MENU to close the...

Страница 17: ...te This feature is not available if the Adaptive Contrast function is set to On Contrast Adjusts the image contrast Brightness Adjusts the image brightness Chroma Adjusts the color intensity of the im...

Страница 18: ...Selects the audio output source from the internal speakers External Selects the audio output source from the external speakers Audio Source Select either the audio from the source of the image curren...

Страница 19: ...ode selects the image source for the sub picture In PBP mode selects the image source for the right picture by default Swap In PIP mode swaps the main and sub pictures In PBP mode swaps the left and r...

Страница 20: ...sabled Aspect Sets the picture s aspect ratio Normal Enlarges the picture to fill the screen in the vertical direction keeping the same aspect ratio A black frame may appear around the picture Full En...

Страница 21: ...the VGA input image H Position Adjusts the horizontal position of the VGA input image V Position Adjusts the vertical position of the VGA input image Touch Feature When turned On Aspect PBP and Oversc...

Страница 22: ...trol the machine RS 232C Sets RS 232C terminal to control the machine Computer In Sets the OPS Open Pluggable Specification controller to control the machine Note The Computer In is only available if...

Страница 23: ...ideo timing Off Disables the Overscan function Note The Overscan function will become unavailable grayed out when The Touch Feature function in the Screen menu is turned on or The PAP function in the...

Страница 24: ...Ultimate Professional Windows 8 Windows 8 Pro Windows 8 Enterprise Windows 8 1 Windows 8 1 Pro Windows 8 1 Enterprise Single point touch Windows 7 Home Basic Home Premium Ultimate Professional Window...

Страница 25: ...e Setting menu to USB Power Supply 100 240V AC 50 60 Hz Consumption While operating 564 W Consumption Standby Less than 0 5 W Environment Operating Temperature 0 32 C 32 89 6oF Operating Humidity 10 8...

Страница 26: ...z SVGA 800 x 600 75Hz 832 x 624 75Hz 1024 x 768 60Hz XGA 1024 x 768 75Hz 1152 x 870 75Hz 1280 x 768 60Hz 1280 x 800 60Hz 1280 x 720 60Hz 1280 x 1024 60Hz SXGA 1600 x 900 60Hz 1680 x 1050 60Hz WSXGA 16...

Страница 27: ...Hz 1920 x 1080p 25Hz 1920 x 1080p 30Hz 1920 x 1080p 50Hz 1920 x 1080p 60Hz 1920 x 1080p 24Psf 1920 x 1080p 25Psf 3840 x 2160p 30Hz 3840 x 2160p 60Hz Resolution Input source VGA DVI 1 DVI 2 DisplayPort...

Страница 28: ...able if the controller designed compliant with OPS Open Pluggable Specification standard is connected to this display Main Left picture signal source VGA DVI 1 1 DVI 1 2 HDMI Display Port Computer In...

Страница 29: ...DisplayPort Input jack as they are You can connect devices and view the video or image displayed on the machine on the connected device Note Depending on the connected device the video or image may n...

Страница 30: ...Video Input Signals Supported by the Machine on page 24 to select a supported resolution and try again Only a monochrome image is displayed Reconnect the cable Check that the correct cable is used The...

Страница 31: ...fication standard is connected to the machine the control panel buttons will not work until the controller is completely shut down Wait until shutdown is complete The remote control does not work Chec...

Страница 32: ......

Страница 33: ...EN GB EN US EN AU Y303 7524A 2016 Ricoh Co Ltd...

Отзывы: