background image

Catalog Explorer User Manual 

______________________________________________________________________________ 

________________________________________________________________________________ 

Page 8 of 36 

Visit our knowledgebase at: 

http://www.ricoh-usa.com/support/knowledgebase.asp


Copyright 2008 Ricoh Americas Corporation 

3. Installing, Removing and Updating the Catalog Explorer 


Installing the Catalog Explorer 

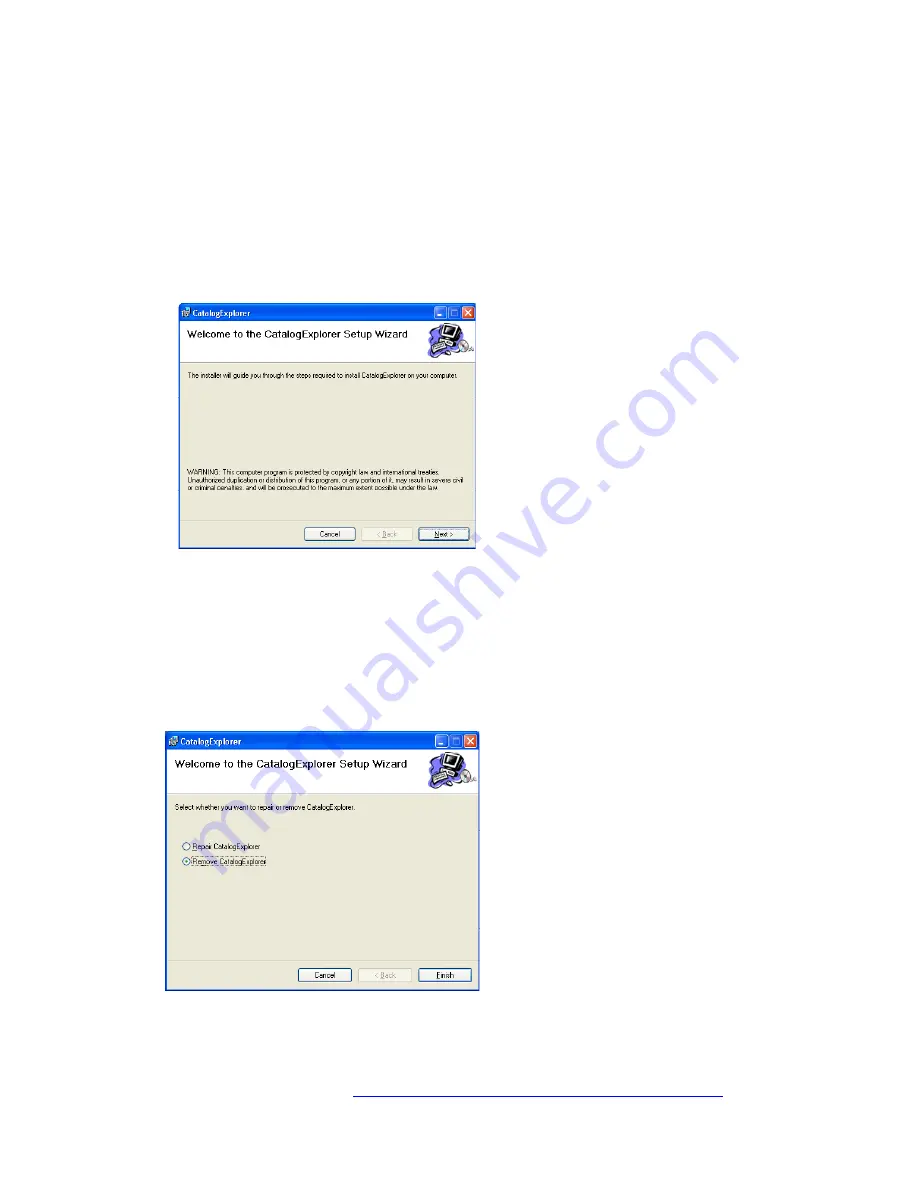
To start the Catalog Explorer Setup Wizard, double-click on the 

“CatalogExplorerInstaller.msi“ file. Then, follow the instructions displayed on the screen to 

complete the installation.  


  Removing the Catalog Explorer 


3.2.1 From the Setup Wizard 

Start the Catalog Explorer Setup Wizard by double-clicking on the same file you used to 

install the program (CatalogExplorerInstaller.msi).  
Select the “Remove CatalogExplorer” radio button, and then click “Finish”. The removal 

will automatically begin.


Содержание Catalog Explorer

Страница 1: ...____________________________ ________________________________________________________________________________ Page 1 of 36 Visit our knowledgebase at http www ricoh usa com support knowledgebase asp C...

Страница 2: ...tware itself please take the time to read the disclaimers mentioned below Thank you very much in advance for your cooperation We hope this tool will be of use to you in your field service activities R...

Страница 3: ...the Catalog Explorer 8 Removing the Catalog Explorer 8 3 2 1 From the Setup Wizard 8 3 2 2 From the Windows Control Panel 9 3 3 Updating the Catalog Explorer to a Newer Version 9 4 Updating the Catalo...

Страница 4: ...image 23 9 4 Enlarging or reducing the main image 23 9 4 1 Enlarge Reduce 23 9 4 2 Set as center for zoom 24 9 5 Highlighted display 25 9 6 Viewing smaller parts contained within a part assembly 26 9...

Страница 5: ...he Parts Catalog this 3D viewing tool displays images of the units sections and individual parts used on a particular model This tool is particularly useful in that it allows the user to search for a...

Страница 6: ...ser s Manual for this tool Note See 3 1 Pull down Menus below for descriptions of each menu 2 List of Target Machine Unit Section This list displays the major machine unit section paper feed fusing ex...

Страница 7: ...area in the lower left hand corner of the GUI The details of each MB can be viewed by double clicking on the MB number title 6 Status Bar Displays a short description or other information regarding t...

Страница 8: ...d Updating the Catalog Explorer Installing the Catalog Explorer To start the Catalog Explorer Setup Wizard double click on the CatalogExplorerInstaller msi file Then follow the instructions displayed...

Страница 9: ...lose the Catalog Explorer Setup Wizard 3 2 2 From the Windows Control Panel Open up the Windows Control Panel select Add or Remove an Application Select Change or Remove From the list of installed pro...

Страница 10: ...___________________________________________________ Page 10 of 36 Visit our knowledgebase at http www ricoh usa com support knowledgebase asp Copyright 2008 Ricoh Americas Corporation 4 Updating the C...

Страница 11: ...all changes made since the release of the original catalog file Therefore depending on which type of file you wish to use download the zip file for the model in question After unzipping the file repla...

Страница 12: ...e catalog data for another destination Close Close a Parts Catalog file Note When you go to close the file a confirmation dialog is displayed alerting the user that the Favorite Parts data will be cle...

Страница 13: ..._____________________________ Page 13 of 36 Visit our knowledgebase at http www ricoh usa com support knowledgebase asp Copyright 2008 Ricoh Americas Corporation 5 2 Help menu Menu Selection Operation...

Страница 14: ...rpcv file The next step is to select the specific model from the Model Code selection dialog see below Note In cases where there is not enough space to display the entire model code place the cursor...

Страница 15: ...iles To close a catalog file select Close from the File menu If you have saved any parts to the Favorite Parts list the list will be cleared when the file is closed Therefore before closing the file t...

Страница 16: ...be located To do this click on one of the selections listed in the Machine Unit Section area on the far left of the GUI The specific unit section is then displayed in the main image area and all parts...

Страница 17: ...a radio button Use the mouse to define a box around a specific area inside the unit displayed To define the box hold the left button down while you drag the mouse Result All registered parts used with...

Страница 18: ...licking on the approximate area that the target part may be located In the Search Method section of the GUI select the Click Search radio button Click on the target part or area of the unit in which t...

Страница 19: ...icoh usa com support knowledgebase asp Copyright 2008 Ricoh Americas Corporation 8 2 3 Enter keyword Search for the part by entering a keyword such as a part name or part number Select the Keyword rad...

Страница 20: ...0 of 36 Visit our knowledgebase at http www ricoh usa com support knowledgebase asp Copyright 2008 Ricoh Americas Corporation 8 2 4 Select Part Keyword Search for the part by selecting from a list of...

Страница 21: ...used in the unit section selected Most recent modification history Displays all parts in the selected unit section that have either been modified or newly added since the previous catalog version Fav...

Страница 22: ...hich the selected part belongs The part number of the selected part The name of the selected part 9 2 Thumbnail Images of Individual Parts Thumbnail images in the parts table contain the following inf...

Страница 23: ...ver the thumbnail image For parts that have already been deleted but were substituted with a new part a large green X appears over the thumbnail image 9 3 Rotating the Main Image Rotate the main image...

Страница 24: ...2008 Ricoh Americas Corporation 9 4 2 Set as Center for Zoom When two or more parts have been selected in the parts table it is possible to choose the part around which the main image will be centered...

Страница 25: ...oh Americas Corporation 9 5 Highlighted Display This feature is used to make the selected unit more visible in the main image Select the Highlighted display checkbox Select a part from the parts table...

Страница 26: ...m support knowledgebase asp Copyright 2008 Ricoh Americas Corporation 9 6 Viewing Smaller Parts Contained Within a Part Assembly To view all of the parts that are contained within one of the parts tha...

Страница 27: ...umber or part name Note When this is done an image of the selected part will be displayed in the main image area Note To return to the image that was displayed before the above operation was performed...

Страница 28: ...described above This will remove the checkmark and also remove the part from the list 9 7 3 Copying the Text to the Windows Clipboard Select Favorite Parts from the File menu The Favorite Parts list...

Страница 29: ...e 29 of 36 Visit our knowledgebase at http www ricoh usa com support knowledgebase asp Copyright 2008 Ricoh Americas Corporation 9 8 2 Modification Details To display the details of a specific modifie...

Страница 30: ...nformation If the catalog file being viewed contains new parts modification information the information for the desired part can be viewed by double clicking on that part listed under New parts The th...

Страница 31: ...ur knowledgebase at http www ricoh usa com support knowledgebase asp Copyright 2008 Ricoh Americas Corporation 10 Other Functions 10 1 Internal Views of Units It is possible to view the internal layou...

Страница 32: ...nal view for a machine unit section Select the unit section from the Machine Unit Section list Select Specify physical area or Click search as the search method If the icon appears near the upper righ...

Страница 33: ...______________________________________________ Page 33 of 36 Visit our knowledgebase at http www ricoh usa com support knowledgebase asp Copyright 2008 Ricoh Americas Corporation 10 2 Viewing the Harn...

Страница 34: ...ttp www ricoh usa com support knowledgebase asp Copyright 2008 Ricoh Americas Corporation 10 3 Viewing the Harness Modification History 10 3 1 Displaying a Tabled Overview If the catalog file being vi...

Страница 35: ...pport knowledgebase asp Copyright 2008 Ricoh Americas Corporation 10 3 2 Displaying the Modification Details The details of each modification listed in the Harness Layout Modifications screen can be v...

Страница 36: ...at http www ricoh usa com support knowledgebase asp Copyright 2008 Ricoh Americas Corporation System Requirements The following are the system requirements for installing the Catalog Explorer Computer...

Отзывы: