Ricoh Caplio G3S Скачать руководство пользователя страница 111

111

Chapter  1 / Section 6  Changing Camera Settings

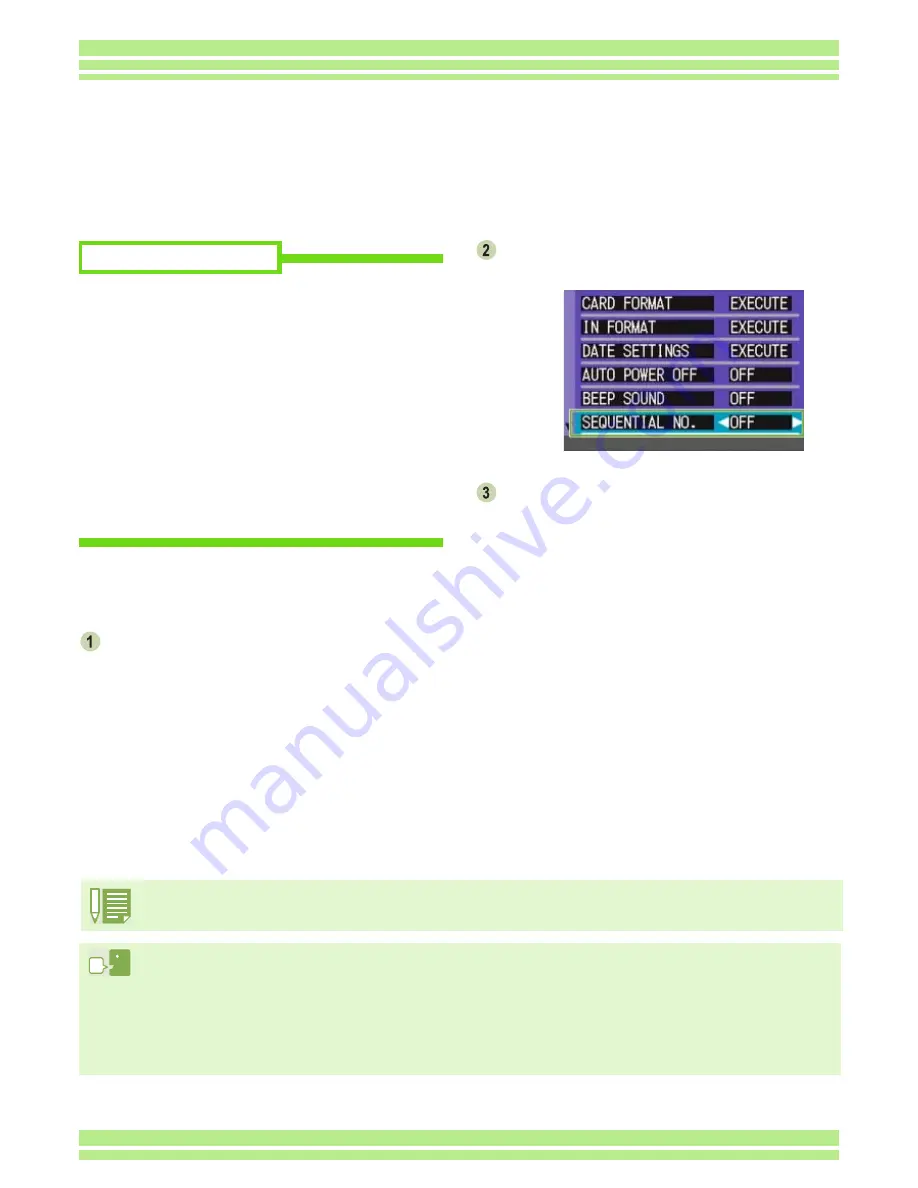
To make changes to file numbering, follow the 
steps below.

Turn the Mode Dial to 

1

 (Setup Mode).

The Setup Screen appears.

Press the 

"

 button to select [SEQUENTIAL 

NO.].

Press the 

#$

 buttons to select the desired 

setting.

This setting will be used for shooting until you change it.

ON (Continue numbering)

File names will be automatically assigned to still 
images you take, in the format of "R" followed by 7 
digits, from R0010001.jpg to R9999999.jpg.
With this setting, even when an SD Memory Card is 
switched for another, consecutive file numbering from 
the previous card is continued.

OFF (Do not continue numbering) (Default)

Every time a new card is loaded, file numbering is 
assigned, from RIMG0001.jpg to RIMG9999.jpg.
If numbering exceeds RIMG9999, further recording is 
not possible.

Possible Settings

Changing File Name Settings (SEQUENTIAL NO.)

When you shoot a still image, it is stored on SD Memory Card or in internal memory, with a 
consecutively-numbered file name automatically assigned.
When you are switching SD Memory Cards, you can set your camera to continue consecutive 
numbering from the previously loaded SD Memory Card.

When you are recording to internal memory, file names are assigned just as when [SEQUENTIAL NO.] is set to 
[OFF].

Extension

The characters "jpg" following the period in a file name are called the extension and indicate file’s type. A type of 
"jpg" indicates that the file is in JPEG format. The extension is always separated from the file name by a period.

JPEG Files

This is read "Jay-Peg" file. This is one of the file formats used for saving image data. It is widely used when 
recording still images, its strong point being its small file size.

Содержание Caplio G3S

Страница 1: ...Operation Manual For the safe use of your camera be sure to read the Safety Precautions thoroughly before use...

Страница 2: ...n of a technical term Important This indicates important information and restrictions Using This Guide This booklet is designed to help you enjoy your Caplio G3 right away by providing quick explanati...

Страница 3: ...ALITY SIZE 60 About Picture Quality Mode 60 About Image Size 60 Changing Picture Quality Mode Image Size of a Still Image 61 Changing the Image Size for Shooting in TEXT Mode62 Changing the Image Size...

Страница 4: ...de show 138 How to Use the slide show Dialog Box 138 Viewing Image Information 139 Using the File Menu 139 Using the Shortcut Menu 139 Displaying the Viewer Screen 140 Viewer Screen 140 Printing an Im...

Страница 5: ...This section explains how to get your camera ready from taking it out of the package to preparing to shoot Chapter 1 Using Your Camera Section 1 Getting Started...

Страница 6: ...warranty card please keep it in a safe place Caplio G3 AV Cable USB Cable CD ROM The software and the operation manual are included on this CD ROM Quick Start Guide AA Alkaline Batteries 2 Handstrap...

Страница 7: ...erminal Cover Lens USB Terminal Video Out Terminal Auto Focus Lamp Viewfinder Flash Lamp D Delete T Self timer Button Z Wide angle 9 Thumbnail Display Button z Telephoto 8 Enlarged View Button Q Quick...

Страница 8: ...and operation for shooting and playback still image viewing Symbol Mode Name Function 1 Setup Mode Allows you to set and confirm camera settings 2 Voice Memo Mode Allows you to record sounds 3 Movie M...

Страница 9: ...venient for travel However in a low temperature environment the number of shots you can take will decrease Warm the batteries before use AA Nickel Batteries available in stores These batteries are not...

Страница 10: ...tery use battery charger BJ 2 sold separately Inserting the rechargeable battery Make sure the camera power is off Slide the battery card cover to open The cover slides two steps Slide the cover two s...

Страница 11: ...daptor from the camera and the power outlet While in use if you detach the AC Adaptor or unplug it from the outlet data may be lost Battery for use with the AC Adaptor AC Adaptor Setting up the AC ada...

Страница 12: ...g the AC adaptor Make sure the camera s power is off Unplug the power plug from the outlet Slide the battery card cover to open The cover slides two steps Slide the cover two steps to open Remove the...

Страница 13: ...off to save power To use the camera again simply press the power switch At time of purchase the Auto Power off function is set to one minute The Auto Power off function does not work when connected t...

Страница 14: ...ickly In FORMAT choose the Date and Time format Check the display on the bottom of the screen and then press the O button Once you have set the date and time the display returns to the Setup screen Bu...

Страница 15: ...e care not to get any dirt on the card s metal parts About where to record When an SD Memory Card is not inserted the camera records images in the internal memory when an SD Memory Card is inserted it...

Страница 16: ...a s power is off Slide the battery card cover to open The cover slides two steps Slide the cover one step for card insertion or extraction Press the card gently and release it The card pops out just a...

Страница 17: ...55 Daylight Overcast Tungsten light Fluorescent light One push How to Use the LCD Monitor The LCD Monitor can be used to view the subject when you are shooting an image as well as for playing back mo...

Страница 18: ...rding to internal memory p 15 Recording to an SD Memory Card p 15 Flash Mode Types Still Image Shooting Mode p 33 Movie Mode p 42 Multi Shot Mode p 39 S Multi Shot Mode p 39 M Multi Shot Mode p 39 POR...

Страница 19: ...E Setting Value Indicates exposure time p 72 Battery Insufficient Capacity Remaining Battery Power Zoom Bar Zoom status p 43 PHOTOMETRY No Display Multi Light Metering Method p 66 Center Spot Self tim...

Страница 20: ...played back Total number of files Total number of files recorded Image Size Setting Value Image size p 60 Folder No Number of the folder in which the file is saved File No Number of the file being pla...

Страница 21: ...cannot turn the LCD Monitor Display on off by pressing T Self timer F Flash or N Macro buttons Turning the LCD Monitor Display Off conserves battery life In this case shoot using just the Viewfinder...

Страница 22: ...ow in Thumbnail Display mode see p 88 Moves the frame left right up and down see p 27 Z Wide angle 9 Thumbnail Display Button If you press the button in Shooting Mode you can shoot with the wide angle...

Страница 23: ...8 F1280 N1280 N640 p 60 FOCUS AF MF SNAP p 64 CONT MODE OFF CONT SCONT MCONT p 39 PHOTOMETRY MULTI CENTRE SPOT p 66 ISO SETTING AUTO 25 200 400 800 p 68 SHARPNESS SHARP NORMAL SOFT p 69 AUTO BRACKET O...

Страница 24: ...fer to MOVIE SIZE 320 160 p 42 WHITE BALANCE Daylight Overcast Tungsten light Fluorescent light One Push p 55 FOCUS AF MF SNAP p 64 Setting Option Refer to EXPOSURE COMP 2 0 to 2 0 p 53 WHITE BALANCE...

Страница 25: ...g the M button Setting Option Refer to DENSITY DEEP NORMAL LIGHT p 78 SIZE 2048 1280 p 60 IMAGE WITH SOUND ON OFF p 51 DATE IMPRINT OFF DATE TIME p 75 Setting Option Refer to SLIDE SHOW ON OFF p 91 PR...

Страница 26: ...r to PORTRAIT p 36 SPORTS p 36 LANDSCAPE p 36 NIGHTSCAPE p 36 TEXT MODE p 36 HIGH SENSITIVITY p 36 Setting Option Refer to CARD FORMAT p 107 IN FORMAT p 108 DATE SETTINGS p 14 AUTO POWER OFF OFF 1 5 3...

Страница 27: ...ect the desired item Press the O button To implement a confirmation screen shooting menu Press the button to select YES Press the O button To select an item you want to implement playback menu Press t...

Страница 28: ...item To select a setting value Press the buttons to select the desired item When you have selected EXE CUTE Press the O button The following screen is displayed so make the necessary settings To close...

Страница 29: ...Section 2 Basic Shooting The basics of shooting are explained here from how to hold your camera to how to shoot still images and movies...

Страница 30: ...cates that camera shake should be avoided under the current shooting condition Hold the camera as illustrated below for best results Be careful when you are shooting not to get a finger your hair or t...

Страница 31: ...left of the Viewfinder Check one of these to make sure the subject is in focus If the camera cannot automatically focus the crosshairs in the center of the LCD monitor turn red and the auto focus lam...

Страница 32: ...p 34 You can use the battery for a longer period of time by using the viewfinder and shooting in power save mode see p 114 In this mode however you cannot check the focus on the LCD monitor Instead ob...

Страница 33: ...Viewfinder Check one of these to make sure the subject is in focus Gently press the shutter button all the way The still image you have taken freezes for a moment on the LCD Monitor and is recorded B...

Страница 34: ...ubjects are hard to bring into focus It may be impossible to bring the following subjects into focus Subjects lacking contrast the sky a white wall the hood of a car etc Flat two dimensional objects w...

Страница 35: ...posure and white balance are fixed and the crosshair in the center of the LCD Monitor turns green as does the auto focus lamp in the lower left of the Viewfinder Check one of these to make sure the su...

Страница 36: ...d as TIFF format files HIGH SENSITIVITY This is best for taking pictures in dimly lit places Shooting with Scenery Matching If you use the Scene Mode you can select from among six types of shooting mo...

Страница 37: ...tch the Mode Dial to5 Shooting Mode you can operate Shooting Mode as usual If you return to Scene Mode again the scene selection screen as previously used is displayed In Text Mode image size cannot b...

Страница 38: ...NDSCAPE Fixed on Flash Off Disabled NIGHTSCAPE Forced flash is disabled Disabled Initial setting Auto TEXT MODE Initial setting Flash Off Enabled HIGH SENSITIVITY Initial setting Flash Off Enabled Com...

Страница 39: ...re grouped together as a set and are recorded as one image file Shooting with Multi Shot If you switch to Multi Shot you can shoot consecutive images This is convenient when you want to capture the mo...

Страница 40: ...is displayed Press the buttons to select Select CONT MODE and press the O button Press the buttons to select CONT SCONT or MCONT Press the O button Press the M button The Shooting Menu closes and the...

Страница 41: ...ton 16 pictures are taken automatically Shooting with M Multi Shot Operation continued from the previous page Compose your picture then press and hold the shutter button Storing to memory begins Relea...

Страница 42: ...image size either 320 240 or 160 120 pixels The maximum shooting time of each is 30 seconds 320 240 and 120 seconds 160 120 Each movie you shoot is recorded as one AVI file The flash cannot be used Wh...

Страница 43: ...s below Turn the Mode Dial to 5 Shooting Mode Compose your picture while viewing either the LCD Monitor or the Viewfinder and zoom by pressing either the z button or the Z button A bar is displayed in...

Страница 44: ...Press the shutter button Buttons used here Shooting with the Digital Zoom The Digital Zoom function enlarges images by processing them When you use the digital zoom pressing the z Telephoto button en...

Страница 45: ...take a tight close up Macro Photo Use this button when the lens to subject distance is 1 60 cm wide angle This feature is good for shooting flowers insects and other small subjects because you can get...

Страница 46: ...lio G3 Recorded sound is stored as a WAV file About where to record When an SD Memory Card is not inserted the camera records sounds in the internal memory when an SD Memory Card is inserted it record...

Страница 47: ...Section 3 Using Special Features for Improved Photography This section describes how to change the various shooting related settings...

Страница 48: ...uto When your subject is poorly lit or backlit the flash fires automatically Red eye reduction When shooting images of people the red eye phenomenon in which people s eyes appear red is reduced Forced...

Страница 49: ...hands and shoot When in LANDSCAPE of Scene Mode the flash setting is fixed to Flash Off When in NIGHTSCAPE of Scene Mode Forced Flash cannot be selected Also the initial setting value is Auto If you p...

Страница 50: ...s begins to shorten and the audio tone begins to beep After shooting Self timer mode switches off Buttons used here Using the Self Timer You can set the Self timer to shoot after either two or ten sec...

Страница 51: ...utton The setting for shooting with sound is complete Press the M button The Shooting menu disappears and the cross hair shooting mark appears Buttons used here Shooting a Still Image with Sound Image...

Страница 52: ...e the recording status Press the shutter release button to stop recording At purchase your camera is set to OFF When the shooting mode is set to Multi Shot excluding S Multi Shot and M Multi Shot soun...

Страница 53: ...hat is mainly dark it will turn out entirely bright over exposure with people appearing white and black objects appearing greyish The same happens when you take photos of people in a spotlight Changin...

Страница 54: ...the minus side makes darker Moving it to the plus side makes it brighter Press the O button Exposure Compensation settings are completed Press the M button The Shooting Menu closes and the setting val...

Страница 55: ...ance fails to adjust properly Overcast Select when shooting in cloudy weather or shade and the White Balance fails to adjust properly Tungsten light Select when shooting under tungsten light and White...

Страница 56: ...reen Only except for scene mode This setting will be used for shooting until you change it Buttons used here In Auto Mode if the subject has limited white area White Balance may not adjust properly In...

Страница 57: ...lance is set Press the O button White Balance settings are complete Press the M button The Shooting Menu closes and the setting value is displayed on the upper left of the screen This setting will be...

Страница 58: ...red Select Auto Bracket and press the O button Press the buttons to select WB BKT Press the O button White Balance Bracket settings are complete Press the M button The Shooting menu disappears and the...

Страница 59: ...played on the LCD monitor immediately after shooting are reddish equal to the current setting and bluish from left This setting will be used for shooting until you turn the power off At purchase your...

Страница 60: ...l Mode About Image Size Image size relates to how large the image is A small image is best for sending via email and using in home pages When printing pictures choose the larger size to obtain better...

Страница 61: ...lternatively turn the Mode Dial to 4 Scene Mode and select a mode to prepare the camera Press the M button The Shooting menu appears Select PIC QUALITY SIZE and then press the O button Press the butto...

Страница 62: ...ttons to select TEXT Mode Press the O button The display changes to the Shooting screen in SCENE Mode with the TEXT Mode mark at the upper part of the screen Press the M button The Shooting menu appea...

Страница 63: ...e steps below Turn the Mode Dial to 3 Movie Mode Press the M button The Shooting menu appears Select MOVIE SIZE and then press the O button Press the buttons to select Size Press the O button Movie Si...

Страница 64: ...ayed on the upper part of the screen Press the buttons to focus the camera If you press the button the focus moves closer If you press the button the focus moves further away Manual Focus is used for...

Страница 65: ...Turn the Mode Dial to 5 Shooting Mode When shooting in Scene Mode set to 4 Scene Mode then select a Shooting Mode When shooting movies set to 3 Movie Mode Press the M button The Shooting menu appears...

Страница 66: ...Light metering is determined by measuring only the central part Use this setting when you want to use the brightness of the center It is useful if there is marked difference in contrast or backlightin...

Страница 67: ...n Press the buttons to select the desired setting Press the O button Light Metering Method setting is complete Press the M button The Shooting Menu closes and the specified value is displayed on the l...

Страница 68: ...l be used for shooting until you change it Buttons used here Sensitivity Settings ISO SETTING You can shoot set the sensitivity ISO SETTING of your camera according to your preferences To fix the shoo...

Страница 69: ...SHARPNESS and then press the O button Press the buttons to select the desired setting Press the O button Sharpness settings are complete Press the M button The Shooting Menu closes and the setting va...

Страница 70: ...press the O button Select ON and then press the O button Press the M button The Shooting Menu closes and AB is displayed on the left side of the screen Buttons used here Shooting Consecutively with Di...

Страница 71: ...sure Compensation value as the standard at 0 5EV 0 and 0 5EV After shooting the three shots are displayed on the LCD Monitor They are from the left 0 5EV the standard compensation value and 0 5EV This...

Страница 72: ...il you change it Buttons used here Setting the Exposure Time TIME EXPOSURE If you set the camera to TIME EXPOSURE when you shoot the shutter stays open for the time specified By setting an exposure ti...

Страница 73: ...es setting then use the button to set the minutes Press the button to move to the seconds setting then press the buttons to set the seconds Press the O button Interval Shooting settings are completed...

Страница 74: ...ned off In steps to if you press the buttons you can quickly raise or lower the setting value If you use batteries for power you may exhaust the batteries Using the AC Adaptor sold separately is recom...

Страница 75: ...he Date Imprint settings are completed Press the M button The Shooting Menu closes and is displayed on the bottom right of the screen This setting will be used for shooting until you change it Buttons...

Страница 76: ...press the O button Press the button to select YES Press the O button The display indicates the camera is restoring the initial settings once it is finished you return to the Mode screen Buttons used h...

Страница 77: ...ient to display the Grid Guide calibration scale and make your composition The Grid Guide is made of lines that divide the LCD Monitor screen into thirds both vertically and horizontally The Grid Guid...

Страница 78: ...O button Press the buttons to select the desired density setting Press the O button Density settings are complete Press the M button The display returns to the shooting screen The value of the DENSITY...

Страница 79: ...es or movies on the LCD Monitor or hear a recorded sound from the speaker and check them This chapter explains how to display a still image or movie or to play back sound It is recommended that you pl...

Страница 80: ...u Just Took Right after shooting a still image if you want to see it immediately you can display the shot in Shooting Mode This function is called Quick Review For movies the first frame appears as a...

Страница 81: ...larged display mode follow the steps below Press the 8 Enlarged View button The still image is enlarged One part of the still image is displayed on the LCD Monitor The enlargement ratio changes each t...

Страница 82: ...y pressing the D DELETE button To delete a still image or movie that is displayed follow the steps below While using the Quick Review function press the D Delete button Press the button to select DELE...

Страница 83: ...s still image or movie If you press and hold either the or the button you can move quickly between images Buttons used here Viewing a Still Image or Movie When you take a still image or movie it is im...

Страница 84: ...ory Card and turn the power back on Turn the Mode Dial to 6 Playback Mode The last still image taken is displayed For movies the first frame is displayed as a still image Move to the still image you w...

Страница 85: ...image or movie Press the shutter button Playback begins The elapsed playback indicator or the elapsed time is displayed on the LCD Monitor Adjusting the Movie Sound Volume To adjust the volume follow...

Страница 86: ...ons to select a sound file for playback speaker icon Press the button to display the next file Press the button to display the previous file Hold the buttons down for fast positioning Press the shutte...

Страница 87: ...s the button to display the next file Press the button to display the previous file Hold the buttons down for fast movement Press the shutter button Playback starts To stop playback press the shutter...

Страница 88: ...Buttons used here Viewing at a Glance The LCD Monitor screen is split into six thumbnail images allowing you to view your still images or movies at one glance Thumbnail Display If you select a still i...

Страница 89: ...8 Enlarged View button The still image is enlarged One part of the still image is displayed on the LCD Monitor Press the buttons to move to the part you want to display To return to the original disp...

Страница 90: ...shot position bar appears at the lower part of the LCD monitor Press the buttons to feed the shot To return to the 16 shot display press the O button Buttons used here Viewing an S Multi Shot or M Mu...

Страница 91: ...iles are played back in order If you want to stop the slide show in progress press any button on the camera Until stopped the slide show will repeat itself Buttons used here Showing Photos in Order Au...

Страница 92: ...iewing on a Television You can also view the still images and movies you have taken on a TV screen The camera displays everything on the TV screen just as on its LCD Monitor To use your television for...

Страница 93: ...the big advantages of digital cameras is that you can delete unwanted still images movies and sounds on the spot This section explains deleting still images movies and sounds you have taken For how to...

Страница 94: ...ere Deleting Unwanted Still Images Movies Sounds You can easily delete still images movies and sounds that have not come out right The following are the three ways to delete photos One shot at a time...

Страница 95: ...ayed Press the D Delete button Press the button to select DELETE ALL and press the O button A screen appears to confirm the deleting Press the button to select YES Press the O button The display indic...

Страница 96: ...select the still images movies or sounds you want to delete Press the D Delete button The trash symbol appears in the upper left of the still image movie or sound Repeat Steps and to select all the s...

Страница 97: ...Playback menu is displayed Press button to select PROTECT and then press the O button Press the button to select 1 FILE Buttons used here Write protecting Your Images PROTECT You can protect still ima...

Страница 98: ...reen The procedure for releasing protection from one file at a time is the same as that for setting protection For how to display still images or movies see p 83 For how to playback sounds see p 86 To...

Страница 99: ...O button Press the button to select ALL FILES Confirm you are choosing SELECT and then press O When set to Protect the Protect symbol appears in the upper left of the screen Buttons used here To remo...

Страница 100: ...Press the buttons to select the still image movie or sound you wish to protect and press the O button The Protect symbol appears in the upper left of the still image movie or sound Repeat Step to sele...

Страница 101: ...is in progress once finished you return to the playback screen Buttons used here Copying the Contents of Internal Memory to a Memory Card COPY TO CARD You can copy all the movie still image and sound...

Страница 102: ...he screen Buttons used here Using a Printing Service PRINT The still images recorded on SD Memory Card can be printed out if you take them to a shop that offers a digital camera print service To use a...

Страница 103: ...O button Press the button to select ALL FILES Confirm you are choosing SELECT and then press O Once the DPOF setting is made the DPOF symbol appears in the upper left of the screen Buttons used here...

Страница 104: ...tting Press the M button The Playback menu appears Press the button to select PRINT and then press the O button The DPOF symbol appears in the upper left of the first still image Press the buttons to...

Страница 105: ...changed and the resized still image is displayed Buttons used here Changing the Image Size Resize You can change the size of a shot still image to create a file storing an image of a different size I...

Страница 106: ...Section 6 Changing Camera Settings This section explains how to make changes to the camera s settings In this section still images and movies will both be referred to as images...

Страница 107: ...your still images cannot be accidentally erased and the memory card cannot be formatted If you return the switch to the former position it is once again possible to erase images and format the card B...

Страница 108: ...O button Formatting commences When it finishes the SETUP screen returns Buttons used here Formatting Internal Memory IN FORMAT Formatting the internal memory clears all the images recorded in the mem...

Страница 109: ...30 Minutes Possible Settings Changing Auto Power Off Settings AUTO POWER OFF If you do not operate the camera for the set period of time it will shut off automatically Auto Power off to conserve batte...

Страница 110: ...OUND Press the buttons to select the desired setting This setting will be used until you change it ON Make sound Default OFF Silent Possible Settings Beep at Recording BEEP SOUND When you shoot an ima...

Страница 111: ...pg If numbering exceeds RIMG9999 further recording is not possible Possible Settings Changing File Name Settings SEQUENTIAL NO When you shoot a still image it is stored on SD Memory Card or in interna...

Страница 112: ...o select the desired setting This setting will be used for shooting until you change it OFF Photo not displayed for confirmation 1 Minute Default 2 Seconds 3 Seconds Possible Settings Changing Image C...

Страница 113: ...justment bar appears Press the buttons to adjust the brightness Moving it to the 9 side makes it darker Moving it to the side makes it brighter The brightness of the screen behind the bar changes as y...

Страница 114: ...n reduce the power consumption of the LCD Monitor and extend the life of your batteries At the time of purchase Power Save Mode is set to OFF If you have activated Power Save mode power consumption wi...

Страница 115: ...Screen appears Press the button to select LANGUAGE Press the buttons to select the desired setting This setting will be used until you change it JPN Japanese ENG English Default FRE French GER German...

Страница 116: ...on TV VIDEO OUT MODE You can view your still images and movies on a television screen by connecting your camera to a television with the video cable included Your camera is set to NTSC video format u...

Страница 117: ...sold separately The explanations provied here assume that the AC Adaptor is begin used Please do not connect your camera to the computer before installing the software for downloading If you happened...

Страница 118: ...ive using Internet Explorer 2 If using Windows98 98SE Me double click DX81xxx exe If using Windows2000 double click DX81NTxxx exe Software and OS Applicability Table The software that can be used diff...

Страница 119: ...ater 800 X 600 or greater recommended Display colors 256 colors or greater 65000 or greater recommended CD ROM drive A CD ROM drive compatible with the above mentioned computer body USB port A USB por...

Страница 120: ...on the right appears The screen shown here is from Windows XP For all versions of except for Windows XP p 121 Windows XP p 123 Install the software Install Acrobat Reader if necessary Connect the cam...

Страница 121: ...rd screen appears Click Next After a few moments the Choose Destination Location screen appears Confirm where you want to install and then click Next After a few moments the Select Program Folder scre...

Страница 122: ...lect Settings and then Control Panel The control panel screen appears Double click the Add Remove Programs icon Select Caplio Software and then click Change Remove A message appears to confirm whether...

Страница 123: ...reen appears Confirm where you want to install and then click Next After a few moments the Select Components screen appears Confirm the software you want to install and then click Next Thereafter if y...

Страница 124: ...ol panel screen appears Click the Add Remove Programs icon Select Caplio Software and then click Change Remove A message appears to confirm whether you want to remove the program click OK The uninstal...

Страница 125: ...le click the Acrobat folder Double click the English folder Double click ar500enu ar500enu exe Install Acrobat Reader by following the messages displayed Installing Acrobat Reader Acrobat Reader is so...

Страница 126: ...anced Select Next Select Search for the best driver in these locations Include this location in the search and then press the Browse button Select the folder where the Caplio Software is installed tha...

Страница 127: ...tically Images are downloaded to your computer from the following memory sources When no memory card is loaded Downloads from internal memory Downloads from SD Memory Card When an SD Memory Card is lo...

Страница 128: ...after saving See p 129 Background illustration settings Changes the background design in the RICOH Gate La window see p 130 About Displays the version of RICOH Gate La Exit Closes RICOH Gate La 2 Sav...

Страница 129: ...nd saves images shot on the same day in the same folder For example if shot on May 1 2002 20020501 folder For each time saved Creates a new folder for each time images are saved and saves the images s...

Страница 130: ...types of patterns If you select Background illustration setting from the menu displayed by the MENU button in the RICOH Gate La window the Background illustration settings dialog box appears 1 Backgr...

Страница 131: ...d the contents of cards like the SD Memory Card In addition to the PC Card type there are Card Readers compatible with various types of cards such as SD Memory Cards into which you can directly insert...

Страница 132: ...laying Thumbnail Images How to Use DU 10s DU 10s enables you to view downloaded images at a glance as well as edit rotate and resave images This section explains how to use DU 10s DU 10s can only be u...

Страница 133: ...r click the Close button in the upper right corner of the screen Starting and Exiting DU 10s There are two methods of starting DU 10s Auto Start from RICOH Gate La In the RICOH Gate La option settings...

Страница 134: ...5 Start List Editor 3 The Thumbnail Display Area The reduced images are displayed at one glance 4 Folder Display Area The folders inside My Computer are displayed in a hierarchy The images inside fol...

Страница 135: ...ing from small to large the opposite is descending order For the alphabet a b c is ascending order and z y x is descending Select which order to use 1 2 or 3 and choose either ascending or descending...

Страница 136: ...ou can change the display size to one of five sizes available 1 Extra large 2 Large 3 Medium 4 Medium 5 Small Changing the Display Size memo The Medium memo display size is used when an image has a ca...

Страница 137: ...n slide show from the menu bar Place the pointer of the mouse on one of the images you selected right click and choose slide show from the menu Menu Shortcut menu displayed with right click The slide...

Страница 138: ...y clicking the mouse button or pressing the Enter key 2 Display interval Specify how long in seconds to display each image when using Auto slide show 3 Background color Choose a background color for y...

Страница 139: ...Using the File Menu Click the image in the Thumbnail Display Area for which you want to see information Select Properties from the File menu Using the Shortcut Menu Right click on the image in the Thu...

Страница 140: ...eterioration Viewer Screen Viewer Screen Menu Bar Tool Bar Save Overwrites an image and saves Tiff files can not be overwritten Rotate 90 counter clockwise Rotate 90 clockwise You can rotate your imag...

Страница 141: ...the next section How to Use the Print Setup Dialog Box Click the OK button Print setup completes How to Use the Print Setup Dialog Box 1 Print Type Select a layout for printing thumbnails 2 Title Prin...

Страница 142: ...nter related settings such as selection of a printer paper size and paper feed method Printing Images To print images follow the steps below Select the images you want to print by clicking on them To...

Страница 143: ...formation such as shooting conditions to the still images you shoot This section explains camera memos To use the camera memo function an SD memory card is required Chapter 3 Shooting with Camera Memo...

Страница 144: ...our computer and transfer it to the camera so that you can use them when shooting images with a camera memo If you want to use data not included in the camera memo list you can make a temporary memo u...

Страница 145: ...hoot still images See p 151 You can create a voice memo using a voice recording function and attach it to a still image See p 164 You can create a temporary memo and attach it to a still image See p 1...

Страница 146: ...This section explains how to create a camera memo list Section 2 Creating a Camera Memo List...

Страница 147: ...u can also start ListEditor by clicking the Start ListEditor icon on the DU 10s screen On the List Title BLANK tab enter a category name in the LIST TITLE text box You can switch between LIST TITLE ta...

Страница 148: ...ocus lamp indicate that the camera power is on If file transfer from the camera to the computer starts when the USB cable is connected wait until the file transfer ends Click the TRANSFER TO CAMERA bu...

Страница 149: ...his button saves a camera memo list in the computer You can select a mta or csv file type To use the file as a camera memo list for the camera save it as an mta file 12 TRANSFER TO CAMERA button Press...

Страница 150: ...By using a camera memo list stored on an SD memory card you can shoot a still image with a memo This chapter explains shooting with camera memos Section 3 Shooting with Camera Memos...

Страница 151: ...o the end of the first row If a voice memo has been attached a speaker icon is displayed To select a temporary memo click TEMPORARY To select a voice memo click the speaker icon Repeat steps to to set...

Страница 152: ...ra memo to a still image after it is taken For how to view a camera memo attached to a still image see p 156 For how to attach a camera memo to a still image see p 151 For how to register play back or...

Страница 153: ...ss the O button to display the camera memo list screen Press the buttons to select Temporary Memo Input Buttons used here Create or correct a memo temporarily Camera memos are edited or corrected on a...

Страница 154: ...ess the O button The Camera Memo screen appears Press the buttons to select a category of temporary memo for correction Press the button to display the camera memo list screen When using a new camera...

Страница 155: ...display the camera memo list screen When using a new camera memo list file the Camera Memo Re registration screen may appear before the Memo List screen Press the button to select YES and then press...

Страница 156: ...image To play back hear a voice memo press the buttons to select the speaker icon and then press the shutter button once to display the speaker screen Press the shutter button again to play back the...

Страница 157: ...s to select the camera memo to attach and then press the O button If a temporary memo has been attached its contents are displayed up to the end of the first row If a voice memo has been attached a sp...

Страница 158: ...the camera memo list screen Press the buttons to select a camera memo and press the O button If a temporary memo has been attached its contents are displayed up to the end of the first row If a voice...

Страница 159: ...display a camera memo perform the following operation Select Display size from the View menu and then select Medium memo from the submenu Thumbnails with a camera memo appear If an image has a voice m...

Страница 160: ...any more camera memos to correct repeat steps to Clicking the Replay Voice button plays back a voice memo Click the OK button Searching for a Camera Memo To search for a camera memo follow the steps b...

Страница 161: ...Detail Dialog Box 1 Memo Embedding Position Select the memo position on an image 2 Set Memo Background Color Enables you to set the memo color Set Memo Character Color Bring up the Color Setup dialog...

Страница 162: ...This section explains operations related to a voice memos such as registration and use of voice memos Section 4 Using Voice Memos...

Страница 163: ...ow to Use of Voice Memo Create a voice memo See p 164 Catalog a camera memo in the camera memo list using the camera You can confirm a voice memo by playing it back before attaching it to a still imag...

Страница 164: ...the shutter button Voice recording starts and can continue for up to eight seconds To stop voice recording halfway half press the shutter button When voice recording is stopped the display returns to...

Страница 165: ...e O button The display returns to the Memo List screen To record again select YES and press the O button to start from steps If there are any more voice memos to change repeat steps to The distance fr...

Страница 166: ...emo screen If there are any more voice memos to play back repeat steps to Changing a Voice Memo Turn the Mode Dial to 5 Shooting Mode or 6 Playback Mode Press the O button Press the buttons to select...

Страница 167: ...s Click the memo you want to correct in the memo list Click the Replay Voice button Playing Back and Confirming a Voice Memo Attached to a Still Image When DU 10s is started images still images and mo...

Страница 168: ...Appendices...

Страница 169: ...buttons to select a character to input Press the E button Entering a blank space Press the buttons to move the cursor to SPACE Press the E button Correcting a character Press the buttons to select one...

Страница 170: ...moves to the input characters Press the buttons to select the character immediately after to the right of the character you want to erase Press the button to return the cursor to the keyboard Press th...

Страница 171: ...en light Fluorescent light One Push Exposure Adjustment Light Metering Sensitive Distribution Multi Light Metering 256 segments Center weighted Light Metering Spot Metering Exposure Compensation Manua...

Страница 172: ...emory Card Recording Capacities The following table shows the approximate number of images that can be recorded onto an SD Memory Card at various image size and picture quality settings Item Model Rem...

Страница 173: ...h water droplets frozen may cause it to fail So do not leave the camera as it is with ice adhering to the camera z In an environment where the temperature changes suddenly condensation may occur in th...

Страница 174: ...for cleaning LCD display surfaces Gently wipe with a soft cloth dampened with a little cleaner Storage zPlease avoid storing your camera in the following kinds of places as breakdown may result In hi...

Страница 175: ...ing the AC Adaptor reconnect it p 9 p 10 p 11 Cannot recharge the batteries Battery life Replace the batteries with a new set p 10 Batteries run out quickly They are being used in extreme high or low...

Страница 176: ...e flash fired the picture is dark The distance to the subject is greater than 2 5 meters in Telephoto or greater than 4 5 meters in Wide angle Get closer to your subject and shoot p 47 The image is to...

Страница 177: ...not recorded normally Load a normally recorded card p 15 The SD Memory Card s contact surfaces are dirty Wipe with a soft dry cloth There is something wrong with the SD Memory Card Play another card...

Страница 178: ...9 p 10 p 11 The date is wrong The correct date time are not set Set the correct date time p 14 The date set has disappeared The batteries were removed If the batteries are removed for about two weeks...

Страница 179: ...your computer 2 If there are several root hubs change to another one If you are using a hub other than USB connect via a USB hub Measure 5 For Windows 98 98SE Me the COM Port setting may be wrong Fol...

Страница 180: ...camera via the USB cable to your computer When the computer recognizes the camera the New Hardware screen launches and your camera is registered by the computer Step 2 If your computer still does not...

Страница 181: ...ove Applications icon 13 On the Add Remove Applications Properties screen displayed select Caplio Software and then click the Add Remove button This uninstalls the Caplio Software 14 Click OK to close...

Страница 182: ...there is right click Caplio G3 to display the menu and select Delete The entry Caplio G3 is deleted 11 Click the x Close button to close the Device Manager screen 12 Click OK to close the System Prope...

Страница 183: ...s now installed properly and recognizes the camera correctly Symptom 2 Even if you check The same image will not be saved in the Ricoh Gate La Optional Settings the same images are loaded into your co...

Страница 184: ...SETTINGS CANNOT BE SET FOR THIS FILE This file movies and other cannot be selected for printing INSUFFICIENT MEMORY Files cannot be stored Make sure there is enough free space or delete files p 85 Th...

Страница 185: ...rranty period 6 This warranty only applies to the camera and not to the accessories such as the case and strap nor does it apply to the battery and other consumables provided 7 Any consequential damag...

Страница 186: ...or an experienced radio TV technician for help FCC 15 105B Changes or modifications not expressly approved by the party responsible for compliance could void the user s authority to operate the equipm...

Страница 187: ...4 2073 656 580 Deutschland innerhalb Deutschlands 06331 268 438 au erhalb Deutschlands 49 6331 268 438 France partir de la France 0800 91 4897 en dehors de la France 33 800 91 4897 Italia dall Italia...

Страница 188: ...C UK Ricoh House 1 Plane Tree Crescent Feltham Middlesex TW13 7HG England RICOH FRANCE S A PMMC FRANCE 383 Avenue du G n ral de Gaulle BP 307 931 13 Clamart C dex France RICOH ESPANA S A PMMC SPAIN Av...

Отзывы: