background image

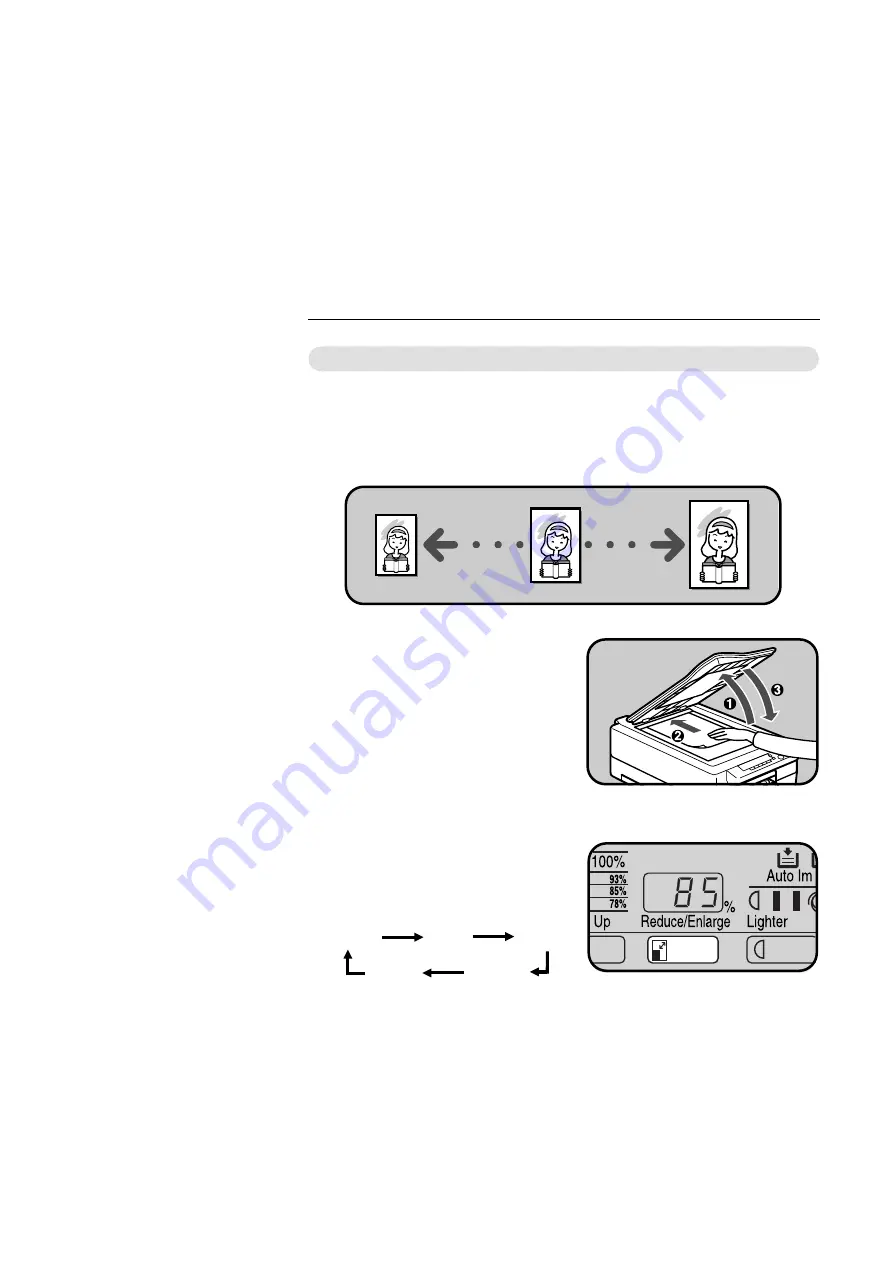
 REDUCED AND ENLARGED COPYING

Not e: This funct ion can be used only when you have t he reduct ion/enlarge-

ment  feat ure.

Reducing And Enlarging Using Preset Ratios
(Preset R/E)   

1.

Place the original face dow n
on the exposure glass, and
low er the platen cover. 

The original should be centered
to the arrow m ark on the scale.

..........................................................

2.

Press the Reduce/Enlarge key
to reduce or increase the re-
production ratio. The reduction
ratio w ill change as follow s:

93%    85%    78%

  100%    129%


..........................................................

3

Enter any other settings and
m ake your copies.

REDUCED AND ENLARGED COPYING

 REDUCED AND ENLARGED COPYING

22

Содержание Business Pro 1200

Страница 1: ...t contains important information related to USER SAFETY and PREVENTING EQUIPMENT PROBLEMS When using your copier the following safety precautions should always be followed Safety During Operation In t...

Страница 2: ...k When the copier needs to be checked adjusted or repaired contact your service representative Do not take apart or attempt any modifications to this copier There is a risk of fire electric shock expl...

Страница 3: ...t grip the plug to avoid damaging the cord and causing fire or electric shock Keep the copier away from humidity and dust A fire or an electric shock might occur Do not place the copier on an unstable...

Страница 4: ...e with a flat even surface Do not place on a surface that has holes ruts cavities or is uneven in any way The copier must be level within 3 mm 0 11 both front to rear and left to right To avoid a poss...

Страница 5: ...r from a heater Sudden temperature changes might cause condensation within the copier Places where the copier might be subjected to frequent strong vi bration Dusty areas Areas with corrosive gases Pl...

Страница 6: ...er and freely accessible so that in event of an emergency it can be unplugged easily Make sure the plug is firmly inserted in the outlet Voltage must not fluctuate more than 10 Do not set anything on...

Страница 7: ...WHERE IS IT WHAT IS IT COPIER EXTERIOR 2 COPIER INTERIOR 3 OPERATION PANEL 4 Type 1 4 Type 2 5 1...

Страница 8: ...of the copier BYPASS FEED ENTRANCE Use to copy onto OHP sheets adhesive labels translucent paper and post cards BYPASS FEED GUIDES Use to align copy paper set in the bypass feed en trance MAIN SWITCH...

Страница 9: ...ot expose this unit to the light for a long time FUSING UNIT Fuses the copy image to the paper When ac cessing the inside of the copier use caution This unit may be very hot TONER BOTTLE Replace the t...

Страница 10: ...ity 5 Check Paper Path indicator See page 40 6 Up and Down keys Use to set the desired number of copies 7 Start key Press to start copying 8 Clear Stop key Press to cancel the copy number entered Whil...

Страница 11: ...sired number of copies 9 Start key Press to start copying 10 Clear Stop key Press to cancel the copy number entered While copying press to stop copying 11 Copy Counter Indicates the number of copies 1...

Страница 12: ...OPERATION PANEL 6...

Страница 13: ...8 When The Main Switch Is In The Stand by Position 8 When The Copier Has Been Turned Off By Auto Off Mode 9 SETTING ORIGINALS ON THE EXPOSURE GLASS 10 ORIGINAL SETTING AND COPY DIRECTIONS 11 CHANGING...

Страница 14: ...for the copier to warm up During the warm up pe riod the indicator on the Start key stays red 3 When the warm up period is completed the indicator on the Start key turns green The copier is ready to...

Страница 15: ...minutes after the last copying job has been completed To use the copier turn on the main switch Auto off is not in effect in the fol lowing conditions When the Start key is red While accessing the use...

Страница 16: ...over When copying book originals it is important that the platen cover and exposure glass are parallel This prevents streaming light and using unnecessary toner enabling you to make clear copies There...

Страница 17: ...d entrance and open the copy tray Remove copies delivered to the copy tray one by one Letterhead When you copy onto letter head set the originals and let terhead as shown on the right Two sided copies...

Страница 18: ...ng the hinges and re fixing the cover 1 1 Lever up the stoppers with the tip of a ballpoint pen to release the hinges 2 Hold the platen cover as shown and pull it towards you 3 Remove the two hinges f...

Страница 19: ...ed when removing the cover in step 1 6 Insert the hinges in their new positions 7 Fit the platen cover onto the copier The hinges should fit into the new holes 8 Push the hinges into the holes with yo...

Страница 20: ...9 Push the stoppers back down with the tip of a ball point pen to fix them CHANGING PLATEN COVER POSITION 14...

Страница 21: ...py Image Density 18 Copying From The Bypass Feed Entrance 19 Entering Copy Job Settings During The Warm up Period Auto Start 21 REDUCED AND ENLARGED COPYING 22 Reducing And Enlarging Using Preset Rati...

Страница 22: ...on the scale 2 If your copier has enlarge ment reduction make sure the magnification ratio is 100 3 Enter the number of copies re quired using the Up and Dow n keys Up to 50 copies can be entered To...

Страница 23: ...rled paper Even if you open the copy tray the page order may vary 5 Press the Start key To stop the machine during a multi copy run press the Clear Stop key Press the Start key to resume copying or pr...

Страница 24: ...the copier auto matically controls the image density If the density has been manu ally adjusted pr ess the Lighter left key or Darker right key to light the center image density indicator Manual imag...

Страница 25: ...ying should also be used for OHP sheets adhesive labels translucent paper or post cards As for the original setting and copy directions see page 11 1 Place the original face down on the exposure glass...

Страница 26: ...ce of copy paper If you are making more than one copy in this set insert the next piece of copy paper into the bypass feed entrance gently until the paper is fed automatically The next copy is made au...

Страница 27: ...the warm up period the indicator on the Start key will blink red green red green then the copier will start copying after the warm up period Set your copy settings during warm up period then press th...

Страница 28: ...the original face down on the exposure glass and lower the platen cover The original should be centered to the arrow mark on the scale 2 Press the Reduce Enlarge key to reduce or increase the re produ...

Страница 29: ...riginal should be centered to the arrow mark on the scale 2 Press the Zoom Dow n key re peatedly to reduce the ratio in 1 steps Or press the Zoom Up key repeatedly to increase the ratio in 1 steps 3 E...

Страница 30: ...REDUCED AND ENLARGED COPYING 24...

Страница 31: ...ROPERLY 28 d IS LIT LOAD PAPER 29 Non recommended Paper For The Paper Cassette 29 Notes For Paper 29 Loading Paper 30 f IS LIT OR BLINKING ADD TONER 31 CHANGING THE IMAGING UNIT 35 How to Change The I...

Страница 32: ...1 is lit Clear misfed paper See page 40 The copier has turned it self off 10 minutes after a copy was made or a key was pressed The Auto off function is set Turn on the main switch Copies have white s...

Страница 33: ...nkled damp or curled paper in the cassette Always load paper correctly Is the paper properly set in the cassette Make sure that the end plate and the side guides are positioned properly See page 44 Ar...

Страница 34: ...ies are too light The original has a low contrast image Adjust the image density See page 18 The image density is too light Damp or rough grain paper is used Use dry paper without rough grain The same...

Страница 35: ...such as carbon or silver coating Thermal paper art paper Thin paper that has low stiffness Notes For Paper Do not copy onto the side of paper that has been already copied on The following types of pa...

Страница 36: ...b When you use 81 2 x 14 paper make sure that the trailing edges of paper are under the guides Maximum capacity 100 sheets 80 g m2 20 lb 3 Push the paper down until the leading corners of the paper ar...

Страница 37: ...n open flame Dispose of the used toner containers according to local regulations Note When you change the toner bottle be careful not to touch the blue material OPC Not e Before set t ing t he new t o...

Страница 38: ...in step 7 4 Open the top unit To stop the top unit from spring ing up keep one hand on it while opening it 5 Open the lever in the direction of the arrow 6 Grasp the right side of the used toner bottl...

Страница 39: ...no cap on the removed toner bot tle remove the cap from under the lever Fix the cap you took off the new bottle onto the used bottle 9 Put the cap side of the bottle under the lever A Push the other...

Страница 40: ...s After you close the top unit the copier replenishes toner for about 1 minute After the copier stops make sure that the Add Toner f indicator is off If the f indicator is lit again turn the main swit...

Страница 41: ...ially the blue material to the light How to Change The Imaging Unit 1 Open the top unit To stop the top unit from spring ing up keep one hand on it while opening it 2 Remove the used imaging unit with...

Страница 42: ...6 Remove the black paper from the imaging unit and remove the tape fixing the lever Insert the trailing part of the imaging unit onto both hinges Then put the other part of the unit on the guide plat...

Страница 43: ...ut the tape in the direction of the arrow on the tape After re moving it you will find the end mark at the end of the tape 8 Open the new toner bottle box and take out the toner bottle 9 Shake the new...

Страница 44: ...lever in the direction of the arrow C Put the cap side of the toner bottle under the lever D Push the other side of the toner bottle in until it locks in position E Close the lever CHANGING THE IMAGI...

Страница 45: ...ew ozone filter While pulling the tab in the di rection of the arrow push the new filter in the holder with the tape side of the filter on the bottom 3 Close the top unit with both hands After you clo...

Страница 46: ...positions and the top unit is closed When a paper misfeed occurs the copier keeps track of the selected copy modes and how many copies have been completed It is not necessary to reset the copy modes a...

Страница 47: ...ioned prop erly to match the paper size you are using If d is still lit change the paper type If the d indicator does not go out call for a service repre sentative See the back cover of this manual fo...

Страница 48: ...ing unit is shaky if you push it there is no problem it does not lock in place 4 If you still cannot remove mis fed paper take it out through the copy tray area 5 Make sure that there are no scraps of...

Страница 49: ...CHANGING THE COPIER S SETTINGS CHANGING THE PAPER SIZE 44 USER TOOLS 47 How To Access User Tools 47 How To Change Adjustment Value Or Modes 48 User Tool Menu 49 43...

Страница 50: ...p slightly and pull out the paper cassette 2 Remove the copy paper 3 Remove the end plate If you are changing the paper size from 81 2 x 14 to a smaller sizes lift out the end plate CHANGING THE PAPER...

Страница 51: ...1 or 81 2 x 14 paper do not follow steps 5 and 6 5 While pushing the bottom plate down pull up the two side guides as shown in the illustration 6 While pushing the bottom plate down set the two side g...

Страница 52: ...ts 80 g m2 20 lb When you use 81 2 x 14 paper make sure that the trailing edges of paper are under the guide Maximum capacity 100 sheets 80 g m2 20 lb 8 Push the paper down until the leading corners o...

Страница 53: ...A dot will appear in the upper left corner of the copy counter to show you are in the User Tools mode 4 Enter the required user tool s number using the Up and Dow n key You will find the user tool s...

Страница 54: ...er the required setting using the Up and Dow n keys For the settings refer to pages 49 to 54 3 Press the Lighter key The setting will be stored in memory You will find the setting number blinks and th...

Страница 55: ...using 10 Auto and manual image density level selection To change the setting see page 47 Default Normal Setting 0 Setting 0 1 2 3 4 5 6 Definition Normal Light Dark Lighter Darker Lightest Darkest 2...

Страница 56: ...10 Auto and manual image density level selection See page 54 If you still cannot get it right adjust the toner density using this function For how to change settings see page 47 Default Normal Settin...

Страница 57: ...nter can be set to show the number of copies made count up or the number of copies remaining to be made count down For how to change settings see page 47 Default Up Setting 0 Setting 0 1 Definition Up...

Страница 58: ...its of the total copy quantity are displayed on the copy counter Example When 12345 copies are made 45 is displayed on the copy counter At that time the right image density indicator is lit When you w...

Страница 59: ...ber 9 You will find the first 2 digits of the total imaging unit counter ar e d i sp l ay ed o n t h e co p y counter Example When the counter is 12345 01 is displayed on the copy counter At that time...

Страница 60: ...twice To access another user tool number press the Lighter key To exit the user tools turn off and on the main switch 10 Auto and manual image density level selection If the image density is too dark...

Страница 61: ...SUPPLIES MAINTAINING YOUR COPIER 56 Exposure Glass 56 Platen Cover 56 Corona Wires Transfer corona wire and charge corona wire 57 Guide Plates 60 DO S AND DON TS 61 Copier 61 USE AND STORAGE OF SUPPL...

Страница 62: ...an the exposure glass with a damp cloth and wipe it with a dry cloth If you do not clean the exposure glass copies may be dirty Platen Cover Clean the platen cover with a damp cloth and wipe it with a...

Страница 63: ...ona wires do not touch the fusing section because it could be very hot Note When you clean the corona wires be careful not to touch the blue material OPC 1 Open the top unit To stop the top unit from...

Страница 64: ...ustration If you set the tool in the wrong direction the charge corona wire may be damaged 4 Move the tool right to left a few times and take it out 5 Remove the imaging unit and put it on spread out...

Страница 65: ...ection the transfer corona wire may be damaged 8 Move the tool right to left a few times 9 Take the tool out from the transfer corona wire and put the tool to the hole right next to the bypass feed en...

Страница 66: ...terial OPC with paper not to expose it to the light See page 58 2 Clean the transfer and trans port guide plates with a damp cloth and wipe them with a dry cloth If you do not clean the guide plates t...

Страница 67: ...then back on again Under the following conditions you might get light copies When you make 150 or more copies continuously When you make one solid full image copy When you make copies when the Add To...

Страница 68: ...bjects to fall inside the machine Always turn the copier off when you have finished copying for the day When adding toner Before setting the new toner bottle shake it well at least 5 or 6 times Do not...

Страница 69: ...n or sliver coated paper Wavy paper Thermal paper art paper Thin paper that has low stiffness Adhesive labels should be fed from the bypass feed entrance one sheet at a time Translucent paper should b...

Страница 70: ...umidity or low temperature and low humidity conditions store paper in a vinyl bag Do not store paper where it will be exposed to heat Store on a flat surface Use older stock first Do not lay heavy obj...

Страница 71: ...SPECIFICATIONS SPECIFICATIONS 66 Main Copier 66 65...

Страница 72: ...inute A4 lengthwise or 81 2 x 11 lengthwise Warm up Time Less than 30 seconds at 23 C or 73 F First copy Time Less than 9 seconds A4 lengthwise or 81 2 x 11 lengthwise Copy Number In put Up Down key 1...

Страница 73: ...Dimensions Height Excluding for the platen cover Weight Copier with platen cover and copy tray Less than 18 kg 39 7 lb Specifications are subject to change without notice Copy tray in the closed posit...

Страница 74: ...RE PACKING YOUR COPIER 1...

Страница 75: ...To stop the top unit from spring ing up keep one hand on it while opening it 4 Remove the used imaging unit with the used toner bottle carefully and horizontally so you don t spill toner Make sure to...

Страница 76: ...rizon tally into the black bag Do not shake the imaging unit to the right or left 8 Set the pieces of styrene foam to both sides of the imaging unit Then put it in the card board box 9 Seal the im agi...

Страница 77: ...th sides of the exposure glass Make sure to insert the metal rods to prevent a machine failure while moving the copier C Close the platen cover D Remove the paper cassette and lay the end plate flat i...

Страница 78: ...E Put the cassette in the clear wrapper F Put the copier in the clear bag G Put the copier in the cardboard box H Firmly put the styrene foam on the copier RE PACKING YOUR COPIER 5...

Страница 79: ...I Set the big support on the cop ier Then put the small sup port imaging unit box and pa per cassette on the big sup port J Seal the box firmly using the gum tape RE PACKING YOUR COPIER 6...

Страница 80: ...4 5 Check the imaging unit counter 53 Check the total copy counter 51 Clear Stop key 4 5 CLEARING MISFEEDS 40 42 COPIER EXTERIOR 2 COPIER INTERIOR 3 Copy Counter 4 5 copy paper 62 COPYING Full Size C...

Страница 81: ...d Enlarging In 1 Steps 23 Reproduction Ratio indicators 5 Right image density indicator adjustment 49 S SAFETY INFORMATION i SETTING ORIGINALS ON THE EX POSURE GLASS 10 SPECIFICATIONS 66 67 Main Copie...

Отзывы: