background image

COPYRIGHT RICHTECH 2020 

- 15 - 

4.  Integration 
 

4.1.  Interfaces 


  P1: USB Host 

o

  Peripheral connection 

o

  Use: connect external devices like a USB storage stick 


  P2: DC 

o

  Power adapter: 12V 


  P3: Wiegand interface 

o

  Supports Weigand protocol 

o

  -WGI0 

o

  +WGI1 


  P4: Reset button 

o

  Press for 5 seconds to restore default factory configuration 


  P5: Alarm 

o

  -GND 

o

  +ALMO 

o

  Alarm output 1: Output 3.3V when its inactive; outpu

t 0V when it’s active 


  P6: Ethernet Port 

o

  Supports 100M network  


P6: Ethernet 

P1: USB 

P7: Relay 

P2: DC 

P3: WG 

P4: Reset 

P5: Alarm 

Содержание V2 LITE

Страница 1: ...t written permission no entity or individual is allowed to extract copy translate or modify all or part of this manual in any way Unless otherwise agreed the company does not provide any express or im...

Страница 2: ...face recognition technology and a full suite of software functions the AATSS V2 is the finalized all in one solution for fully automated quick contactless temperature screening 2 Quick installation 2...

Страница 3: ...COPYRIGHT RICHTECH 2020 3 2 1 2 Slip the V2 interface cables through the center hole of the Stand Base 2 1 3 Affix the V2 to the Stand Base and secure from the bottom using the helix nut provided...

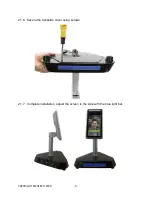
Страница 4: ...COPYRIGHT RICHTECH 2020 4 2 1 4 Connect the USB Ethernet and Power Cable to the Stand Base connectors 2 1 5 Pass all the data interface cables through the hole in the stand backside cover...

Страница 5: ...COPYRIGHT RICHTECH 2020 5 2 1 6 Secure the backside cover using screws 2 1 7 Complete installation adjust the screen to the side with the blue light bar...

Страница 6: ...ter powering on the boot time is about 30 40 seconds If you need to manage the V2 through a network connect the base to your router through an ethernet cable For how to set up the network please refer...

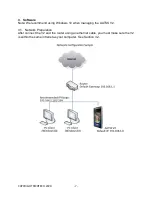
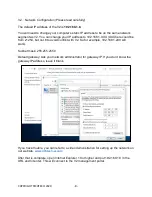
Страница 7: ...e Note We recommend using Windows 10 when managing the AATSS V2 3 1 Network Preparation After connect the V2 and the router using an ethernet cable you must make sure the V2 is within the same intrane...

Страница 8: ...254 but not 8 to avoid conflict with V2 So for example 192 168 1 200 will work Subnet mask 255 255 255 0 Default gateway Ask your network administrator for gateway IP If you don t know the gateway IP...

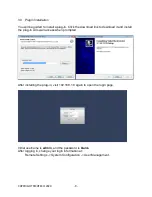
Страница 9: ...d link to download it and install the plug in Allow all access when prompted After installing the plug in visit 192 168 1 8 again to open the login page Initial username is admin and the password is b...

Страница 10: ...o keep V2 s IP address in the same segment as your computer terminal You can always find the V2 s IP address on left corner of its screen 3 5 Face Recognition Library Setup To input all your employees...

Страница 11: ...y going to Smart Configuration Records menu You can search data by time face library employee name etc 3 7 Temperature Monitoring The default normal temperature value is set to 96 1 99 It s not recomm...

Страница 12: ...administrator account and five more normal user accounts Only the administrator account can modify device parameters all the other accounts can only view the data To check each account s login history...

Страница 13: ...n input your email account information from Remote Settings Network Configuration Email Config Please make sure the V2 can access internet through your local network 3 10 Local Settings To keep snapsh...

Страница 14: ...Updates To update V2 with latest firmware please get the firmware package from your reseller or official website Install it from Remote Settings System Maintenance Firmware update System will restart...

Страница 15: ...Power adapter 12V P3 Wiegand interface o Supports Weigand protocol o WGI0 o WGI1 P4 Reset button o Press for 5 seconds to restore default factory configuration P5 Alarm o GND o ALMO o Alarm output 1...

Страница 16: ...ic door system can be controlled through the relay interface With our embedded program you only need to connect the V2 with your existing door control system through relay interface and Here is an exa...

Страница 17: ...COPYRIGHT RICHTECH 2020 17 4 2 1 Hardware integration Install V2 onto door base Open door control system Get V2 Interfaces ready Find DC Ethernet Relay Interface...

Страница 18: ...COPYRIGHT RICHTECH 2020 18 Connect network cable with Ethernet port Connect door control interface with and Connect 12V DC Power Adapter...

Страница 19: ...mart Configuration menu There are three options Face recognition Detect if the visitor s face matches whitelist group ignore temperature Temperature Detect if visitor s temperature is normal only igno...

Отзывы: