background image


Page 5 of 11


3. Menu Introduction 

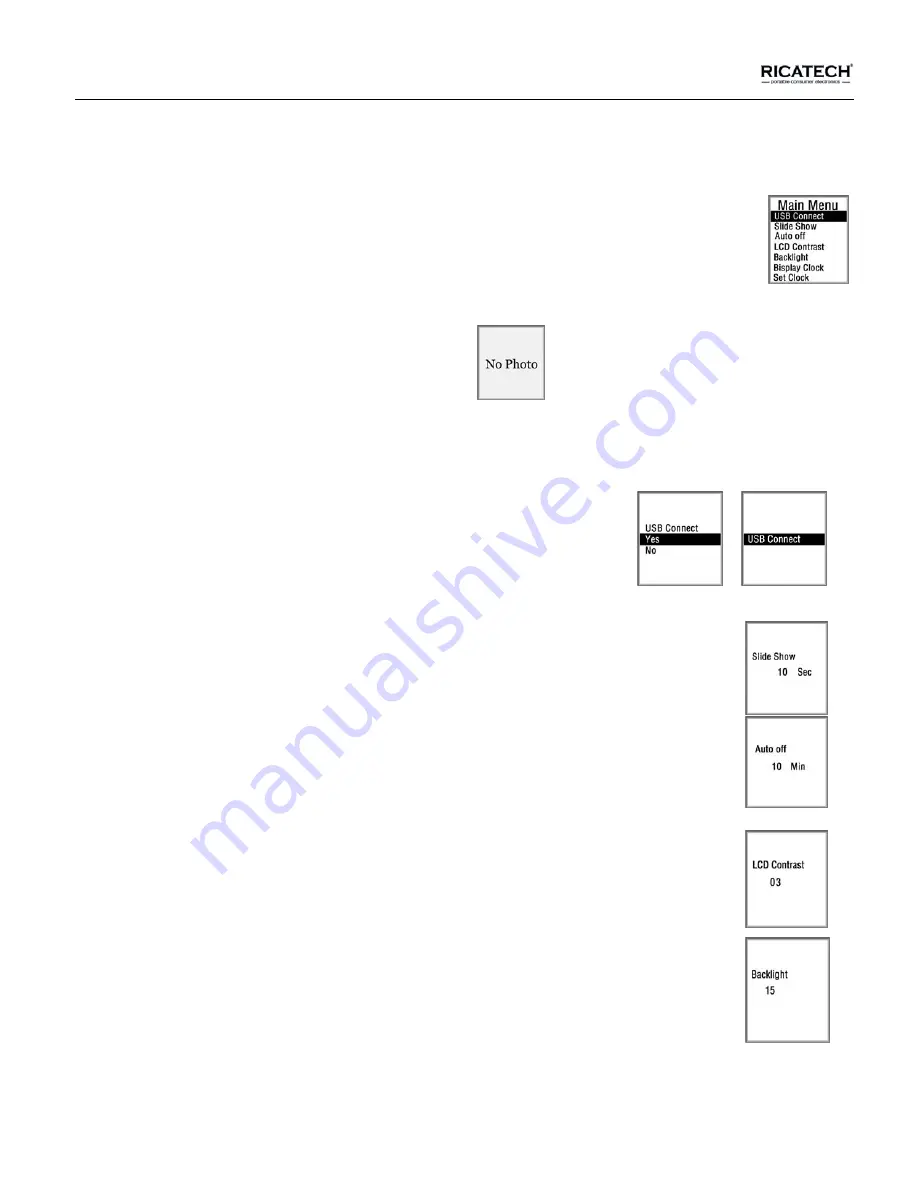
 A. Press “Menu” button to access the Menu: 

-Use “Up/Down” buttons to navigate then press “Menu” to access the selected item. 


-The menu including

USB connect, Slide Show

Auto off, LCD Contrast LCD Backlight Display Clock, Set Clock 

Delete, Delete All and Exit. 


- If there are no pictures in the unit, the screen will display: 

-Power off: Hold the “Menu” button for 2 seconds. The unit will power off.   


B. Connecting to your computer: 

    -Connect the unit with your computer. Select “USB connect” and press “Menu” button to enter the sub-menu.   

-Select “Yes” to connect it with computer.


-Select “No” to exit the connection menu. 

(Without connecting the unit, it can be used while powered trough the USB port 

of your computer.    The battery will be charged) 


C. Slide Show 


-Select “Slide Show” and press “ Menu ” to enter.


- Adjust the setting by using the “Up/Down” buttons (the range is 00-15

0 is for manual slide). 

-Press “Menu“ to confirm and exit the slide show menu. 


D. Auto Power On/Off: 

-Select “Auto off” and press “Menu” to enter. 

- Adjust the setting by using “Up/Down” buttons (range is 00-30

0 is for don’t auto power off). 


E. Contrast Adjustment:


-Select “Contrast adjusting” and press “Menu” to enter. 

-Adjust the setting by using “Up/Down” buttons.


F. 

Backlight

 Adjustment:   

-Select “Backlight” and press “Menu” to enter. 

-Adjust the setting by using “Up/Down” buttons. 


Содержание RPF15

Страница 1: ...Page 1 of 11 Ricatech RPF15 FULL COLOR DIGITAL PHOTOFRAME User Manual English User manual v1 0...

Страница 2: ...tulations with the purchase of the new Ricatech RPF 15 digital photoframe Please while reading this manual connect the photoframe to a free USB port on your computer to start the charging process 8hou...

Страница 3: ...gue SAFETY AND MAINTENANCE Page 2 BUTTONS Page 4 FUNCTIONS Page 4 MENU INTRODUCTION Page 5 PICTURE CONVERSION Page 7 TECHNICAL SPECIFICATIONS Page 9 ACCESSORIES Page 9 WARRANTY INFORMATION Page 9 CONT...

Страница 4: ...before using it for the first time This drastically increases battery life When the battery is empty the screen will display Low Power please charge the battery Battery is not needed if connected to t...

Страница 5: ...onnect it with computer Select No to exit the connection menu Without connecting the unit it can be used while powered trough the USB port of your computer The battery will be charged C Slide Show Sel...

Страница 6: ...Press Menu button and use Up Down buttons to adjust the date and time G Delete a picture Select Delete One and press Menu to enter Select a picture by using Up Down buttons Select Yes and press Menu t...

Страница 7: ...frame automatically Because of the fully automated installation some virus scanners may detect a system intrusion Click Allow or manually allow this installation in your anti virus software Connect th...

Страница 8: ...econnect Zoom in out the picture for select the picture Rotates the picture counter clockwise Left Right Cut the picture to correct size Whole picture convert Select all pictures in the unit Delete th...

Страница 9: ...ny other service center then ours Firmware upgrade Water and moisture damage Drop and bump damage Usage with non Ricatech approved accessories Short circuit or over voltage by host computer PC Physica...

Отзывы: