2
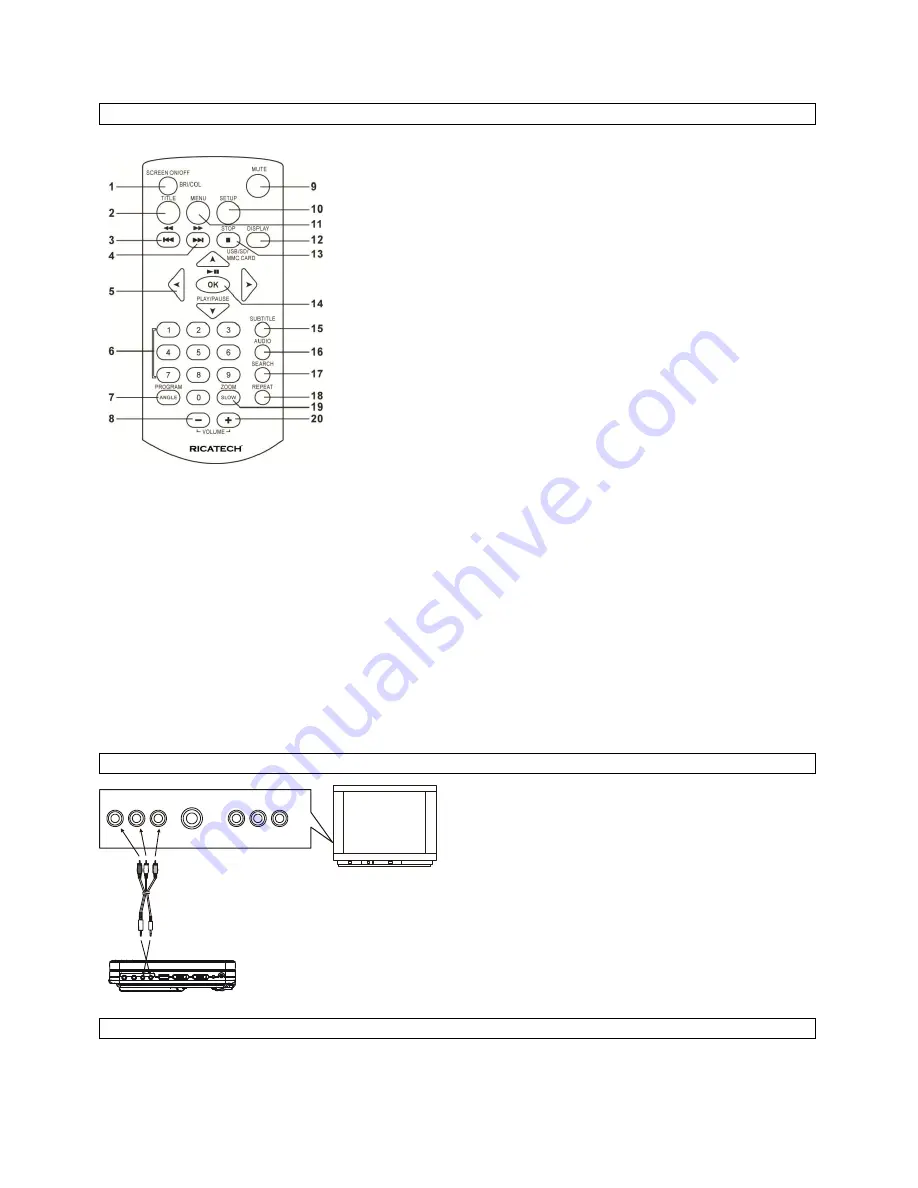
REMOTE CONTROL UNIT
1. SCREEN ON/OFF & BRI/COL ADJUST BUTTON
2. TITLE BUTTON
3. PREV & FAST BACKWARD BUTTON
4. NEXT & FAST FORWARD BUTTON
5. NAVIGATION BUTTONS
6. NUMERIC BUTTONS
7. PROGRAM/ANGLE BUTTON
8. VOLUME - BUTTON
9. MUTE BUTTON
10. SETUP BUTTON
11. MENU BUTTON
12. DISPLAY BUTTON
13. STOP &USB/SD/MMC CARD BUTTON
14. OK/ENTER(PLAY/PAUSE) BUTTON
15. SUBTITLE BUTTON
16. AUDIO BUTTON
17. SEARCH BUTTON
18. REPEAT BUTTON
19. ZOOM/SLOW BUTTON
20. BUTTON
BASIC CONNECTION
It is recommended to connect a multi-system TV.
Ensure that this player and other equipment to be connected are set to the standby mode or off and disconnect the AC power
cords before commencing connection.
Do not block ventilation holes of any of the equipment and arrange them so that air can circulate freely.
Read through the instructions before connecting other equipment.
Observe the color coding when connecting audio and video cables, for instance connect yellow plug to the yellow jack, the red
plug to the red jack and so on. If the A/V connected cable is only supplied, please link one end of the A/V connected cable with
A/V cable according to the color coding, and connect the other end of the A/V connected cable to the unit, finally connect the
AV cable with TV set.
Note:
During DVD play, the TV volume may be at a lower level than during TV broadcasts, etc. If this is the case, adjust the volume
to the desired level.
If the DVD/CD player is connected to the TV through a video cassette recorder, the picture may not be played back normally
with some DVDs. If this is the case, do not connect the player via the VCR.
Connecting to a stereo TV set
A U D I O R
A U D I O L
V I D E O I N
S - V I D E O
Y U V I N P U T
A V A U D I O / V I D E O I N P U T
Connecting to an affiliated screen
This unit is equipped with another affiliated screen, you can use the affiliated screen and player to appreciate the programme at
the same time, the connecting method is illustrated as below using the in car adaptor.
A/V cable
TV SET


