background image

If the pump is not in good condition, do not use it. Have it repaired by an authorized centre. 
4. If an extension is used, ensure that it is officially approved. Keep it well away from sharp edges, 
heat sources and combustibles. 
5. The plug-in connector for the extension should be of the 2 pole + earth type of 10-16A/250V, in 
accordance with CEE standards. The wire section in the cable should be equal to or greater than 1mm

2

The cable should not be lighter than cables of H05 RN-F type. 
6. When disconnecting the power cable from the socket, always grip the plug itself and not the cable. 
7. If the pump is used for emptying a pond, it should not be used when there are people in the pond. 
8. When the pump is immersed, handling should not be carried out using the power cable, but using a 
device (for ex. a rope) connected to the carrying handle. 
9. Do not use power cable or float switch cable for carrying or hanging up the pump. 


IV. GETTING STARTED 


Before any intervention on product, ensure that product is disconnected form its 
power source. 


4.1- Unpacking 

Remove product from its packaging. 
Check that product and accessories are not damage  
 

4.2- Connecting the evacuation hose 

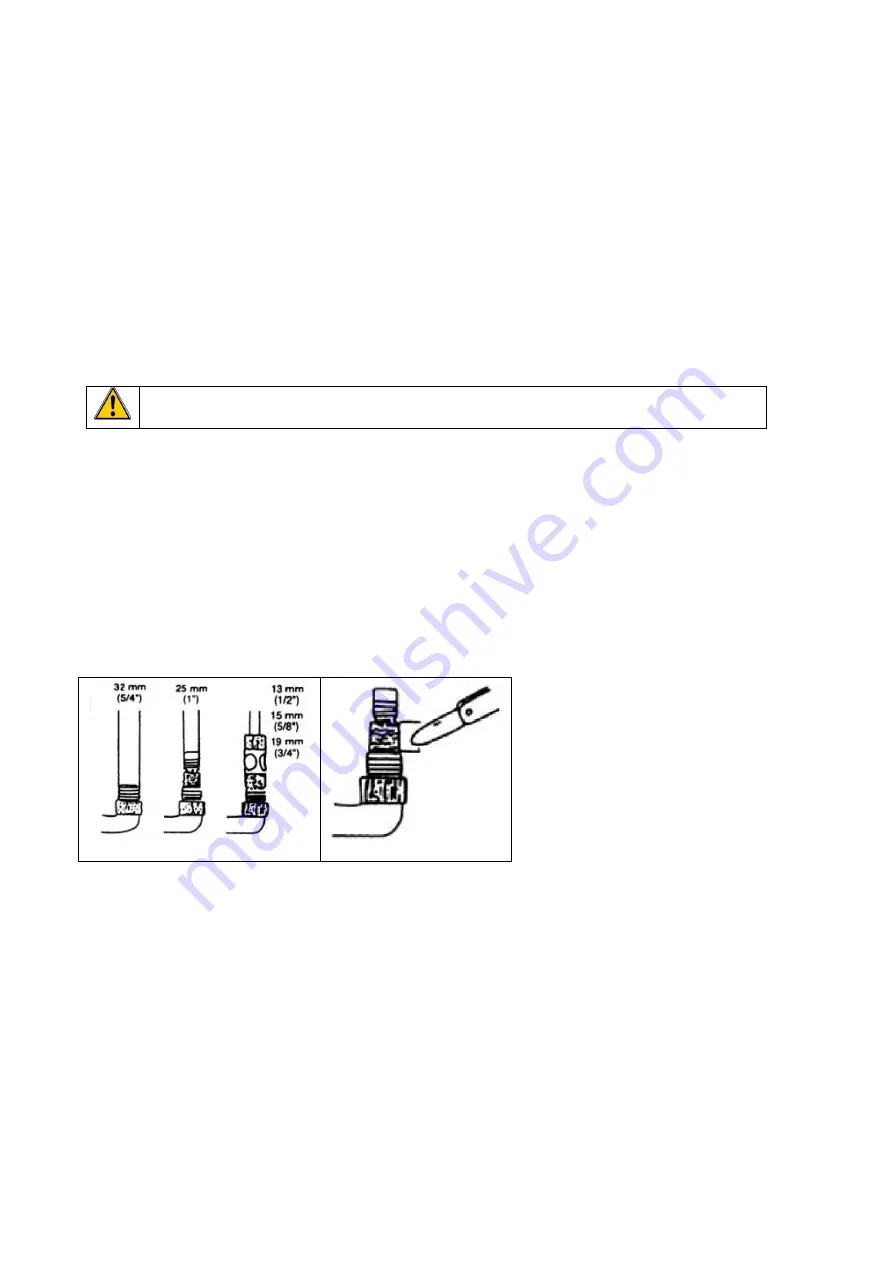
1. Screw the universal fitting (connector) (7) provided onto the pump outlet elbow (Fig.1). 
2. Wedge the discharge hose on to the connection section corresponding to the internal diameter of 
the hose (Fig.3). 
3. Add a fixing collar (hose clamp not supplied) to complete the seal. 
N.B.: For large diameter hoses and to obtain the optimum discharge output, it will be necessary to cut 
the end of the universal fitting (7) so as to only keep the section suitable for the hose used. 


Fig. 3 


Fig. 4 


4.3- Adjusting the floating switch 

1. The float switch (5) enables the automatic start of the pump.  
When the water rises to reach approximately 53cm, the pump starts up.  
When water level has lowered to approximately 10cm, the pump will stop automatically.  
2. By shortening the length of the cable between the pump and the float, it is possible to modify the 
water heights that trigger starting and stopping of the pump. 
3. To adjust the cut-in/cut-out height, fix the float switch cable to the float switch lock (3) provided 
for this purpose, located at the top of the pump.  
4. Adjust the cable to the required length 
 

4.4- Start-up 

Note: Before use, clear the outlet line 
 

 Observe and respect minimum water level and max delivery height 

1. The pump must be in a vertical position: ensure that it is stable during operation. 

Содержание 511686

Страница 1: ...MPA SOMMERGIBILE Manuale di istruzioni e di manutenzione DE TAUCHPUMPE Bedienungs und Wartungsanleitung ES BOMBA SUMERGIBLE Manual De Instrucciones Y Mantenimiento R f Atr Nr PRPVC750CC 510856 Import...

Страница 2: ...er la causa de lesiones y o da os Guarde este manual para futuras consultas Attention Ces pompes ne sont pas destin es aux piscines Dans aucun cas elles ne doivent tre utilis es pour le nettoyage ou 1...

Страница 3: ...g env 5 2 kg Temp rature maxi du liquide 35 C Symboles Signale un risque de blessures graves et ou dommages et ou de d t rioration du produit en cas de non respect des consignes Lire le mode d emploi...

Страница 4: ...st recommand de ranger le produit dans des locaux secs de le placer hors de port e des enfants soit en hauteur soit sous clef 6 Ne pas forcer sur le produit Le produit travaillera mieux et sera plus s...

Страница 5: ...r gles de s curit appropri es Il convient que les r parations soient effectu es uniquement par du personnel qualifi en utilisant des pi ces d tach es d origine autrement il peut en r sulter un danger...

Страница 6: ...e d alimentation du socle de prise de courant le saisir toujours par la fiche 7 Si la pompe est utilis e pour vider un bassin celle ci ne doit pas tre utilis e lorsque des personnes sont dans le bassi...

Страница 7: ...urer qu elle est stable pendant le fonctionnement 2 S assurer que le flotteur peut se mouvoir librement 3 Les trous d aspirations ne devront jamais tre obstru s Il est donc pr f rable que la pompe ne...

Страница 8: ...ompe n est pas pr vue pour une utilisation en continue Temps d utilisation recommand 10mn La pompe submersible doit obligatoirement tre immerg e avant la mise en route Installer la pompe dans l eau pu...

Страница 9: ...s d tergents ni d ponge abrasive ni d objets tranchants ou pointus 6 2 D pannage Ne jamais chercher d monter la pompe Si n cessaire la faire contr ler et d panner par un centre agr consulter le revend...

Страница 10: ...30mm Weight kg approx 5 2 kg Liquid temperature max 35 C Symbols Caution Risk of injury and or damage and or deterioration of product in case of non compliance to safety requirements Read the instruct...

Страница 11: ...will do the job better and safer at the rate speed for which it is intended Do not use the product for purposes other than those for which it is intended The product will do a better and safer job if...

Страница 12: ...ions and situations that may arise The operator and or user must use common sense and caution when operating the product especially for any matters that are not referred in the above 3 2 Special warni...

Страница 13: ...damage 4 2 Connecting the evacuation hose 1 Screw the universal fitting connector 7 provided onto the pump outlet elbow Fig 1 2 Wedge the discharge hose on to the connection section corresponding to...

Страница 14: ...ey should be used only for drying out flooded premises or for pumping water out of wells or cellars 2 This pump is designed to suck up clear and dirty water with particles in suspension that are less...

Страница 15: ...to automatically bleed the circuit this is not a fault but corresponds to a normal function of the pump 4 After having pumped dirty water water containing sand or other abrasive material the pump shou...

Страница 16: ...i scarico 30mm Peso 5 2 kg Temperatura max del liquido 35 C Simboli Attenzione Rischio di lesioni e o danni e o deterioramento dell attrezzo in caso di non conformit ai requisiti di sicurezza Leggere...

Страница 17: ...ensile Il lavoro sar migliore e pi sicuro se si rispetta la gamma di applicazione specificata 7 Utilizzare l utensile corretto Non usare utensili o accessori troppo deboli per lavori pesanti 8 Indossa...

Страница 18: ...solo accessori e dispositivi aggiuntivi specificati nelle istruzioni sul funzionamento o consigliati dal produttore dell utensile 21 Osservazioni Le consegne di sicurezza e le istruzioni indicate nel...

Страница 19: ...asportare o sospendere la pompa con il cavo d alimentazione o il cavo del galleggiante Utilizzare l impugnatura di trasporto prevista a questo scopo IV PER INIZIARE 4 1 Disimballagio Rimuovere il prod...

Страница 20: ...n sospensione di dimensione inferiore a 30 mm Fig 5a Fig 5b V FUNZIONAMENTO 5 1 Uso destinato 1 Le pompe idrovore per cantine sono pompe sommergibili destinate ad uso domestico Devono essere utilizzat...

Страница 21: ...del forro di evacuazione situato sulla parte superiore del corpo della pompa l acqua viene evacuata in modo di ripulire automaticamente il circuilo Quest operazione non un difetto e corrisponde ad un...

Страница 22: ...asser 5mm Versschmutztes wasser 30mm Gewicht 5 2 kg Max Einsetztemperatur 35 C Symbole Achtung Bei Nichtbeachtung der Sicherheitsanforderungen besteht die Gefahr von Verletzungen und oder Ger tesch de...

Страница 23: ...n 6 Ger t nicht berstrapazieren Das Ger t funktioniert am besten und sichersten mit der Geschwindigkeit f r die es vorgesehen ist Ger t nicht f r Arbeiten benutzen f r die es nicht vorgesehen ist Das...

Страница 24: ...der ersetzt werden Das Ger t entspricht den geltenden Sicherheitsvorschriften Reparaturen sollten nur von einem qualifizierten Fachmann unter Verwendung von Original Ersatzteilen durchgef hrt werden u...

Страница 25: ...Das Kabel immer am Stecker fassen urn diesen aus der Steckdose zu ziehen 7 Soilte die Pumpe zum Leeren eines Beckens verwendet werden darf sie nicht eingesetzt werden wenn sich Personen im Becken bef...

Страница 26: ...Pumpe unter der Bodengleichc angebracht werden 4 5 Klares wasser Versschmutztes wasser Betrieb 4 5 1 Klares wasser Fig 5a Klappen Sie die F e 10 um die Pumpe in klarem Wasser Modus verwenden wodurch...

Страница 27: ...ulugen solange die Pumpe noch am Netz angeschlossen ist 2 Die Pumpe ist mit einem Motor ausgestattet der durch einen Uberhitzungssehutz mit automatischem Wiedereinsehallen geschutzt ist Bei Uberhitzun...

Страница 28: ...ander zu nehmen Gegebenenfalls durcli einen zugelassenen Betrieb uberprufen und reparieren lassen den Handler fragen 6 3 Lagerung Das Ger t muss an einem trockenen Ort gelagert werden Das Ger t stets...

Страница 29: ...as Eaux claires 5mm Eaux charg es 30mm Peso Kg 5 2 kg Temperatura m x del liquido 35 C S mbolos Precauci n Riesgo de lesiones y o de da os y o deterioro en la m quina si no se cumplen los requisitos d...

Страница 30: ...gar seco alto y cerrado fuera del alcance de los ni os 6 No fuerce el producto Su rendimiento ser mejor y m s seguro si se utiliza a la velocidad de r gimen para la que est indicada No utilice el prod...

Страница 31: ...ucciones de seguridad que se indican en este manual no contemplan a fondo todas las condiciones y situaciones que puedan surgir El operario y o el usuario deben utilizar su sentido com n y actuar con...

Страница 32: ...tal efecto IV PROCEDIMIENTOS INICIALES Antes de manipular el producto aseg rese de que est desconectado del suministro el ctrico 4 1 Desembalaje Saque el producto de su embalaje Compruebe que el prod...

Страница 33: ...AMIENTO 5 1 Uso previsto 1 Las bombas de vac o cave son bombas sumergidas destinadas a un uso domestico Deben emplearse nicamente para achicar locales inundados o bombear el agua de pozos o s tanos 2...

Страница 34: ...l agua desciende por debajo del agujero de aireaci n situado en el cuerpo de la bomba el agua se evacua por este agujero de forma que purgue el circuito autom ticamente esto no es una aver a sino que...

Отзывы: