background image

55

D -  

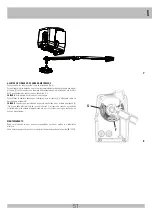
PROGRAMACIÓN DE LOS TIEMPOS PARA 1 MOTOR (#) CON 
FUNCIONAMIENTO POR TIEMPO (DIP 7 OFF)

ATENCIÓN: PARA GESTIONAR UN SOLO MOTOR, EL DIP 13 DEBE ESTAR COLOCADO 
EN POSICIÓN ON.

1 -  La cancela debe estar completamente cerrada.
2 -  Coloque el microinterruptor DIP 2 en posición ON => El led DL1 emitirá parpadeos 

breves.

3 -  Presione el pulsador PROG. => M1 se abre.
4 -  Una vez alcanzado el seguro mecánico de apertura, después de un segundo, presione el 

pulsador PROG. => M1 se detiene.

5 -  Presione el pulsador PROG. => M1 se cierra.
   En el mismo momento el led DL1 dejará de parpadear, indicando la salida del 

procedimiento de memorización.

   Desde este momento, las seguridades o los otros mandos de la cancela funcionarán 

normalmente (inversiones, stop, alarmas, etc.).

6 -  Una vez que el cómputo del tiempo finaliza, la cancela se detiene.
7 -  

AL FINALIZAR LA PROGRAMACIÓN VUELVA A COLOCAR EL DIP 2 EN POSICIÓN 
OFF.

D -  

PROGRAMACIÓN DE LOS TIEMPOS DE APERTURA PEATONAL (#) 
TANTO PARA EL FUNCIONAMIENTO POR TIEMPO COMO PARA EL 
FUNCIONAMIENTO CON SENSOR DE CORRIENTE

Con la cancela cerrada:
1 -  Coloque primero el DIP2 en posición ON (el led DL1 parpadea rápidamente) y después el 

DIP1 en posición ON (el led DL1 parpadea lentamente).

2 -  Presione el pulsador peatonal (COM-PED.BUTT) => M1 se abre.
3 -  Presione el pulsador peatonal para detener la carrera (definiendo así la apertura de M1)
4 -  Presione el pulsador peatonal para poner en marcha el cierre.
5 -  Al alcanzar el cierre, vuelva a colocar los DIP 1 y 2 en posición OFF.

(#)  

DURANTE LA PROGRAMACIÓN LAS SEGURIDADES ESTÁN ACTIVAS Y SU 
INTERVENCIÓN DETIENE LA PROGRAMACIÓN (EL LED DL1 DE INTERMITENTE 
CAMBIA A ENCENDIDO FIJO). 


PARA REPETIR LA PROGRAMACIÓN COLOQUE LOS DIP1 Y 2 EN POSICIÓN OFF, 
CIERRE LA CANCELA MEDIANTE EL PROCEDIMIENTO DE “CONTROL DEL SENTIDO 
DE ROTACIÓN DE LOS MOTORES” Y REPITA LA PROGRAMACIÓN ELEGIDA.

E -  PROGRAMACIÓN DE LOS CÓDIGOS DE RADIO APERTURA TOTAL 

(MÁX. 62 CÓDIGOS - SOLO MODELOS CRX)

La programación puede llevarse a cabo únicamente con la cancela detenida.
1 -  Coloque el DIP 1 en posición ON y, sucesivamente, el DIP2 en ON
2 -  El led rojo DL1 de programación parpadea con una frecuencia de 1 seg. ON y 1 seg. 

OFF durante 10 segundos.

3 -  Presione la tecla del mando a distancia (normalmente el canal A) dentro de los 10 

segundos programados. Si el mando a distancia se memoriza correctamente, el led DL10 
(verde) emite un parpadeo.

4 -  El tiempo de programación de los códigos se renueva automáticamente para poder 

memorizar el mando a distancia sucesivo.

5 -  Para terminar la programación deje transcurrir 10 segundos o presione por un instante 

el pulsador PROG. El led rojo DL1 de programación deja de parpadear

6 -  Vuelva a colocar el DIP 1 en posición OFF y el DIP2 en OFF
7 -  Final del procedimiento.

PROCEDIMIENTO CANCELACIÓN DE TODOS LOS CÓDIGOS DE RADIO DEDICADOS A 
LA APERTURA TOTAL

La cancelación puede llevarse a cabo únicamente con la cancela detenida.
1 -  Coloque el DIP 1 en posición ON y, sucesivamente, el DIP2 en ON
2 -  El led rojo DL1 de programación parpadea con una frecuencia de 1 seg. ON y 1 seg. 

OFF durante 10 segundos.

3 -  Presione y mantenga presionado el pulsador PROG durante 5 segundos. La cancelación 

de la memoria se señala mediante dos intermitencias del led verde DL10

4 -  El led rojo DL1 de programación permanece activo y es posible introducir nuevos códigos 

siguiendo los procedimientos arriba descritos.

5 -  Vuelva a colocar el DIP 1 en posición OFF y el DIP2 en OFF
6 -  Final del procedimiento.

SEÑALIZACIÓN DE MEMORIA SATURADA POR LOS CÓDIGOS DE RADIO DEDICADOS 
A LA APERTURA TOTAL

La señalización se puede obtener únicamente con la cancela detenida.
1 -  Coloque el DIP 1 en posición ON y, sucesivamente, el DIP2 en ON

2 -  El led verde DL10 parpadea 6 veces indicando la condición de memoria saturada (62 

códigos presentes)

3 -  Sucesivamente, el led DL1 de programación permanece activo por 10 segundos, 

permitiendo una posible cancelación de todos los códigos.

4 -  Vuelva a colocar el DIP 1 en posición OFF y el DIP2 en OFF
5 -  Final del procedimiento.

F -  PROGRAMACIÓN DE LOS CÓDIGOS DE RADIO DE APERTURA PEATONAL 

(MÁX. 62 CÓDIGOS - SOLO MODELOS CRX)

La programación puede llevarse a cabo únicamente con la cancela detenida.
1 -  Coloque el DIP1 en posición ON y, sucesivamente, el DIP3 en ON
2 -  El led rojo DL1 de programación parpadea con una frecuencia de 1 seg. ON y 1 seg. 

OFF durante 10 segundos.

3 -  Presione la tecla del mando a distancia (normalmente el canal B) dentro de los 10 

segundos programados. Si el mando a distancia se memoriza correctamente, el led DL10 
(verde) emite un parpadeo.

4 -  El tiempo de programación de los códigos se renueva automáticamente para poder 

memorizar el mando a distancia sucesivo.

5 -  Para terminar la programación deje transcurrir 10 segundos o presione por un instante 

el pulsador PROG. El led rojo DL1 de programación deja de parpadear

6 -  Vuelva a colocar el DIP 1 en posición OFF y el DIP3 en OFF
  

NOTA: SI EL LED DL1 CONTINÚA PARPADEANDO RÁPIDAMENTE, SIGNIFICA QUE 
EL DIP1 AÚN ESTÁ COLOCADO EN POSICIÓN ON Y CUALQUIER MANIOBRA SERÁ 
DENEGADA.

7 -  Final del procedimiento.

PROCEDIMIENTO DE CANCELACIÓN DE TODOS LOS CÓDIGOS DE RADIO DEDICADOS 
A LA APERTURA PEATONAL

La cancelación puede llevarse a cabo únicamente con la cancela detenida.
1 -  Colocar el DIP 1 en posición ON y, sucesivamente, el DIP3 en ON
2 -  El led rojo DL1 de programación parpadea con una frecuencia de 1 seg. ON y 1 seg. 

OFF durante 10 segundos.

3 -  Presione y mantenga presionado el pulsador PROG durante 5 segundos. La cancelación 

de la memoria se señala mediante dos intermitencias del led verde DL10

4 -  El led rojo DL1 de programación permanece activo y es posible introducir nuevos códigos 

siguiendo los procedimientos arriba descritos.

5 -  Vuelva a colocar el DIP 1 en posición OFF y el DIP3 en OFF
6 -  Final del procedimiento.

SEÑALIZACIÓN DE MEMORIA SATURADA CÓDIGOS DE RADIO DEDICADOS A LA 
APERTURA PEATONAL

La señalización se puede obtener únicamente con la cancela detenida.
1 -  Coloque el DIP 1 en posición ON y, sucesivamente, el DIP3 en ON
2 -  El led verde DL10 parpadea 6 veces indicando la condición de memoria saturada (62 

códigos presentes)

3 -  Sucesivamente, el led DL1 de programación permanece activo por 10 segundos, 

permitiendo una posible cancelación de todos los códigos.

4 -  Vuelva a colocar el DIP 1 en posición OFF y el DIP3 en OFF
5 -  Final del procedimiento.

FUNCIONAMIENTO ACCESORIOS DE MANDO

ADVERTENCIA: CONECTE ACCESORIOS DE COMANDO SOLO SI IMPULSIVO
Asegúrese de que cualquier otro accesorios de comando que se instalan (por 
ejemplo, sensores magnéticos) están programados en el modo de IMPULSO, 
de lo contrario pueden activar el movimiento de la puerta sin tener activos los 
elementos de seguridad.

PULSADOR DE MANDO PASO-PASO (COM-K BUTTON)
DIP 6 OFF => 

 Ejecute un mando cíclico de órdenes abre-stop-cierra-stop-abre etc.

DIP 6 ON =>

   Ejecute la apertura con cancela cerrada. Si se acciona durante el movimento 

de apertura, no tiene efecto. Si se acciona con la cancela abierta, la cierra 
y, si se acciona durante el cierre, la vuelve a abrir.

PULSADOR DE APERTURA (COM-OPEN)

Con la cancela detenida, el pulsador ordena el mando de apertura. Si se lo acciona durante 
el cierre, vuelve a abrir la cancela.

FUNCIÓN RELOJ DEL PULSADOR DE APERTURA

E

S

Содержание AC02033

Страница 1: ... Operateur Operator Torantrieb Operador Alimentazione Alimentation Power Supply Stromspannung Alimentacion Peso max cancello Poids maxi portail Max gate weight Max Torgewicht Peso máx verja Coppia max Couple maxi Max torque Max Drehmoment Coppia max Codice Code Code Kode Codigo KIT PREMIER 24V 230V 50 60Hz 300 kg 660 lbs 150 Nm AD18010B ...

Страница 2: ...osservanza nell installazione delle norme di sicurezza e delle leggi attualmente in vigore ATTENTION POUR LA SECURITE DES PERSONNES IL EST IMPORTANT DE SUIVRE TOUTES LES INSTRUCTIONS CONSERVER SOIGNEUSEMENT CES INSTRUCTIONS 1 Si ce n est pas prévu dans la centrale installer en amont de celle ci un interrupteur de type magnétothermique omnipolaire avec ouverture minimum des contacts de 3 mm qui por...

Страница 3: ...the non observance during the installation of the safety standards and of the laws in force at present ACHTUNG FÜR DIE SICHERHEIT DER PERSONEN IST ES WICHTIG DASS ALLE ANWEISUNGEN GENAU AUSGEFÜHRT WERDEN INSTALLATIONSVORSCHRIFTEN BEACHTET WERDEN 1 Wenn nicht bereits an der elektrischen Schaltzentrale vorgesehen muss vor der Schaltzentrale ein thermomagnetischer Schalter installiert werden omnipola...

Страница 4: ...cquisto di una nuova apparecchiatura di tipo equivalente Presso i distributori di prodotti elettronici con superficie di vendita di almeno 400 m2 è inoltre possibile consegnare gratuitamente senza obbligo di acquisto i prodotti elettronici da smaltire con dimensioni inferiori a 25 cm L adeguata raccolta differenziata per l avvio successivo dell apparecchiatura dismessa al riciclaggio al trattament...

Страница 5: ...ora per qualche secondo fino a quando non interviene il timer di funzionamento della centralina di comando o il sensore di corrente Misure in mm inch 1 5 5 4 4 3 2 7 1 6 LAYOUT IMPIANTO I CARATTERISTICHE TECNICHE PREMIER 24V Lunghezza max anta m 3 Peso max cancello kg 300 Tempo medio di apertura s 17 Coppia max di spinta Nm 150 Alimentazione e frequenza 230V 50Hz Potenza motore W 72 Assorbimento A...

Страница 6: ... che sull anta siano presenti maniglie idonee tali maniglie siano posizionate in modo da non creare punti di pericolo durante il loro utilizzo lo sforzo manuale per muovere l anta non superi i 225 N per i cancelli posti su siti privati ed i 390 N per i cancelli posti su siti commerciali ed industriali valori indicati nel punto 5 4 5 della norma EN 12453 N B In caso di cancelli a due ante per un ef...

Страница 7: ...figura 5 Attenzione avvitare a fondo le viti V ed W dopodichè per entrambe eseguire mezzo giro in senso inverso per garantire il corretto movimento della leva Una volta assemblata la leva sbloccare l operatore e fissarla al motore con la vite M8 e la rondella in dotazione Il Bloccaggio anti intrusione E impedisce alla leva di muoversi a cancello chiuso e a motore fermo 5 E V W DRL8x17I DRG6I DRL10...

Страница 8: ...ta è sufficiente spostare il fermo G e bloccarlo come descritto per il fermo F ATTENZIONE La leva di traino del cancello è dotata di un sistema di blocco E Fig 5 che deve intervenire solo in caso di intrusione Se non viene correttamente regolato il fermo di chiusura questo sistema interviene ogni volta che il cancello chiude e ciò ne comporta il danneggiamento in breve tempo MANUTENZIONE Da effett...

Страница 9: ... AC02034 ANTENNA CALZA ANTENNA CHIUDE APRE STOP FUSE T 2 A FOTOCELLULE PASSO PASSO COMUNE COMUNE 24Vdc 0 8A 15 per ACCESSORI 24Vdc 0 8A 15 per AUTOTEST COSTE LAMPEGGIATORE 24Vdc 20W LED R 2 2K 1 4W SERRATURA ELETTRICA PEDONALE COSTE ALIMENTAZIONE 230Vac 50Hz TRASFORMATORE M1 M2 ...

Страница 10: ...6 TR3 J10 J8 J9 J1 J7 S3 TRANSFORMER J1 N F Alimentazione 230 Vac 50 60 Hz esterna alla scheda 120V 60Hz a richiesta J2 COM Comune dei contatti CLOSE Contatto impulso di chiusura NA OPEN Contatto impulso di apertura NA STOP Contatto impulso di stop NC AERIAL Antenna radio J3 SIGNAL Spia cancello aperto e segnalazione stato di funzionamento con batteria e batteria scarica 24Vdc 3W max A TEST Positi...

Страница 11: ... su ON Il led DL1 emetterà dei lampeggi brevi 3 Premete il pulsante PROG M1 apre 4 Raggiunto il fermo meccanico di apertura il SENSORE DI CORRENTE AUTOMATICO ferma M1 con memorizzazione del tempo e della corrente Nello stesso momento si attiva M2 che apre 5 Raggiunto il fermo meccanico di apertura il SENSORE DI CORRENTE AUTOMATICO ferma M2 con memorizzazione del tempo e della corrente 6 Premete il...

Страница 12: ...ntro i 10 secondi impostati Se il telecomando viene correttamente memorizzato il led DL10 verde emette un lampeggio 4 Il tempo di programmazione dei codici si rinnova automaticamente per poter memorizzare il telecomando successivo 5 Per terminare la programmazione lasciare trascorrere 10 sec oppure premere per un attimo il pulsante PROG Il led rosso DL1 di programmazione smette di lampeggiare 6 Ri...

Страница 13: ...re la funzionalità delle fotocellule almeno ogni 6 mesi EDGE COSTA COM EDGE Durante l apertura se impegnata inverte il moto in chiusura Durante la chiusura se impegnata inverte il moto in apertura Se rimane impegnata dopo il primo impegno esegue un ulteriore inversione dopo 2 secondi per poi eseguire un ulteriore piccola inversione e quindi segnalare l allarme di costa guasta o impegnata contatto ...

Страница 14: ... 300ms Tempo diseccitazione 300ms Tutti gli ingressi devono essere utilizzati come contatti puliti perchè l alimentazione è generata internamente tensione sicura alla scheda ed è disposta in modo da garantire il rispetto di isolamento doppio o rinforzato rispetto alle parti a tensione pericolosa Eventuali circuiti esterni collegati alle uscite del quadro elettronico devono essere eseguiti per gara...

Страница 15: ...CG8022 In alluminio pressofuso IP54 cod ACJ9078 CAVO PER SBLOCCO Cavo per sblocco dall esterno da collegare alla cassaforte cod ACG8022 SERRATURA ELETTRICA Serratura Orizzontale destra vista esterna 12Vac cod ACG8660 Serratura Orizzontale sinistra vista esterna 12Vac cod ACG8670 Serratura Verticale 12Vac cod ACG8650 BATTERIA Batteria 2 2Ah 12V cod ACG9515 SCHEDA DI CARICA BATTERIA cod ACG4661 I OP...

Страница 16: ...fonctionne encore pendant quelques secondes jusqu à ce qu intervienne le timer de fonctionnement de la centrale de commande ou le détecteur de courant Mesures en mm inch 1 5 5 4 4 3 2 7 1 6 CARACTERISTIQUES TECHNIQUES PREMIER 24V Longueur maxi du battant m 3 Poids maxi du portail kg 300 Temps moyen d ouverture s 17 Couple max de poussée Nm 150 Alimentation et frequence 230V 50Hz Puissance moteur W...

Страница 17: ...de pouvoir manœuvre manuellement le vantail il est important de vérifier que Il soit fourni des poignées adaptées sur le vantail Ces poignées doivent être positionnées de sorte à ne pas créer un danger durant leur utilisation L effort manuel pour mettre en mouvement le vantail ne doit pas excéder 225 N pour les portes et portails en usage privé et 390 N pour les portes et portails à usage industri...

Страница 18: ... Attention Visser les vis V et W à fond exécuter ensuite pour toutes les deux un demi tour dans les sens contraire pour garantir le mouvement correct du levier Une fois le levier assemblé débloquer l opérateur et fixer le levier au moteur avec la vis M8 et la rondelle fournies Le Blocage anti intrusion E empêche au levier de se déplacer quand le portail est fermé et quand le moteur est arrêté 5 I ...

Страница 19: ...l ouverture désirée il suffit de déplacer la butée G et de la bloquer comme décrit pour la butée F ATTENTION Le levier d entraînement du portail est doté d un système de blocage E Fig 5 qui doit intervenir seulement en cas d intrusion Si la butée de fermeture n est pas correctement réglée ce système intervient à chaque fois que le portail se ferme et ceci en provoque l endommagement dans un délai ...

Страница 20: ...MMUN COMMUN 24Vdc 0 8A 15 pour ACCESSOIRES 24Vdc 0 8A 15 AUTOTEST pour BARRE PALPEUSE FEU CLIGNOTANT 24Vdc 20W LED R 2 2K 1 4W SERRURE ÉLECTRIQUE PIETON BARRE PALPEUSE ALIMENTATION 230Vac 50Hz TRANSFORMATEUR M1 M2 BRANCHEMENTS ÉLECTRIQUES T2 PREMIER 24V code AC02033 T2 PREMIER 24V CRX code AC02034 ...

Страница 21: ...NCHEMENTS J3 TR2 TR1 J2 J4 F1 FUSE 1 J5 J6 TR3 J10 J8 J9 J1 J7 S3 TRANSFORMER J1 N F Alimentation 230Vac 50 60Hz externe à la fiche 120V 60Hz sur demande J2 COM Commun des contacts CLOSE Contatto impulso de fermeture NA OPEN Contatto impulso d ouverture NA STOP Contact impulsion de stop NC AERIAL Antenne radio J3 SIGNAL Voyant portail ouvert et signalisation état de fonctionnement avec batterie et...

Страница 22: ... TEMPS POUR 2 MOTEURS AVEC DETECTEUR DE COURANT ACTIVE DIP 7 ON PENDANT LA PROGRAMMATION LE DETECTEUR DE COURANT EST TOUJOURS ACTIF 1 Le portail doit être totalement fermé 2 Mettez le DIP 2 sur ON la DEL DL1 émettra des clignotements brefs 3 Appuyez le pressoir PROG la porte M1 s ouvre 4 Une fois l arrêtoir mécanique d ouverture rejoint le DETECTEUR DE COURANT AUTOMATIQUE arrête M1 avec mémorisati...

Страница 23: ...et ensuite DIP 3 sur ON 2 La DEL rouge DL1 de programmation clignote avec une fréquence de 1 sec ON et 1 sec OFF pendant 10 secondes 3 Appuyer sur la touche de la télécommande normalement sur le canal B dans les 10 secondes Si la télécommande est correctement mémorisée la DEL DL10 verte émet un clignotement 4 Le temps de programmation des codes se renouvelle automatiquement pour pouvoir mémoriser ...

Страница 24: ...assant devant les photocellules le portail s arrête Terminé de transit après 1 seconde le portail se ferme DIP 16 ON et DIP 4 ON Comme le portail s ouvre en passant devant les photocellules le portail continue à s ouvrir Terminé de transit le portail s arrête et après 1 seconde de pause il invertit le mouvement en fermeture Si l ouverture totale a lieu fin du temps d ouverture la fermeture immédia...

Страница 25: ...c secondaire 18Vac Consommation maximale 50 mA micro interrupteurs de réseau 100ms Puissance maximale voyant portail ouvert 24Vdc 3W équivalent à une petite lampe de 3W ou à 5 DEL avec résistance en série de 2 2 KΩ Charge maximale feu clignotant 24Vdc 20W Courant disponible pour photocellules et accessoires1A 15 Courant disponible sur le connecteur radio 200mA CARACTERISTIQUES TECHNIQUES RADIO mod...

Страница 26: ... Câble pour déblocage de l extérieur à connecter au coffre fort code ACG8022 OPTIONS Pour les branchements et les données techniques des accessoires se conformer aux livrets d instruction correspondants BRAS LONG BRAS LONG pour portails avec l axe des gonds positionné jusqu à 50 cm du bord du poteau code ACG8034 COFFRE FORT STONE Coffret de sécurité empêchant tout accès non autorisé aux dispositif...

Страница 27: ...he stoke either a time or a current sensor device will cut out the motor power supply Measurements in mm inch 1 5 5 4 4 3 2 7 1 6 TECHNICAL DATA PREMIER 24V Max gate leaf length m 3 Max gate leaf weight kg 300 Average opening time s 17 Maximum thrust torque Nm 150 EEC Power supply 230V 50Hz Motor capacity W 72 Power absorbed A 0 311 Normative cycles n 17s 2s Daily operations suggested n 60 Service...

Страница 28: ...C inside the strong box as in Pic 3 code ACJ9071 or ACJ9078 CAUTION In order to manually open the gate leaf make sure of the following The gate leaves must be endowed with appropriate handles Position of the handles onto the gate leaves must be in risk free area The manual force necessary to move the gate leaves should not be higher than 225 N in case of installations at domestic private dwellings...

Страница 29: ...s shown in Pic 5 Caution Once the screws V and W have been thoroughly tightened Pic 5 unscrew them for half a turn in order to guarantee a free movement of the arm After assembling the arm unlock the motor and fix the arm to the motor with the supplied screw and M8 washer With the gate in closing position and the motor at rest the anti theft lock E keeps the gate leaves securely closed and prevent...

Страница 30: ...anical stopper G against the arm gate must be opened completely and tighten it as described above Caution Always use two Allen screws for every stopper Caution The drive arm is equipped with an anti theft locking device E in Pic 5 If the close mechanical stopper is not properly adjusted the anti theft device can get damaged in a short period MAINTENANCE Maintenance should be carried out by skilled...

Страница 31: ...N COMMON 24Vdc 0 8A 15 for ACCESSORY SUPPLY 24Vdc 0 8A 15 for AUTOTEST SAFETY STRIPS BLINKER 24Vdc 20W LED R 2 2K 1 4W ELECTRIC LOCK PEDESTRIAN SAFETY STRIPS POWER SUPPLY 230Vac 50 Hz TRANSFORMER M1 M2 G B ELECTRIC CONNECTIONS T2 PREMIER 24V code AC02033 T2 PREMIER 24V CRX code AC02034 ...

Страница 32: ...N 5 SECONDS AS PER STANDARD EN12453 POINT A 2 2 ACCEPTABLE STATIC FORCE THEREBY COMPLYING WITH THE IMPACT TESTS ALSO OUTLINED G B J1 N F Power supply 230 Vac 50 60 Hz external to the control panel 120V 60Hz upon request J2 COM Common contact CLOSE Closing impulse contact NA OPEN Opening impulse contact NA STOP STOP impulse contact NC AERIAL Radio Antenna J3 SIGNAL Gate open state and battery state...

Страница 33: ...e gate 10 AFTER PROGRAMMING RESET DIP 2 TO OFF D SETTING THE TIME FOR ONE MOTOR M1 WITH POWER SENSOR ACTIVATED DIP 7 ON CAUTION FOR ONE MOTOR CONTROL DIP 13 MUST BE POSITIONED TO ON DURING PROGRAMMING THE POWER SENSOR IS CONTINUOUSLY ACTIVE The gate must be completely closed 1 Set DIP 2 to ON LED DL1 will blink rapidly 2 Press the PROG button M1 opens When the mechanical opening stop is reached th...

Страница 34: ...a switch to open and hold the gate opened you must request a T2 PREMIER 24V with firmware version fw 04 NOUP If the version is fw 03 or higher BEWARE IN CASE OF FAILURE OF THE SAFETY DEVICES A MINUTE AFTER THE TIMER OR THE SWITCH HAVE BEEN ACTIVATED THE GATE WILL OPEN WITHOUT ANY SAFETY PROTECTION This function is useful during peak hours when vehicle traffic is slow e g entry exit of workers emer...

Страница 35: ...osing start functioning again Note 1 during this functioning in dead man mode in case of damage to the safety strips or photocells the photocells or safety strips still work by interrupting the operation in progress Note 2 the stop command is not to be considered a safety command that can be bypassed in this mode Therefore when pressed or damaged it will not allow any movement of the gate The dead...

Страница 36: ... UNLOCKING CABLE Cable for manual releasing the operators from outside to be connected to strong box code ACG8022 FAULT SOLUTION After having carried out the various connections and having supplied voltage all the LEDS are switched off Check fuses F1 FUSE 1 If the fuse is blown use only a suitable replacement F1 T 2A TRANSFORMER PROTECTION FUSE on the outside of the T2 PREMIER 24V board FUSE 1 8A ...

Страница 37: ...st bleibt der Motor noch einige Sekunden beansprucht und solange aktiv bis der Timer oder der Stromsensor die Funktion der Steuerzentrale übernimmt Abmessungen in mm inch 1 5 5 4 4 3 2 7 1 6 TECHNISCHE EIGENSCHAFTEN PREMIER 24V Max Torflügelweite m 3 Max Torgewicht kg 300 Mittlere Öffnungszeit zirka s 17 Anlaufmoment maximal Schub Nm 150 Stromspannung und frequenz 230V 50Hz Motorleistung W 72 Stro...

Страница 38: ...e dell anta occorre verificare che sull anta siano presenti maniglie idonee tali maniglie siano posizionate in modo da non creare punti di pericolo durante il loro utilizzo lo sforzo manuale per muovere l anta non superi i 225 N per i cancelli posti su siti privati ed i 390 N per i cancelli posti su siti commerciali ed industriali valori indicati nel punto 5 4 5 della norma EN 12453 N B Für Tore m...

Страница 39: ...uben V und W ganz anziehen danach für beide eine halbe Drehung entgegengesetzt ausführen damit eine korrekte Bewegung der Hebel garantiert wird Ist der Hebel montiert den Operator entblocken und mit der Schraube M8 und der Unterlegscheibe am Motor befestigen Das Eindringschutz Blocksystem E verhindert die Hebelbewegung wenn das Tor geschlossen ist und der Motor nicht läuft 5 I X B A α α A max A ma...

Страница 40: ...utzen Um die gewünschte Öffnung zu erhalten genügt es den Feststeller G zu verschieben diesen so blockieren wie Feststeller F ACHTUNG Der Zug Hebel des Tors ist mit einem Block System ausgerüstet E Fig 5 dieses System wird sich nur bei forciertem Eindringen aktionieren Wenn der Feststeller nicht korrekt reguliert wird wird dieses System jedes mal eingreifen wenn das Tor geschlossen wird mit der Fo...

Страница 41: ...E ERDUNGSKONTAKTE GEMEINSAME ERDUNGSKONTAKTE 24Vdc 0 8A 15 für ZUBEHÖRE 24Vdc 0 8A 15 für AUTOTEST KONTAKTLEISTE BLINKER 24Vdc 20W LED R 2 2K 1 4W ELEKTROSCHLOSS FUSSGÄNGER KONTAKLEISTE STROMVERSORGUNG 230Vac 50 Hz TRANSFORMATOR M1 M2 D ELEKTROANSCHLÜSSE T2 PREMIER 24V Kode AC02033 T2 PREMIER 24V CRX Kode AC02034 ...

Страница 42: ...Anfrage J2 COM Gemeinsame erdungskontakte CLOSE Schließung Impuls Kontakt NA OPEN Öffnungs Impuls Kontakt NA STOP Stop Impuls Kontakt NC AERIAL Radio Antenne J3 SIGNAL Kontrollanzeigelampe Tor offen signalisiert den Batterie betriebenen Funktionierungsstand und leere Batterie 24Vdc 3W max A TEST Positive Ladung für die Speisung für Rippen Selbstkontrolle EDGE N C Ripppen Kontakt NC COM Gemeinsame ...

Страница 43: ...LED AnzeigeDL1 beginnt zu blinken 3 Den Schalter PROG drücken M1 öffnet 4 Nach Erreichen des Öffnungs Endanschlages hält der AUTOMATISCHE STROMSENSOR M1 an und speichert Zeit und Stromwerte Gleichzeitig aktiviert sich M2 und öffnet 5 Nach Erreichen des Öffnungs Endanschlages hält der AUTOMATISCHE STROMSENSOR M2 an und speichert Zeit und Stromwerte 6 Den Schalter PROG drücken M2 schließt 7 Den Scha...

Страница 44: ...0 Grün 4 Die Programmierzeit der Codes verlängert sich automatisch damit die nächste Fernbedienung programmiert werden kann 5 Um die Programmierung abzuschließen 10 Sekunden abwarten oder die Taste PROG drücken Die rote LED Anzeige erlischt 6 Erneut DIP 1 und DIP 2 auf OFF stellen ANMERKUNG WENN DIE LED ANZEIGE DL1 STÄNDIG RASCH WEITERBLINKT BEDEUTET DAS DASS DIP 1 NOCH AUF ON STEHT UND JEDER WEIT...

Страница 45: ...automatische Schließzeit aktiviert wenn der Trimmer TCA aktiviert ist und die LED Anzeige DL6 leuchtet Kommt es während der Schließung zu einem raschen Passieren zum Beispiel durch einen Fußgänger öffnet sich das Tor für 2 Sekunden um sich anschließend erneut zu schließen DIP 16 OFF sofortige Schließung nach Passierten der Fotozellen deaktiviert ZU BEACHTEN Es wird empfohlen die Funktionsweise der...

Страница 46: ...echungen 100ms Höchstleistung Kontrollleuchte Tor geöffnet 24 Vdc 3 W entspricht 1 Glühbirne mit 3 W oder 5 LED mit Serienwiderstand von 2 2 KΩ Höchstbelastung am Blinker Ausgang 24 Vdc 20 W Verfügbarere Strom für Fotozellen und Zubehör 1 A 15 Verfügbarere Strom auf der Funkgerätsteckverbindung 200 mA TECHNISCHE EIGENSCHAFTEN FUNKGERÄT Modell T2 PREMIER 24V CRX Empfangsfrequenz 433 92 MHz Widersta...

Страница 47: ...echts extern12Vac Kode ACG8660 Horizontal Schloss links extern12Vac Kode ACG8670 Vertikal Schloss 12Vac Kode ACG8650 BATTERIE Batterie 2 2Ah 12V Kode ACG9515 BATTERIE LADEKARTE Kode ACG4648 SICHERHEITSSCHRANK FLAT Behälter als Sicherheit zur Verhinderung zum Zugang und Benutzbarkeit der Steuerbedienungsanordnung Wird in Serie geliefert komplett mit Schalttasten auf unter öffne schließe und für die...

Страница 48: ...a por algunos segundos hasta cuando no interviene el timer de funcionamiento de la central de mando o el sensor de corriente Medidas en mm inch 1 5 5 4 4 3 2 7 1 6 CARACTERÍSTICAS TÉCNICAS PREMIER 24V Longitud máxima de la anta m 3 Peso máx cancela kg 300 Tiempo de abertura s 17 Momento torsional máx de empuje Nm 150 Alimentación e frequenza 230V 50Hz Potencia motor W 72 Absorcion A 0 311 Ciclos n...

Страница 49: ...ta siano presenti maniglie idonee tali maniglie siano posizionate in modo da non creare punti di pericolo durante il loro utilizzo lo sforzo manuale per muovere l anta non superi i 225 N per i cancelli posti su siti privati ed i 390 N per i cancelli posti su siti commerciali ed industriali valori indicati nel punto 5 4 5 della norma EN 12453 NB En el caso de cancelas con dos puertas para un cierre...

Страница 50: ... en la figura 5 Cuidado Atornillar hasta el tope los tornillos V y W para luego a los dos darles un giro en sentido inverso para garantizar el correcto movimiento de la palanca Una vez ensamblada la palanca desbloquear el operador y fijarla en el motor con el tornillo M8 y la arandela suministrados El Bloqueo anti intrusión E impide a la palanca moverse con la cancela cerrada y con el motor parado...

Страница 51: ...er la abertura deseada es suficiente mover el seguro G y bloquearlo como se describe para el seguro F CUIDADO La palanca de remolque de la cancela está dotada de un sistema de bloqueo E Fig 5 que debe intervenir sólo en caso de intrusión Si el seguro de cierre no es regulado correctamente este sistema interviene cada vez que la cancela cierra lo que conlleva a un daño en breve tiempo MANTENIMIENTO...

Страница 52: ... COMÚN COMÚN 24Vdc 0 8A 15 para ACCESSORIOS 24Vdc 0 8A 15 para AUTOTEST COSTAS INTERMITENTE 24Vdc 20W LED R 2 2K 1 4W CERRADURA ELÉCTRICA PEATONAL COSTAS ALIMENTACION 230Vac 50Hz TRANSFORMADOR M1 M2 E S CONEXIONES ELÉCTRICAS T2 PREMIER 24V cód AC02033 T2 PREMIER 24V CRX cód AC02034 ...

Страница 53: ...S E S A CONEXIÓN J3 TR2 TR1 J2 J4 F1 FUSE 1 J5 J6 TR3 J10 J8 J9 J1 J7 S3 TRANSFORMER J1 N F Alimentación 230 Vac 50 60 Hz externa a la tarjeta 120V 60Hz bajo pedido J2 COM Común de los contactos CLOSE Contacto para impulsos de cierre NA OPEN Contacto para impulsos de apertura NA STOP Contacto para impulsos de stop NC AERIAL Antena radio J3 SIGNAL Indicador luminoso de cancela abierta y señal del e...

Страница 54: ...R DE CORRIENTE HABILITADO DIP 7 ON DURANTE LA PROGRAMACIÓN EL SENSOR DE CORRIENTE ESTÁ SIEMPRE ACTIVO 1 La cancela debe estar completamente cerrada 2 Coloque el DIP 2 en posición ON El led DL1 emitirá parpadeos breves 3 Presione el pulsador PROG M1 se abre 4 Una vez alcanzado el seguro mecánico de apertura el SENSOR DE CORRIENTE AUTOMÁTICO detiene M1 con memorización del tiempo y de la corriente E...

Страница 55: ...O DEDICADOS A LA APERTURA TOTAL La señalización se puede obtener únicamente con la cancela detenida 1 Coloque el DIP 1 en posición ON y sucesivamente el DIP2 en ON 2 El led verde DL10 parpadea 6 veces indicando la condición de memoria saturada 62 códigos presentes 3 Sucesivamente el led DL1 de programación permanece activo por 10 segundos permitiendo una posible cancelación de todos los códigos 4 ...

Страница 56: ... no intervendrán Las fotocélulas intervendrán solo en fase de cierre con restablecimiento del movimiento inverso después de un segundo aún cuando las mismas estén ocupadas ATTENCION Si el Led del receptor queda encendido es posible que sea debito a interferencias en la red de alimentación Aconsejamos conectar eléctricamente en tierra las columnas o las columnas de soporte a los contactos A para pr...

Страница 57: ... tiempo en que la puerta queda abierta Se apagará una vez que la puerta llega en posición de cierre completo Se recomienda abrir completamente la cancela Deje que la cancela se cierre por sí sola con el cierre automático o aguarde a que el intermitente deje de parpadear antes de dar una orden de cierre Esta operación permitirá que la cancela se realinee De hecho si durante el apagón los motores ha...

Страница 58: ...er efectuado varias conexiones y haber dado tensión todos los led están apagados Verifique la integridad de los fusibles F1 FUSE 1 En caso de fusible interrumpido utilice únicamente uno de valor adecuado F1 T 2A FUSIBLE DE PROTECCIÓN TRANSFORMADOR externo a la tarjeta T2 PREMIER 24V FUSE 1 8A FUSIBLE DE PROTECCIÓN DE MOTORES El motor abre y cierra pero no tiene fuerza y se mueve lentamente Verifiq...

Страница 59: ...blocco CME1137 Perno sblocco CME1139 Vite senza fine CME1141 Ingranaggio elicoidale CME1143 Albero lento scanalato CME1173 Leva Brocciata CME2153 Perno M8 attacco cancello CPL1182 Tappo per carter CPL1252 Supporto scheda CPL1253 Copri leva CPL1254 Ferma cavo CPL1255 Carter superiore CPL1258 Ferma Levetta Sblocco CPL1325 PROFILO DI SICUREZZA CPL1326 Coperchio copri trasformatore CPL1327 Custodia tr...

Страница 60: ... CE angewendet wurden Die Übereinstimmung mit den genannten harmonisierten Normen sieht die Vermutung der Übereinstimmung mit den festgelegten grundlegenden Anforderungen der Richtlinie vor die unter diese Normen oder Teile davon fallen ACHTUNG Weitere Anforderungen und andere EU Richtlinien können für Produkte dieser Erklärung unterliegen angewendet werden Los siguientes requisitos esenciales de ...

Отзывы: