background image

41 


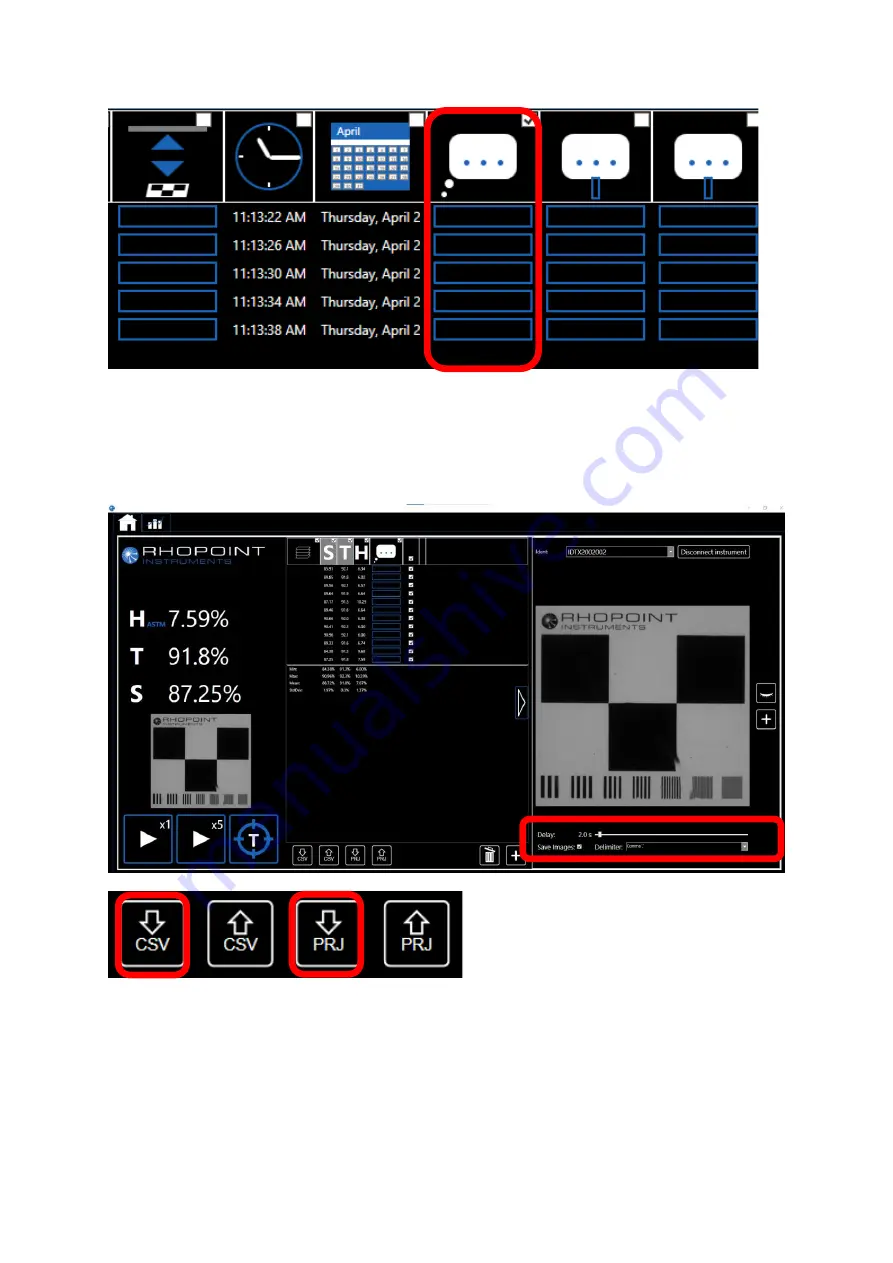
Save/Export Data- 

To save the readings and all associated images, click the SAVE Project 

button (PRJ) or to save the data only press the SAVE CSV button 

Delimiter- 

The data will be saved with the selected delimiter- this can be changed using the 

drop down menu to suit regional PC settings. 


When saving a project (Images and data) you will be presented with a create new folder 
window, simply name the new folder and click the folder icon and then press OK. The folder 
will contain all of the images and the data in csv format. 

Содержание IDTX

Страница 1: ...lease read these instructions carefully before operating this product and retain them for future reference The images shown in this manual are for illustrative purposes only English Operating Instruct...

Страница 2: ...used in their products they reserve the right to change information included in this document without prior notice Copyright 2020 Rhopoint Instruments Ltd All Rights Reserved Rhopoint is a registered...

Страница 3: ...stance Dependency or Matching End Use Applications 19 Measuring ASTM Haze Sharpness 20 Starting a Measurement Single Reading 21 Starting a Measurement Multipoint Average 23 Settings Menu 25 Rhopoint I...

Страница 4: ...elds or in an environment with excessive vibrations The instrument s metal body and touchscreen are resistant to a variety of solvents however the recommended cleaning method is by using a soft damp c...

Страница 5: ...object or at variable viewing distances up to 45mm The instrument is supplied in 2 formats IDTX E a stand alone low cost instrument designed for the QA environments IDTX L a laboratory instrument wit...

Страница 6: ...30 HU 6mm has been verified as 1 5 H SD Sharpness Quantifies any reduction in the optical sharpness of an object viewed through the tested material Poor optical sharpness is often caused by surface r...

Страница 7: ...he visible distortion of the ID graticule edges through the material W is the standard deviation of the edge deformation in m Waviness homogeneity is assessed by comparing W average waviness with WH h...

Страница 8: ...onstrate a reduction in sharpness and increase in haze which peak with a separation distance of 2 4mm between the sample and material Rhopoint instruments offer bespoke adaptor plates or 3D CAD models...

Страница 9: ...ter Calibration certificate 1 x checking standards IDTX Haze 8mm spacer 5mm spacer DC power supply and mains cable UK EU US USB with operating manual Cleaning cloth IDTX L USB 2 to LAN adaptor LAN cab...

Страница 10: ...9 Functional Overview 1 Display and touch screen 2 Camera optics 3 Illuminated graticule 4 Levelling feet 6 Power socket 7 USB socket 8 Power button...

Страница 11: ...fied to comply to ASTM D1003 W Waviness is a measure of the wavy distortion of objects viewed through the material C Clarity the blurriness of a viewed object Measurements made with the ASTM 8mm adapt...

Страница 12: ...11 Adjust volume...

Страница 13: ...e initializing the instrument To power down the unit press on the settings icon and then press and hold the power icon 2seconds until the instrument begins the power down cycle indicated by the screen...

Страница 14: ...he Unit After power up it is necessary to tare zero the unit Before the unit is tared the measurement buttons are unavailable greyed out To tare the unit press and hold the tare symbol 3 sec on the to...

Страница 15: ...ement buttons are available and the instrument is ready for use Tolerance on tared values After tare the instrument will measure the graticule as follows average of 5 readings after 4 min warm up peri...

Страница 16: ...iness with the Rhopoint IDTX Place the 8mm Haze spacer on the instrument The spacer is held in place by magnets and automatically detected by the unit Once in place ASTM Haze measurement and Sharpness...

Страница 17: ...harpness and Clarity modes The ID L instrument also has the ability to measure waviness press the T button to toggle between transmission and waviness function only available in the Rhopoint ID L Tran...

Страница 18: ...n the stated tolerance the instrument is ready to use Please note that the Sharpness value is sensitive to positioning slightly adjust the position of the standard if the value is out of tolerance Cle...

Страница 19: ...wed object when the sample is in direct contact To perform a measurement place the sample directly on to the measurement graticule For fast easy manipulation high clarity samples with low distance dep...

Страница 20: ...should be spaced away from the platen It is recommended that the optional Rhopoint IDTX spacers are used Multiple spacers can be stacked to achieve the required distances To match an end use applicati...

Страница 21: ...aze Sharpness To measure ASTM Haze sharpness the ASTM Haze spacer should be placed in position and the sample placed on top Measuring with the ASTM haze spacer in place is often the default method for...

Страница 22: ...21 Starting a Measurement Single Reading To initiate a single measurement press the single read button on the touch screen The instrument will initiate a reading and report the result...

Страница 23: ...2 To view the waviness and Clarity results for the same sample press the T or S icons to toggle the viewed values function only available in the Rhopoint ID L Transmission Appearance Analysis Software...

Страница 24: ...lculate statistics for a measured batch of readings To select the batch size click on the X3 number in the top corner of the middle button The unit has preset batch sizes of 3 4 5 10 or To initiate a...

Страница 25: ...between readings this allows the user time to manipulate the sample To finish an batch press the stop button the instrument will report the statistical analysis for the measured samples After complet...

Страница 26: ...ower off the instrument press hold the power icon To adjust the volume of the audible signal use the volume slider To return to measurement screen press home icon Unlock Keys is reserved for upgrading...

Страница 27: ...ed in the IDTX folder Copy the IDTX folder to your desktop Double click on the setup exe located in the IDTX folder to install PLEASE NOTE THAT DURING INSTALLATION YOUR PC MAY RESTART WITH NO WARNING...

Страница 28: ...7 Connecting the Instrument to the PC Direct connection use the provided USB 2 0 or similar adaptor to connect the Rhopoint ID to the PC using the provided ethernet cable USB 2 0 to Ethernet Connector...

Страница 29: ...ection the software can operate multiple instruments which are connected to a local network Connect the instrument directly to the required network using the provided ethernet cable or similar Local A...

Страница 30: ...reens Rhopoint IDTX Software supports the use of multiple screens for operation viewing and manipulating data comparing images and viewing graphs For effective data analysis it is preferable to run th...

Страница 31: ...xe located in the IDTX folder to begin installation PLEASE NOTE THAT DURING INSTALLATION YOUR PC MAY RESTART WITH NO WARNING ENSURE ALL WORK IS SAVED BEFORE PROCEDING Setup Once installed the software...

Страница 32: ...e then press connect 4 NOTE If the instrument is connected via a LAN the text local may need to be added directly after the instrument serial number no space The instrument and software will connect t...

Страница 33: ...multiple reading play button to change the auto measurement batch size c Click and hold the tare button to tare the instrument wait until the button has stopped spinning before releasing the mouse but...

Страница 34: ...te the ID Instrument View and the ID Setting and Live View with the results and image for the selected measurement If the instrument is in Live View mode the results will update but the camera will co...

Страница 35: ...lts table Click on the Graph tab A graph of the selected parameters is displayed Customise the Results Table Parameters The Results Table can be customized to any selected results or comments from the...

Страница 36: ...35 Clicking on the tick box in the top corner of any parameter will include exclude it from the ID Results Table...

Страница 37: ...HH2 HH3 HH4 HV Vertical Haze Average of HV1 HV2 HV3 HV4 HH1 HH2 HH3 HH4 Horizontal Haze H1 H2 H3 H4 Calculated using Michelson contrast of B W zones adjacent to edge transition HV1 HV2 HV3 HV4 Vertica...

Страница 38: ...erage of WV1 WV2 WV3 WV4 WH1 WH2 WH3 WH4 Horizontal Waviness H1 H2 H3 H4 Calculated using edge deformation analysis WV1 WV2 WV3 WV4 Vertical Waviness V1 V2 V3 Calculated using edge deformation analysi...

Страница 39: ...sion Pixel intensity full graticule area Pixel intensity tare image T1 Transmission zone 1 Pixel intensity area T1 Pixel intensity T1 tare image T2 Transmission zone 2 Pixel intensity area T2 Pixel in...

Страница 40: ...aceability during data analysis The first column has a fixed name Comments all other fields can be named by the user these names will be transferred to the data output csv Click into the small blue bo...

Страница 41: ...urement distance to the measurement data the distance text box should be used Add a comment To add a comment to the measurement data the comments text box should be used As each new measurement is tak...

Страница 42: ...er The data will be saved with the selected delimiter this can be changed using the drop down menu to suit regional PC settings When saving a project Images and data you will be presented with a creat...

Страница 43: ...ess the LOAD Project or CSV button this data is added to the bottom of the data table use this feature to combine and compare batches To view saved data in isolation first clear the table Clear the Ta...

Страница 44: ...amples before measurement Note With live view switched on it is not possible to view images of saved measurements IDTX Software Visual Analysis of Results Sharpness Click in the data table to select i...

Страница 45: ...isation of Sharpness High Sharpness Sharp view of object S 95 In the above captured image the lines in frequency pattern 6 are visible and undistorted Low Sharpness Fuzzy out of focus object S 30 In t...

Страница 46: ...Analysis of Results Waviness Plastic materials can exhibit local surface effects such as orange peel which can be seen as small waves when a pattern or object is viewed through the material The pictu...

Страница 47: ...46...

Страница 48: ...ss for each individual zone using the toggle buttons on the right If horizontal values are different from vertical values it is an indication of anisotropy visible directionality in the material The o...

Страница 49: ...48 Click on the compare icon in the expanded image window The software will replicate and fix the current view Multiple windows can be opened to visually compare different materials...

Страница 50: ...49 IDTX Notes...

Страница 51: ...arance Meter TO WHICH THIS DECLARATION RELATES ARE IN CONFORMITY WITH THE FOLLOWING STANDARDS EN 61326 1 2013 EN 61000 4 2 2009 EN 61000 4 3 2006 EN 61000 4 4 2012 EN 61000 4 11 2004 EN 61010 1 2010 E...

Отзывы: