ASSEMBLY
F-4145 01/11
Assembly Section 3-2
© 2011 Alamo Group Inc.
ASSEMBL
Y
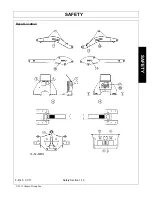
INSTALLING PUMP KIT (Optional)
NOTE:
Drawbar may need to be removed if it interferes
with reservoir. If drawbar can be left in place, retaining
bracket (4) should be installed on left side of pump as
shown and positioned on left side of tractor drawbar.
1. Fasten hydraulic pump retaining bracket (4) to pump
(6) using 3/8-16 x 1-1/4 cap screws (19) and 3/8 lock
washers (21). Fasten one end of chain (8) to pump
retaining bracket using only “U” bolt of wire rope clip
(5) and 5/16 lock nuts that come up with clip.
NOTE:
Wrap chain tightly around hitch bracket on tractor
to prevent pump from slipping off PTO shaft.
2. Fasten tank (1) to backhoe using 3/8 x 1 cap screws
(23), 3/8 flat washers 924) and 3/8 lock nuts (25).
3. Install 3/4 NPT x 3/4 NPT 90° elbow (17) to right tank
port. Point fitting up.
4. Install filter body (without filter element) to 3/4 elbow
(17). Be sure oil flow (arrow on filter body) is correct.
Position body so element points right. Install filter
element (7).
5. Install 3/4 NPT x 3/4 JIC fitting (16) to filter body.
6. Install 1-1/4 strainer (10) and 3/4 NPT x 3/4 NPT 90°
elbow to left tank port.
7. Install 1-5/16 o-ring x 1-1/16 JIC to “IN” port on pump.
Install 3/4 x 1-1/16 elbow fitting (15) to “OUT” port on
pump.
8. Connect suction hose (3) to left port on reservoir and
to “IN” port on pump.
9. Connect pressure hose (12) to “OUT” port on pump
and “IN” port on valve. Connect tank hose (11) to
“OUT” port on valve and to filter on hydraulic
reservoir.
10.Fill reservoir to within 1 inch from top with 10W or
20W hydraulic oil with SAE J183-M2C33F
classification. Dextron 2 ATF fluid and 10W engine oil
with API “SD” classification are also acceptable. Install
breather cap (2) to reservoir.
NOTE:
After cycling all cylinders, recheck oil level. Empty
reservoir requires 4 gallons to fill to 1 inch from top.
Содержание RHINO 95C
Страница 5: ...Safety Section 1 1 SAFETY SECTION...
Страница 19: ...SAFETY F 4145 01 11 Safety Section 1 15 2011 Alamo Group Inc SAFETY Decal Location...
Страница 24: ......
Страница 25: ...Introduction Section 2 1 INTRODUCTION SECTION...
Страница 28: ...INTRODUCTION F 4145 01 11 Introduction Section 2 4 2011 Alamo Group Inc INTRODUCTION...
Страница 29: ...Assembly Section 3 1 ASSEMBLY SECTION...
Страница 33: ...Operation Section 4 1 OPERATION SECTION...
Страница 42: ......
Страница 43: ...Maintenance Section 5 1 MAINTENANCE SECTION...
Страница 50: ...MAINTENANCE F 4145 01 11 Maintenance Section 5 8 2011 Alamo Group Inc MAINTENANCE...
Страница 52: ...MAINTENANCE F 4145 01 11 Maintenance Section 5 10 2011 Alamo Group Inc MAINTENANCE PROPER TORQUE FOR FASTENERS...
Страница 53: ......
Страница 56: ...95C SOM 01 11 P N F 4145C Printed U S A...

