Assembly Instructions
22x24x12 Peak Style Two Car Garage
V2.3
4
Step 6.
Add remaining 4 Interior Arch Assemblies and
finally 2
nd
End Arch Assembly in sequence in the same
fashion. For each arch that is added, add a pair of base
cross rails, a pair of side cross rail and the top ridge rail
by inserting a Swedged End Cross Rail (SCR-5030) into
the prior pole end. By adding cross rails at base, side,
and top ridge, the arches will integrate into a strong
frame assembly.
At the other End Arch Assembly, be certain to install the
remaining two (2) Wind Braces (CW-6005) for stability.
Plain end of final Swedged Cross Rail should fasten
under the End Top Ridge Crest Arch and the Swedged
End above middle Top Ridge Crest arch.
NOTE: Do not completely tighten bolts that connect the
Cross Rails to the End Arches. They must be removed
for proper for End Panel Zippered Door installation
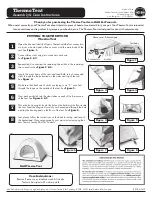
Step 7
. Move the frame assembly into its final
installation location. This should be done with at least
one person lifting each frame upright to avoid bending or
stressing any frame members.
Under End
Arch
Frame should now be squared up in position. Use a
straight-line string to align all frame members on the first
side into position. Then measure and adjust each arch
end to the proper base width of 22’ to align the other
side. Finally measure diagonally from inside corner to
inside corner of frame. Both diagonal measurements
should match. Measure at each end across base of
arches. Do not expand arch width beyond 22’ wide.
This will severely reduce strength of arch assembly and
cause fabric misfit. Adjust frame and support as
necessary to bring frame into square.
Failure to square
frame of unit will result in poor main cover fit and
reduced strength and rigidity
. If end or interior upright
ends are placed on soft material that will not support
weight, recess small patio blocks or bricks under leg
ends. This will also allow better setting of frame before
securing to ground.
Over
Interior Arch
Align each
Arch with
string to make
edge of Frame
STRAIGHT
before securing
Wind Brace
Across End
Arch and
Interior Arch
Assemblies