background image

4

EN

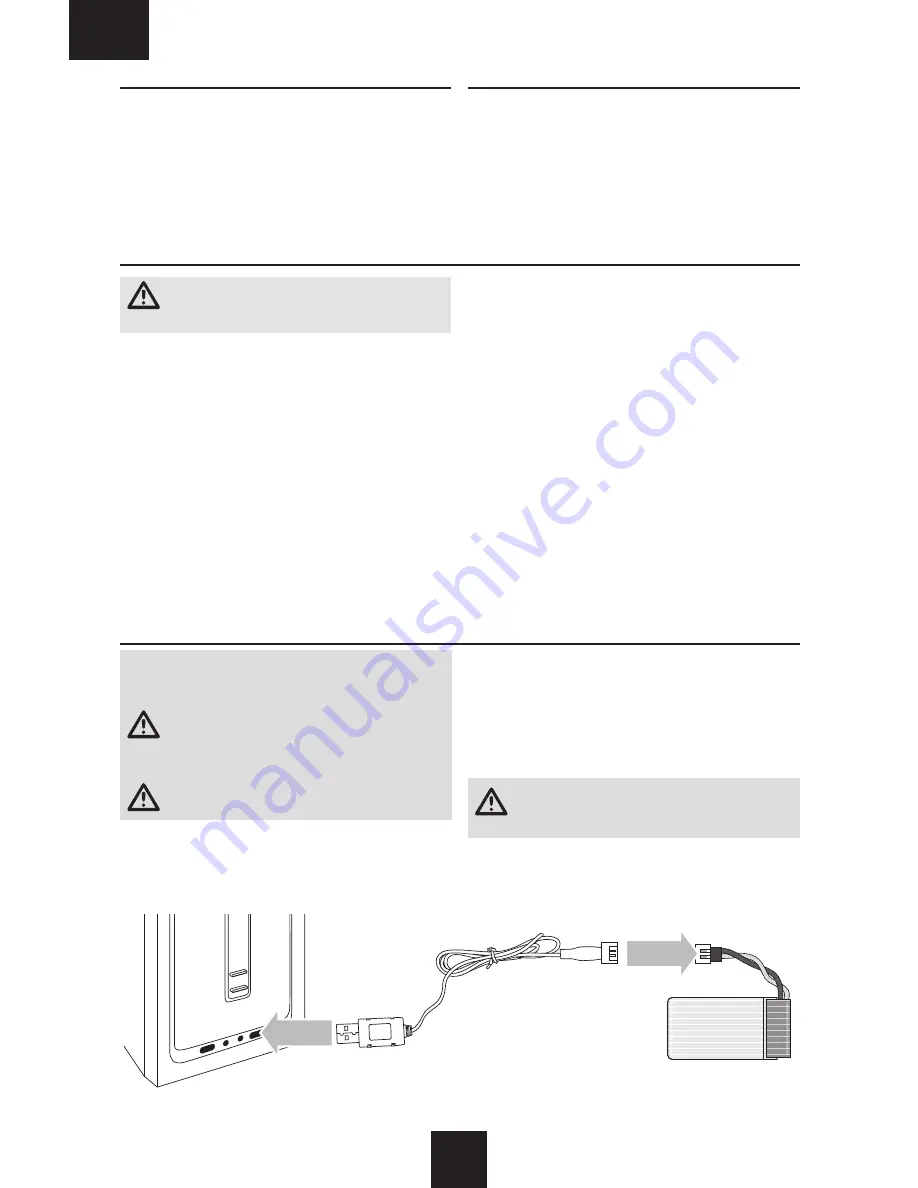
Charging the Flight Battery

NOTICE:

 Charge only batteries that are cool to the touch 

and are not damaged. Look at the battery to make sure it 

is not damaged e.g., swollen, bent, broken or punctured. 

CAUTION:

 Only use chargers specifically 

designed to charge the included Li-Po battery. 

Failure to do so could result in fire, causing injury or 

property damage.

CAUTION:

 Never exceed the recommended 

charge rate.

Use only the included USB charger to charge the flight battery.

1. Connect the charger to a suitable USB power port. The 

charger will work with most 5V mobile power sources 

or smartphone chargers.

2. Connect the charge lead to the battery, noting correct 

polarity. Charging a fully discharged flight battery takes 

approximately 90 minutes. Charge times may vary 

depending on the power source.

3. Remove the battery from the charger when the charging 

cycle is complete.

4. Remove the charger from the power supply.

CAUTION:

 Once charging is complete, immedi-

ately remove the battery. Never leave a battery 

connected to the charger.

Charger LED Indications

RED, solid = Charging

OFF = No battery connected or charging complete

First Flight Preparation

•  Remove and inspect the contents

•  Charge the flight battery

•  Install the batteries in the transmitter

•  Familiarize yourself with the controls

•   Install the flight battery in the drone  

(once it is fully charged)

•  Connect the transmitter

•  Find a suitable flight area for flying

Flying Checklist


Power on the transmitter


 Plug the flight battery into the drone


Fly the drone


Land the drone


 Unplug the flight battery from the drone


Power off the transmitter

Charging Warnings

CAUTION:

 All instructions and warnings must be 

followed exactly. Mishandling of Li-Po batteries can 

result in a fire, personal injury and/or property damage.

•  NEVER LEAVE CHARGING BATTERIES UNATTENDED.

•  NEVER CHARGE BATTERIES OVERNIGHT.

•  By handling, charging or using the included Li-Po battery, 

you assume all risks associated with lithium batteries.

•  If at any time the battery begins to balloon or swell, 

discontinue use immediately. If charging or discharging, 

discontinue and disconnect. Continuing to use, charge 

or discharge a battery that is ballooning or swelling can 

result in fire.

•  Always store the battery at room temperature in a dry 

area for best results.

•  Always transport or temporarily store the battery in a 

temperature range of 40–120º F (5–49° C).

•  Do not store battery or model in a car or direct sunlight. 

If stored in a hot car, the battery can be damaged or 

even catch fire.

•  Always charge batteries away from flammable materials.

•  Always inspect the battery before charging

•  Always disconnect the battery after charging, and let the 

charger cool between charges.

•  Always constantly monitor the temperature of the 

battery pack while charging.

•  ONLY USE A CHARGER SPECIFICALLY DESIGNED TO 

CHARGE LI-PO BATTERIES. Failure to charge the battery 

with a compatible charger may cause a fire resulting in 

personal injury and/or property damage.

•  Never discharge Li-Po cells to below 3V under load.

•  Never cover warning labels with hook and loop strips.

•  Never charge batteries outside recommended levels.

•  Never charge damaged batteries.

•  Never attempt to dismantle or alter the charger.

•  Never allow minors to charge battery packs.

•  Never charge batteries in extremely hot or cold places 

(recommended between 40–120° F or (5–49° C) or 

place in direct sunlight.

Содержание VIZO

Страница 1: ...Instruction Manual Manuel d utilisation ...

Страница 2: ...low the directions and warnings for this and any optional support equipment chargers rechargeable battery packs etc Always keep all chemicals small parts and anything electri cal out of the reach of children Always avoid water exposure to all equipment not specifi cally designed and protected for this purpose Moisture causes damage to electronics Never place any portion of the model in your mouth ...

Страница 3: ...or transmitter Smart device mount fits sizes 2 25 4 in 58 102mm Length 3 1 in 80mm Height 1 6 in 40mm Propeller Length 2 75 in 68mm Flying Weight 1 8 oz 53 g Specifications Transmitter Throttle Yaw Yaw Trim Auto Land Photo Video Flip Pitch Trim Pitch Roll Pitch Trim Roll Trim Power LED Power Switch Roll Trim Auto Take Off Rate Up Rate Down Yaw Trim Motor Start Motor Stop ...

Страница 4: ...ff the transmitter Charging Warnings CAUTION All instructions and warnings must be followed exactly Mishandling of Li Po batteries can result in a fire personal injury and or property damage NEVER LEAVE CHARGING BATTERIES UNATTENDED NEVER CHARGE BATTERIES OVERNIGHT By handling charging or using the included Li Po battery you assume all risks associated with lithium batteries If at any time the bat...

Страница 5: ...tage may become damaged resulting in loss of performance and potential fire when batteries are charged To connect the drone and transmitter follow this start up sequence 1 Power ON the transmitter 2 With the drone on a level surface power ON the drone The drone s LEDs will blink rapidly 3 Fully raise the throttle stick 4 Fully lower the throttle stick The transmitter emits two short beeps 5 After ...

Страница 6: ...rates Press RATE button to increase the flight rate from Easy to Intermediate to Pro Press the RATE button to decrease the flight rate from Pro to Intermediate to Easy The transmitter beeps indicating the active flight rate Easy Rate 1 beep This rate limits the possible speed and control sensitivity of the drone This allows beginner pilots to get used to the flight controls with less chance of ove...

Страница 7: ...are comfortable with basic flight you can explore the different flight rates and functions explained in the Flight Rate Selection section Typical flight times for the included battery range from 5 6 minutes Low Voltage Cutoff LVC LVC decreases the power to the motors when the battery voltage gets low The LEDs on the drone will indicate when the battery charge is getting low When the drone LEDs beg...

Страница 8: ...l results ensure the drone is at least 5 10 feet 1 5 3 m off the ground Press the FLIP button Push the CONTROL stick DOWN then back to center Press the FLIP button Push the CONTROL stick UP then back to center Press the FLIP button Push the CONTROL stick RIGHT then back to center Press the FLIP button Push the CONTROL stick LEFT then back to center Left Side View Left Side View ...

Страница 9: ...gle 3 Secure the smart device to the transmitter by tightening the rear screw Using the Vizo View App The Vizo View app is free software for your 2 4GHz WiFi capable smart device allowing you to connect to the Vizo View camera as FPV take videos and pictures control the Vizo drone using a smart device 1 Install the Vizo View app from Google Play or the App Store or use the QR code right to downloa...

Страница 10: ...Micro memory card is not formatted Format the micro memory card Micro memory card is full Use another micro memory card Photos video will not save to smart device App does not have access to the photos video Following the app prompts allow the app to access photos video Drone continues to drift Drone was not level during gyro calibration Place drone on a level surface Using paper shim the drone ar...

Страница 11: ...before cleaning Remove dust and debris with a soft brush or a dry lint free cloth Fasteners Make sure there are no loose screws other fasteners or connectors Do not over tighten metal screws in plastic parts Tighten screws so the parts are mated together then turn the screw only 1 8th of a turn more Do not use threadlock on or near plastic parts Propellers Make sure there is no damage to the prope...

Страница 12: ...ce you in the event that you may need any assistance For questions or assistance please visit our website at www horizonhobby com submit a Product Support Inquiry or call the toll free telephone number referenced in the Warranty and Service Contact Information section to speak with a Product Support representative Inspection or Services If this Product needs to be inspected or serviced and is comp...

Страница 13: ... device complies with part 15 of the FCC rules Operation is subject to the following two conditions 1 This device may not cause harmful interference and 2 this device must accept any interference received including interference that may cause undesired operation NOTICE Modifications to this product will void the user s authority to operate this equipment This product contains a radio transmitter w...

Страница 14: ... Revolution logo Vizo and the Horizon Hobby logo are trademarks or registered trademarks of Horizon Hobby LLC All other trademarks service marks or logos are property of their respective owners Patents pending Updated 7 17 55190 1 RVOH1200 ...

Отзывы: