14
15
English
English
INSTrUCTIoNS For SaFe drIvINg
GENERAL DRIVING TIPS:
• Always maintain visual contact with the vehicle and do not look at the remote control!
• On initial driving attempts, there is a general tendency toward excessive movements
of the controls. Make sure that you have sufficient room.
After a crash, always release the speed control immediately in order to prevent
damage to the electronics.
THE SUITABLE DRIVING ENVIRONMENT:
The location in which the vehicle is driven should fulfill the following criteria:
1. It should be a location in which there is as much open area as possible, without
disruptive obstacles.
2. Make absolutely sure when starting that there are no people or animals in the
immediate vicinity.
3. Always watch the vehicle so that it does not drive into the operator, other people or
animals and injuries them.
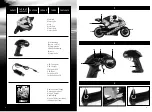
4 ChargINg proCeSS
Attention:
The battery and motor must cool down for 10 to 30 minutes before
charging and after each use. Otherwise they can be damaged. The charging process
must be constantly monitored. Always ensure that the charging process takes place on
a fire proof surface in a fireresistant environment.
Transmitter:
1. Switch off the motorcycle and the remote control.
2. Plug the USB charger into a USB port
(4A)
.
3. Carefully insert the charger cable in the charge socket of the motorcycle
(4B)
;
the USB plug illuminates. The plug must be gently inserted into the charging socket –
DO NOT USE FORCE
. If the plug is not correctly inserted into the charging socket, the
motorcycle may become damaged and, under certain circumstances, cause injury.
4. The charging process has been completed when the light on the USB plug switches
off. After the charging process has been completed, disconnect the USB plug from
the USB port and from the motorcycle.
The motorcycle can be driven for approx. 12 minutes after a charge time of approx. 30
minutes, depending on driving style.
Warning notice:
The LiPo battery does not normally heat up while charging. Howe-
ver, if it should become warm or even hot and/or show signs of changes in the
surface, the charging process must be immediately discontinued!
3 INSerTINg baTTerIeS
Remote Control
3A
Unscrew the cover.
3B
Insert 4 x 1.5 V AA batteries and pay attention to the polarity, as shown in the
battery compartment.
3C
Close the battery cover and secure with the screw.
5 STarT preparaTIoN
Set the ON/OFF switch on the motorcycle to "ON"
(5A)
. The front headlamp begins to
blink. Then set the controller's ON/OFF switch to "ON"
(5B)
. The power LED begins to blink.
The remote control now connects to the motorcycle; the process takes a few seconds
and is finished when the Power LED and the front headlamp illuminate continuously.
The gyroscope in the motorcycle starts up at the same time and it is then ready to start.
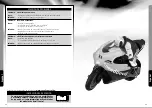
7 vehICle CoNTrol
7A Ground start
: place the motorcycle on the ground such that it stands on both
wheels and one of the rollover bars. Now carefully apply the throttle. The motorcycle will
initially drive in a circle. It straightens out and drives straight ahead once it has
reached the minimum speed.
7B Hand start
: place the motorcycle on the ground and hold it upright. Now
apply a little throttle and release the motorcycle. If you have applied
sufficient throttle, it travels straight ahead. However, if it falls over, try applying a little
more throttle.
7C
To drive along a curve, turn the steering wheel to the left or right.
Note
: the curves become wider the faster the motorcycle is driven.
You can adjust the maximum speed that the motorcycle reaches with full throttle
with the controller for maximum speed.
Recommendation
: At first, set the controller to the centre position. The motorcycle
must be driven fasten enough that it drives straight ahead when it is not steered.
6 adjUSTMeNT oF The MaxIMUM Speed
Содержание Speed Devil
Страница 3: ...4 4 4A 4B 5 5A 5B 6 5 7A 7C 7B 7 ...
Страница 22: ...42 43 Notes Notes ...


