User’s Manual
Electric Bike
5
6
4. Routine Maintenance Check and Lubrication
WARNING!
As with all mechanical components, your bicycle is subjected to
wear and stress. Different materials and components may react to wear or fatigue in
different ways. If the design life of a component has been exceeded it may suddenly
fail, possibly causing injuries to the rider. Any types of cracks, scratches, or change
of coloring in highly stressed areas indicate that the life of the component has been
reached and it should be replaced immediately.
Always inspect your bicycle before every ride.
WARNING!
Use only genuine replacement parts, particularly for safety-critical
components, installed by a professional bicycle mechanic. To keep your electric
bicycle functioning well, the following routine maintenance lubrication is necessary
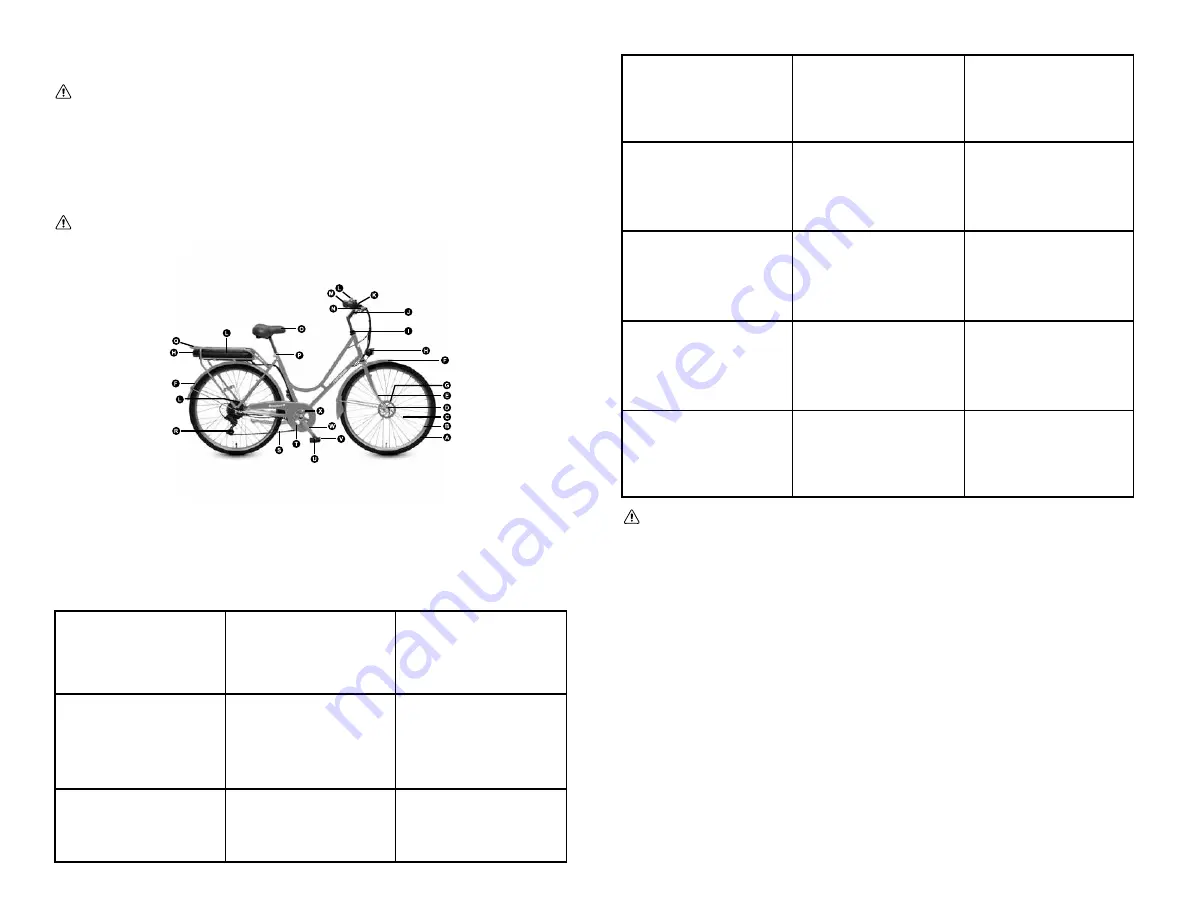
(refer to
Fig. 5
):
Half-Yearly:
Remove, clean, and lubricate chain, derailleur(s), cog set, and all cables.
Check and replace as required.
Weekly (or as needed):
Wash bicycle with warm soapy water. Dry with a soft,
nonabrasive cloth. Do not use strong chemicals or abrasives. Do not use a high-
pressure washer. Inspect your bicycle while cleaning.
A-Tires
Check for cuts and wear maintain
pressure indicated on tires wall for
maximum efficiency
J-Stem
Ensure stem nuts and bolts are tight.
T- Chain Cover
Check the chain cover is secure and
undamaged, replace if necessary.
B.C- Wheel
Check that axles are sealed and secured
properly. Rim should be kept free from
wax, oil, grease and glue. Check for
loosed or missing spokes. (see warning
below)
K-Handlebar
Check handlebar bolt is tight. Check
brake lever securely mounted to
bars and brakes stop smoothly and
efficiency.
U-Pedals
Lightly oil; bearings monthly.
D-Wheel Hub
Grease bearing monthly. Adjust cones
to avoid free play side to side.
M-Bell and Grip
Check them are clean and tight.
V-Pedals reflector
Check all fitting are secure.
E-Fork
Dealer adjustment only
L-The Electrical Parts
You can refer to the manual for
electrical parts
L-The Electrical parts
You can refer to the manual for
electrical parts
F-Mudguard
Check the mudguards are clean and
tight. Ensure the mudguard are secure
and undamaged. Replace if necessary.
F-Mudguard
Check the mudguards are clean and
tight. Ensure the mudguard are secure
and undamaged. Replace if necessary.
X- Bottom Bracket
Clean, re-grease yearly checking for
wear.
G-Brake
Lightly oil exposed cables monthly.
Maintain adjustment and replace brake
blocks when worn, brake cables when
frayed.
Q-Rear Carrier
Check the painting is OK, and no
breakage.
H-Battery Lights (Front and Rear)
Ensure the front and rear battery light
are secure and undamaged, Replace if
necessary.
H-Battery Lights (Front and Rear)
Ensure the front and rear battery light
are secure and undamaged, Replace if
necessary.
H-Battery Lights (Front and Rear)
Ensure the front and rear battery light
are secure and undamaged, Replace if
necessary.
S-Chain
Keep light oiled weekly, clean and lubri-
cate haft yearly.
WARNING!
Every six months, your pedal electric assistance bicycle should be
professionally checked to ensure that it is in correct and safe working order. It is the
responsibility of the rider to ensure all parts are in working order prior to riding.
5. Assembly Instructions
Following is important information and instructions for assembling and maintaining
your new electric bicycle.
Step 1: Unpacking Your Bike
1. Remove your e-bike from the box.
2. Watch-out for staples and sharp edges as you lift the bike out of the box. A friend
can make this easier. Do not lay flat and cut-out the bike from the box - you may
damage the bike.
3. Cut all of the packing zip ties. Detach all parts that are tied to the frame. Be careful
not to cut/scratch the bike, particularly the tires and cables when removing the ties.
4. Do not attempt to rotate the handlebar/fork until you are sure all zip ties and
packing have been removed, otherwise you may damage the bicycle. Carefully examine
the carton for loose parts and make certain that no parts are remaining in the box.
5. Rotate the handlebars (and fork) to face forward.
6. Examine your new bike for any visible damage which may have occurred during
shipping.
Fig. 5
Содержание BEAUMONT
Страница 1: ...USER S MANUAL 36V 350W Beaumont ...


