background image


10 

Operating

polarity is printed inside the battery compartment. Preferably use 
alkaline batteries for proper function. 

  Re-install the rear part of the housing so that the hanging hole (4) 

is on top of the small arrow marking of the clock. Then twist the 
read part clockwise to fasten it. Do not use force when removing 
or installing the rear part of the housing. Pay attention that the 
rubber sealing ring sits properly in place. 

  Replace the battery with a new battery of the same type if the 

display gets weaker or if the clock runs imprecisely.  

Operating the radio controlled Clock 

  After inserting the battery, the movement 

automatically

 will start 

the initializing procedure adjusting the hands to 12 o’clock posi-
tion. The clock starts receiving the transmitted time signal. Do not 
reposition the clock during this reception and setup process. A 
few minutes later the hands will be adjusted to the current time 
according to the transmitter’s time signal. 

  Press the signal receiving key REC (3) for more than 3 seconds 

to manually enable the 

signal reception mode

. The hands will 

reset to the 12 o’clock position and the clock enters signal recep-
tion mode. The clock sets the hands to the exact time and starts 
working after a successful signal reception and setup. The entire 
procedure can take several minutes after all hands reset to 12 
o’clock.   

  If no signal can be received, the time has to be 

setup manually

Press the manual setting key M.SET key (1) for more than  
3 seconds. As long as the M.SET key is pressed, the minute 
hand and hour hand are turning. Press the M.SET key briefly to 
turn the minute hand in one minute steps forward. If you do not 
press the M.SET key for more than 7 seconds, time adjustment is 
finished. The time will be adjusted automatically when the time 
signal is received at a later time. 

Содержание 83 22 10

Страница 1: ...Funkuhr mit Quarzwerk und Temperaturanzeige Artikel Nr 83 22 10 Radio controlled Quartz Clock with Temperature Display Article No 83 22 10 Bedienungsanleitung Instruction Manual RE OX ...

Страница 2: ...anual carefully and keep it for future reference Bedienungsanleitungen enthalten wichtige Hinweise für den Umgang mit Ihrem neuen Gerät Sie ermöglichen Ihnen alle Funktionen zu nutzen und sie helfen Ihnen Missverständnisse zu vermeiden und Schäden vorzubeugen Bitte nehmen Sie sich die Zeit diese Bedienungsanleitung in Ruhe durchzulesen und bewahren Sie diese für späteres Nach lesen gut auf Sehr ge...

Страница 3: ...III Übersicht Overview 1 2 3 4 5 6 7 8 ...

Страница 4: ...T 2 Rücksetztaste RESET RESET Key 3 Signal Empfangstaste REC Signal Receiving Key REC 4 Aufhängeöse Hanging Hole 5 Saugnäpfe Suction Cup 6 Tischaufsteller Table Stand 7 Analoge Zeitanzeige Analogue Clock 8 Temperaturanzeige Temperature Display Übersicht Overview ...

Страница 5: ...raturanzeige Seite 5 Aufstellmöglichkeiten Seite 5 Fehlerbehebung Seite 6 Reinigung und Lagerung Seite 7 Technische Daten Seite 7 Safety Notes Page 8 Introduction Page 9 Information on the DCF77 Time Signal Page 9 Inserting replacing the Battery Page 9 Operating the radio controlled Clock Page 10 Temperature Display Page 11 Setup Options Page 11 Troubleshooting Page 11 Cleaning and Storing Page 12...

Страница 6: ...it nicht benutzen wollen Batterien dürfen nicht geladen nicht auseinander genommen ins Feuer geworfen oder kurzgeschlossen werden Mischen Sie Batterien nicht mit Akkus Verwenden Sie nur Batterien bzw Akkus gleichen Typs Setzen Sie die Uhr nicht direktem Sonnenlicht Verschmutzun gen starker Hitze heißen Lichtquellen oder starken Magnetfel dern aus Die Uhr ist spritzwassergeschützt IP24 Tauchen Sie ...

Страница 7: ...m Atomuhr der Physikalisch Technischen Bundesanstalt in Braunschweig Das Signal wird vom Sender in Mainflingen kodiert und ausgesendet Solche Cäsium Atomuhren haben eine Genauigkeit von 1 Sekunde in 1 Million Jahren Der Sender besitzt eine Reichweite von ca 2000 km und sendet mit einer Langwellenfrequenz von 77 5 kHz Wenn sich die Uhr außer halb der Reichweite des Senders befindet halten sie die T...

Страница 8: ...8 schwächer wird oder die Uhr ungenau läuft Inbetriebnahme und Bedienung der Funkuhr Nachdem die Batterie eingesetzt wurde startet das Funkuhrwerk automatisch mit der Initialisierung Die Zeiger richten sich auf die 12 00 Uhr Position aus und die Funkuhr geht in den Empfangs modus Während des Empfangvorganges stellen Sie die Uhr nicht an verschiedenen Orten auf sondern warten Sie bis der Vorgang be...

Страница 9: ...tellt Temperaturanzeige Auf der Temperaturanzeige 8 wird sofort nach dem Einsetzen der Batterie die momentane Umgebungstemperatur angezeigt 9 C bis 50 C Aufstellmöglichkeiten Verwenden Sie die Aufhängeöse 4 um die Uhr an einem Nagel oder an einer Schraube aufzuhängen Verwenden Sie die vier Saugnäpfe 5 um die Uhr an einer glatten Oberfläche anzuheften Stellen Sie sicher dass der Un tergrund glatt s...

Страница 10: ...r nicht funkentstörten Haushaltsgeräten aufgestellt ist Bewegen Sie die Funkuhr nicht während des Empfangs Warten Sie bis der Empfangvorgang beendet ist und stellen Sie die Uhr nach einem fehlgeschlagenen Empfang nach ca 10 Minuten an einer anderen Stelle auf Nehmen Sie die Batterie aus dem Bat teriefach des Uhrwerks warten Sie eine Minute und versuchen Sie einen Neustart Bedenken Sie dass der Emp...

Страница 11: ...sobald die Uhrzeit falsch angezeigt wird oder die Temperaturanzeige schwächer wird Nehmen Sie die Batterie aus der Uhr wenn Sie diese für längere Zeit nicht benutzen wollen Lagern Sie die Funkuhr im Innenbereich an einem trockenen vor Staub Schmutz und extremen Temperaturen geschützten Ort Lagern Sie die Funkuhr außerhalb der Reichweite von Kindern Technische Daten wenn kein Empfang des DCF Signal...

Страница 12: ...assemble burn or short circuit batteries and do not attempt to recharge non rechargeable batteries Do not mix rechargeable batteries and non rechargeable batteries and use only batteries of the same type Do not expose the unit to direct sunlight dirt high temperature strong light or strong magnetic fields The clock is splash proof IP24 Although do not immerse the clock in water or any other liquid...

Страница 13: ...isch Technische Bundesan stalt at Braunschweig Germany Such Caesium Atomic Clocks have an accuracy of 1 second in 1 million years The signal is coded and transmitted from the station at Mainflingen The station has an effective range of about 2000 km and broadcasts on a frequency of 77 5 kHz If the clock is unable to pick up the signal hold the M SET key to setup the time manually and to switch to ...

Страница 14: ...during this reception and setup process A few minutes later the hands will be adjusted to the current time according to the transmitter s time signal Press the signal receiving key REC 3 for more than 3 seconds to manually enable the signal reception mode The hands will reset to the 12 o clock position and the clock enters signal recep tion mode The clock sets the hands to the exact time and start...

Страница 15: ...s a little bit before you stick the clock to the surface Use the table stand 6 which is initially placed inside the rear part of the housing figure A to put the clock to a table top or similar To do so insert the table stand into the corresponding recess at the bottom of the rear side of the clock figure B You will find the table stand 6 inside the rear part of the housing Troubleshooting If the h...

Страница 16: ...eatures such as mountains or man made structures metal or concrete Preferably place the radio controlled clock close to windows Use a thin not too pointy object e g a paper clip to press the RESET key 2 to reset the clock and to start a new initializing procedure If the clock movement still runs without stopping the clock movement is defective Cleaning and Storing Clean the housing of the clock on...

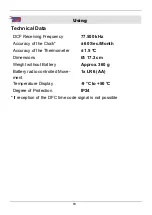
Страница 17: ... possible DCF Receiving Frequency 77 500 kHz Accuracy of the Clock 60 Sec Month Accuracy of the Thermometer 1 5 C Dimensions Ø 17 2 cm Weight without Battery Approx 360 g Battery radio controlled Move ment 1x LR6 AA Temperature Display 9 C to 50 C Degree of Protection IP24 ...

Страница 18: ...14 Notizen Notes ...

Страница 19: ... mélangez pas les piles avec des piles rechargeables Utilisez seulement de piles ou des batteries rechargeables du même type Ne mettez pas l appareil à l écart des rayons du soleil la saleté la chaleur extrême lumières chaudes ou des champs magnétiques puissants L horloge est anti éclaboussure IP24 Trempez l horloge mais pas sous l eau ou d autres liquides Ne démontez l appareil et n essayez pas d...

Страница 20: ...rcuito Non mischiare batterie con batterie ricaricabili Usare solo batterie ricaricabili o batterie dello stesso tipo Non mettere l orologio lontano da luce solare diretta sporcizia gene ad alte temperature luci calde o di forti campi magnetici L orologio è spruzzi d acqua IP24 Immergere l orologio ma non in acqua o altri liquidi Non smontare mai il banco da lavoro o cercare di riparlo L attrezzo ...

Страница 21: ...festgelegt sind Hagen den 14 Januar 2012 Thomas Klingbeil Qualitätsbeauftragter We the Westfalia Werkzeugcompany Werkzeugstraße 1 D 58093 Hagen declare by our own responsibility that the product Radio controlled Quartz Clock with Temperature Display Article No 83 22 10 is according to the basic requirements which are defined in the European Directives 1999 5 EC R TTE Directive 2011 65 EU Restricti...

Страница 22: ... ch Internet www westfalia net Kundenbetreuung Customer Services Werter Kunde bitte helfen Sie mit Abfall zu vermeiden Sollten Sie sich einmal von diesem Artikel trennen wollen so bedenken Sie bitte dass viele seiner Komponenten aus wertvollen Rohstoffen bestehen und wiederverwertet werden können Entsorgen Sie ihn daher nicht in die Mülltonne sondern führen Sie ihn bitte Ihrer Sammelstelle für Ele...

Отзывы: