background image

Using the device

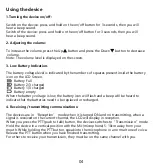
1.Turning the device on/off: 

Switch on the device: press and hold on the on/off button for 3 seconds, then you will 

hear a beep sound.

Switch of the device: press and hold on the on/off button for 3 seconds, then you will 

hear a beep sound.

2. Adjusting the volume: 

To increase the volume, press the Up     button and press the Down      button to decrease

 volume.

Note: The volume level is displayed on the screen.

3. Low Battery Indication.

The battery voltage level is indicated by the numbers of squares present inside the battery 

icon on the LCD Screen.

        Battery Full

        Battery 2/3 charged

        Battery 1/3 charged

        Battery empty

When the battery voltage is low, the battery icon will flash and a beep will be heard to 

indicate that the batteries need to be replaced or recharged.

4. Receiving / transmitting communications:

The devices are in ‘Reception’ mode when it is turned ON and no transmitting, when a 

signal is received on the current channel, the LCD will display in reception.

When you press the PTT(push to talk) button, the devices switches to“Transmission”mode.

Hold the device in a vertical position with the Mic(microphone) 5-10cm away from your 

mouth. While holding the PTT button, speak into the microphone in a normal tone of voice.

Release the PTT button when you have finished transmitting.

For others to receive your transmission, they must be on the same channel with you.

04

Содержание RT675

Страница 1: ...User s manual 0 5Watts Handheld walkie talkie Model US RT75 EU RT675 ...

Страница 2: ...tentially explosive setting e g Around petrol pumps on the lower deck of a boat or around a fuel storage installation or chemical products If travelling in a car or by bike stop before using the device Switch off the device if on an airplane or in a hospital Never use the device in close proximity to a radio to avoid interference Remove the batteries if the device is not use for an extended period...

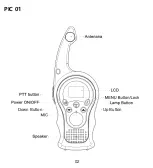
Страница 3: ...PIC 01 02 Up Button Down Button ...

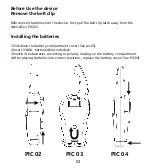
Страница 4: ...the device See PIC02 Installing the batteries 1 Slid down the battery compartment cover See pic03 2 Insert 3 AAA batteries Not included 3 Position the batteries according to polarity making on the battery compartment 4 After placing batteries into correct positions replace the battery cover See PIC04 PIC 04 PIC 03 PIC 02 03 ...

Страница 5: ...d Battery 1 3 charged Battery empty When the battery voltage is low the battery icon will flash and a beep will be heard to indicate that the batteries need to be replaced or recharged 4 Receiving transmitting communications The devices are in Reception mode when it is turned ON and no transmitting when a signal is received on the current channel the LCD will display in reception When you press th...

Страница 6: ...the MENU button twice the current CTCSS code will flash on the display Press the up down button to change the 61 available codes Press the PTT button to confirm and return to stand by mode License free radio s operating on the FRS PMR446 frequency band the device has 16 22 available radio channels If there are many device users near you there is a chance that some of the users are operating on the...

Страница 7: ...r an active radio channel Press and hold the UP button 2 seconds the SCAN function indicator will appear on the display and the channel will scan continuously from 1 to 16 22 once an active channel is found the scanning will stop and you can listen to the transmission When the transmission is on the found channel stop the scanning will resume automatically Note If you press PTT button while listen...

Страница 8: ...13 Backlit Display Press any button except for the MENU button to activate the back light of the LCD display The back light will light on about 5 seconds 14 Headset connection The device can be used with headset If there is headset packed together with the device The connector is located on the top of the device Insert the earpiece plug into the connector 2 5mm jack There is a small PTT button on ...

Страница 9: ...ht signals or for our lighting needs 17 Lock Unlock the device Press and hold MENU button for 3 seconds to lock the device The button lock icon is displayed on the LCD screen Press and hold MENU button for 3 seconds to unlock the device 18 Technical specifications Frequency US FRS EU PMR446 CA FRS GMRS Channels EU 16 channels US CA 22 channels Sub code CTCSS 61 Transmission Power 500mW ERP Range U...

Страница 10: ...5 13 467 6875 14 467 7125 15 462 5500 16 462 5750 1 446 00625 2 446 01875 3 446 03125 4 446 04375 5 446 05625 6 446 06875 7 446 08125 8 446 09375 9 446 10625 10 446 11875 11 446 13125 12 446 14375 13 446 15625 14 446 16875 15 446 18125 16 446 19375 17 462 6000 18 462 6250 19 462 6500 20 462 6750 21 462 7000 22 462 7250 US Frequency ZGHRK EU Frequency ZGHRK 09 ...

Страница 11: ...t the Local Gove rnment Regulations requires users to be fully aware of and able to control their ex posure to meet occupational requirements Exposure awareness can be facilitated by the use of a product label directing users to specific user awareness information Your Retevis two way radio has a RF Exposure Product Label Also your Retevis user manual or separate safety booklet includes informatio...

Страница 12: ...15 of the FCC Rules Operation is subject to the condition that this device does not cause harmful interference Licensed radios are applicable This device complies with part 15 of the FCC Rules Operation is subject to the following two conditions Other devices are applicable 1 This device may not cause harmful interference and 2 this device must accept any interference received including interferen...

Страница 13: ...tronic products batteries and accumulators rechargeable batteries must be taken to designated collection locations at the end of their working life Do not dispose of these products as unsorted municipal waste Dispose of them according to the laws in your area IC Requirements Licence exempt radio apparatus This device contains licence exempt transmitter s receiver s that comply with Innovation Scie...

Страница 14: ... compliance is limited to the specific belt clip and accessory configurations as documented in this filing and the separation distance between user and the device or its antenna shall be at least 2 5 cm Mobile Device during operation the separation distance between user and the antenna subjects to actual regulations this separation distance will ensure that there is sufficient distance from a prop...

Страница 15: ...dy harness for this product Us ing approved body worn accessories is important because theuse of Non Retevis approved accessories may result in exposure levels which exceed the IEEE ICNIRP RF exposure limits Hand held Mode Hold the radio in a vertical position with the microphone and other parts of the radio including the antenna at least 2 5 cm one inch away from the nose or lips The antenna shou...

Страница 16: ...tect your hearing Use the lowest volume necessary to do your job Turn up the volume only if you are in noisy surroundings Turn down the volume before adding headset or earpiece Limit the amount of time you use headsets or earpieces at high volume When using the radio without a headset or earpiece do not place the radio s speaker directly against your ear Use careful with the earphone maybe possibl...

Страница 17: ...o in the area over an air bag or in the air bag deploy ment area The radio may be propelled with great force and cause serious injury to occupants of the vehicle when the air bag inflates To reduce risk Pull by the plug rather than the cord when disconnecting the charger Unplug the charger from the AC outlet before attempting any maintenance or cleaning Contact Retevis for assistance regarding rep...

Страница 18: ......
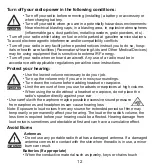
Страница 19: ...ard must be stamped and dated for sale to take effect 3 This card must not be altered Please confirm that the warranty card serial number matches the purchase machine number otherwise it will be invalid 4 The warranty period is one year Chargers batteries headphones antennas and feeders are consumables not covered by warranty 5 Users can choose the following ways to get repair service a At the ori...

Страница 20: ...aixin Science Technology Park No 12 Ganli 6th Road Jihua Street Longgang District Shenzhen China Web www retevis com E mail kam retevis com Facebook facebook com retevis EU Importer Germany Retevis Technology GmbH Address Uetzenacker 29 38176 wendeburg ...

Отзывы: