


34
35
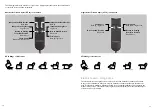
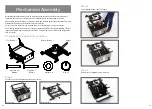
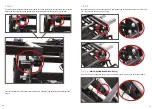
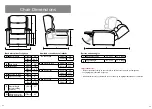
Arm Installation
Step 1
The dark grey tabs (C) on the Arm Bracket (A) hook over the top of the Mechanism Bracket (B)
as demonstrated in image 1. The arm bracket also has three small tabs shown in light pink (D1 and
D2), one at either end, and a top tab (D3). These tabs (D1-3) act as a guide to aid the Arm Bracket
(A) to sit square on the Mechanism Bracket (B) – image 2.
Push the arm towards the mechanism and down to the ground (image 3) ensuring that the pink tabs
are properly located at the top and front/back of the Mechanism Bracket (B) – image 2.
A - Arm Bracket
B - Mechanism Bracket
B
C
A
A
C
D2
D1
D3
B
Image 1
Image 2
Image 3
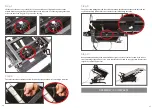
Step 2
Once the arm is positioned you will need to put the chair into the rise position. This enables you to
secure the thumb screws, into the housing holes underneath the arm. Tightly secure the arm.
Important note:
Never use the arms to lift the chair as this may cause damage to them.
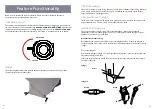
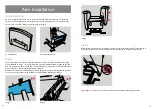
Arm installation
No tools are required. Each arm comes with a pre-attached metal arm bracket (A). This bracket
(A) fits over and sits tightly and securely against the corresponding bracket on the mechanism (B).
If you need to fit or take off the arm tops see page see page 36.


