background image

English

English

3

4

θ

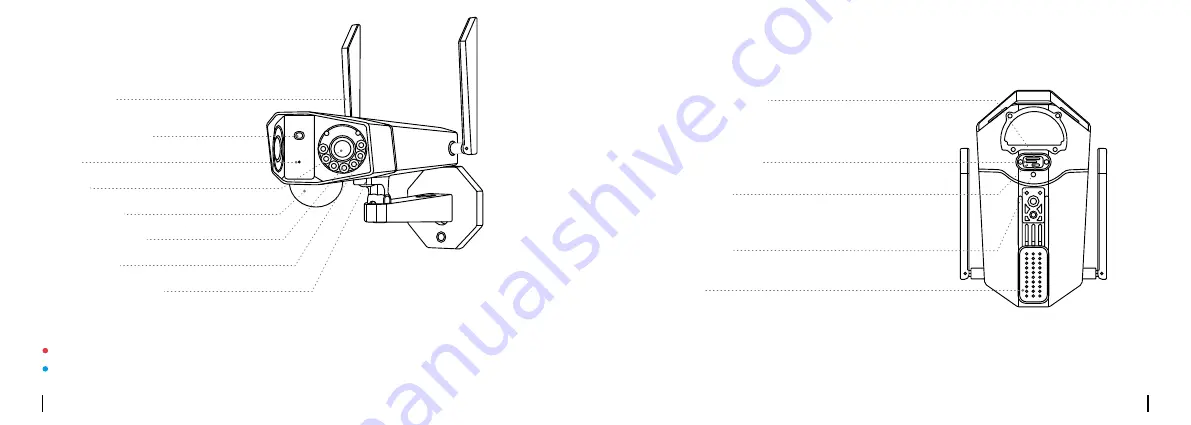
Camera Introduction

θ

Mic

Daylight Sensor

Antennas

Speaker 

Nano SIM Card Slot

Micro SD Card Slot

Reset Button

Power Switch

* Press the reset button with a 

pin to restore factory settings.

* Remove the cover to find the reset hole,

SIM card slot and SD card slot.

Lens

PIR Sensor 

Infrared Lights

Spotlights

Mounting Bracket 

Different states of the status LED:

Red Light: 

WiFi connection failed

Blinking: 

Standby status

Blue Light: 

WiFi connection succeeded

On: 

Working status

Содержание Duo 4G

Страница 1: ...Sept 2021 QSG1_A_EN Quick Start Guide Apply to Reolink Duo 4G ReolinkTech https reolink com 58 03 001 0238 ...

Страница 2: ...a 11 Install the Camera 13 Safety Instructions of Battery Usage 19 Troubleshooting 20 Specifications 21 Notification of 21 Compliance 21 What s in the Box Pack of Screws Camera Strap Antennas Mounting Plate Surveillance Sticker Quick Start Guide USB Cable Screwdriver Mounting Hole Template EN Content ...

Страница 3: ...h Press the reset button with a pin to restore factory settings Remove the cover to find the reset hole SIM card slot and SD card slot Lens PIR Sensor Infrared Lights Spotlights Mounting Bracket Different states of the status LED Red Light WiFi connection failed Blinking Standby status Blue Light WiFi connection succeeded On Working status ...

Страница 4: ... a PIN code You may use your smartphone to disable the PIN first Remove the cover with the screwdriver and then open the rubber cover Insert a SIM eject tool into the hole beside the SIM tray and push it in to pop open the tray Place the SIM card into the tray then insert the tray into the camera completely NOTE Do not insert the IoT or M2M SIM into your smartphone ...

Страница 5: ...ith the SIM card inserted you can turn on the camera Wait a few seconds and a red light will be on and solid for a couple of seconds Then it will go out A blue LED will flash for a few seconds and then go solid before going out You will hear a voice prompt Network connection succeeded which means the camera has been successfully connected to the network ...

Страница 6: ...l strength Network connection failed Data call failed Please confirm your cellular data plan is available or import the APN settings Camera Status Camera cannot recognize this SIM card Your SIM card has a PIN Camera fails to register to the operator network Camera fails to connect to the server The SIM card has run out of data or APN settings are not correct Solutions 1 Check if the SIM card is fac...

Страница 7: ...ing the battery USB θ Orange LED charging Green LED Fully charged Charging Indicator Charge the Camera Charge the battery with a power adapter not included Charge the battery with the Reolink Solar Panel not included if you only purchase the camera θ θ It s recommended to fully charge the battery before mounting the camera outdoors ...

Страница 8: ...ll NOTE Use the drywall anchors inclued in the package if needed 1 2 Install the Camera Install the camera 2 3 meters 7 10 ft above the ground This height maximizes the detection range of the PIR motion sensor For better motion detection performance please install the camera angularly NOTE If a moving object approaches the PIR sensor vertically the camera may fail to detect motion θ Mounting Heigh...

Страница 9: ...er two screws and hang the camera on it Then lock the camera in position with the lower screw 1 2 NOTE The camera can t be adjusted horizontally when ceiling mounted Please adjust the camera angle before fixing it To get the best field of view loosen the adjustment screw on security mount and turn the camera Stiffen the adjustment screw to lock the camera ...

Страница 10: ... strap It is the most recommended installation method if you plan to mount the camera to a tree Install the Camera with Loop Strap θ θ To get the best field of view loosen the adjustment screw on security mount and turn the camera Stiffen the adjustment screw to lock the camera ...

Страница 11: ...s of Battery Usage The camera is not designed for running 24 7 at full capacity or around the clock live streaming It s designed to record motion events and to live view remotely only when you need it Learn useful tips on how to extend the battery life in this post https support reolink com hc en us articles 360006991893 1 The battery is built in so do not remove it from the camera 2 Charge the re...

Страница 12: ...roved by the party responsible for compliance could void the user s authority to operate the equipment two conditions this device may not cause harmful interference and this device must accept any interference received including interference that may cause undesired operation Make sure the PIR schedule is set up properly Check the network connection on your phone and try again Make sure the camera...

Страница 13: ...uggest that you reset the camera to Use of the product is subject to your agreement to the Terms of Service and Privacy Policy at reolink com Keep out of reach of children Terms and Privacy household wastes throughout the EU To prevent possible harm to the environment or human health from uncontrolled waste disposal recycle it responsibly to promote the sustainable reuse of material resources To r...

Страница 14: ...m between the radiator body Cet équipement est conforme aux limites d exposition IC établies pour un environnement non contrôlé L appareil peut être utilisé dans des conditions d exposition portables Cet équipement doit être installé et utilisé avec une distance minimale de 20 cm entre le radiateur et le corps If you need any technical help please visit our official support site and contact our su...

Отзывы: