


b) Batteries
• Check that the batteries are inserted with the correct polarity.
• To prevent battery leakage, remove the batteries when you do not plan to use
the product for an extended period. Leaking or damaged batteries may cause
acid burns if they come into contact with your skin. Always use suitable protective
gloves when handling damaged batteries.
• Batteries must be kept out of the reach of children. Do not leave batteries lying
around, as there is a risk that children or pets may swallow them.
• All batteries must be replaced at the same time. Mixing old and new batteries can
cause the batteries to leak and damage the product.
•
Batteries must not be dismantled, short-circuited or thrown into flames. Never
recharge non-rechargeable batteries. Danger of explosion!
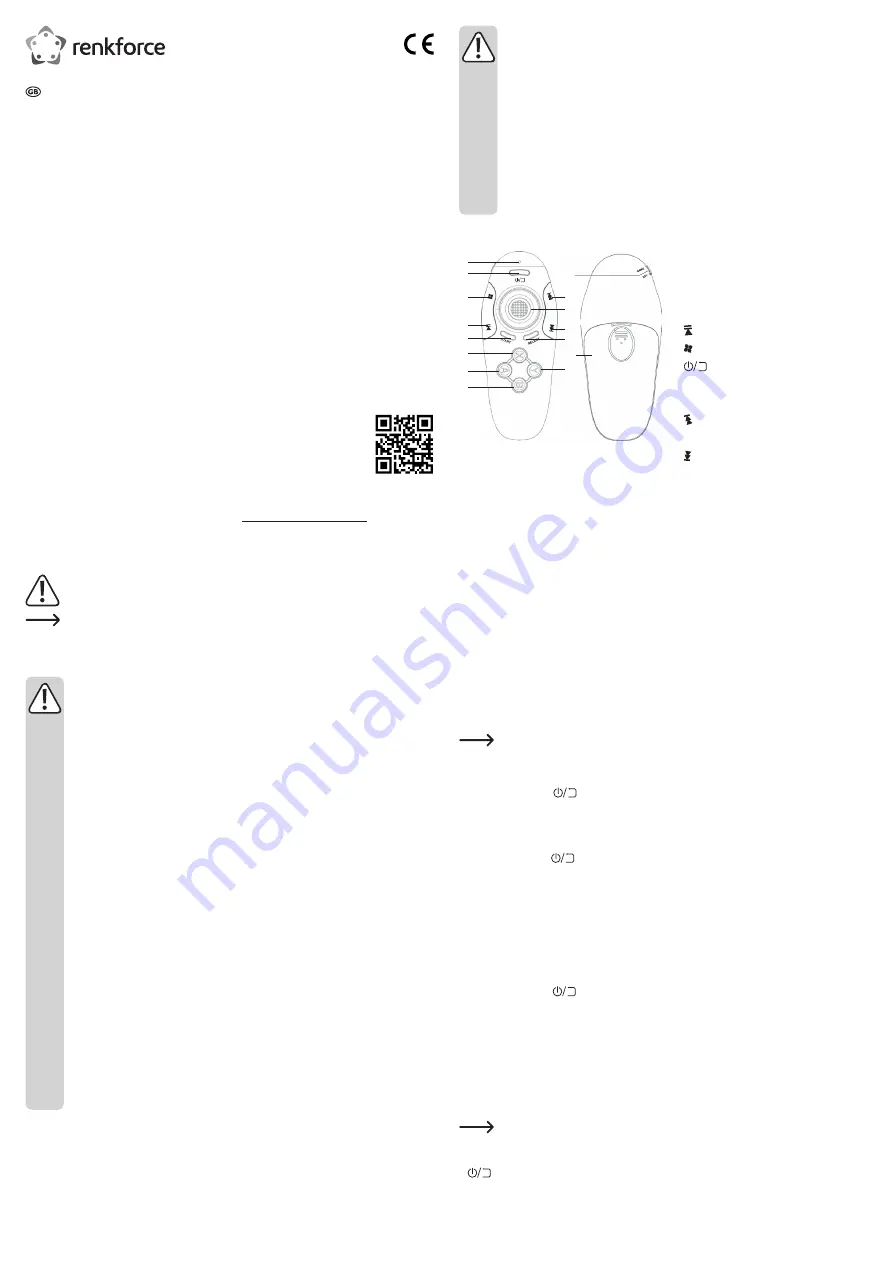
Product overview
1
2
12
13
15
10
11
3
4
5
6
14
7
8
9
1
B
button
2
A
button
3
X
button
4
START
button
5
button
6
button
7
(On/Off) button
8 LED
9
GAME KEY
slide switch
10 button
11 Joystick
12 button
13
SELECT
button
14 Battery compartment cover
15
Y
button
Operation
a) Replacing the batteries
• The enclosed batteries must be inserted before the device can be used.
• To insert the batteries, remove the battery compartment cover (14) from the rear of the
product. To do this, lightly press the locking tab and slide in the direction of the arrow. Open
the battery compartment cover outwards.
• Insert two 1.5 V batteries with correct polarity into the battery compartment (batteries are
enclosed). Always observe the correct polarity (po and negative/-). The battery
compartment is not marked. The spring contact is the negative/- terminal, the po
terminal is the opposite contact.
• Replace the battery compartment cover (14) and ensure that the locking tab clicks into place
when pressed.
If you need to replace the batteries at a later point in time, repeat this procedure but
remove the old batteries first.
b) Switching on and off
• Press and hold the
button (7) until the LED (8) lights up. After a short period, the LED
begins to flash. The device is ready to pair with a Bluetooth device.
•
If the controller is already connected to a Bluetooth device, the LED (8) flashes at longer
intervals (approx. every 9 seconds). This indicates the Bluetooth connection.
• Press and hold the
button (7) until the LED (8) flashes several times and then goes out.
The device is switched off.
• All button and switch activity is indicated by the LED (8) lighting up. This only applies if there
is Bluetooth connection to a device.
• If not used for an extended period of time, the controller switches off automatically in order to
save energy. If there is no Bluetooth connection, the controller switches off after 5 minutes.
If there is a Bluetooth connection, the controller switches off automatically after 30 minutes.
c) Pairing with a Bluetooth device
• Press and hold the
button (7) until the LED (8) flashes quickly to put the controller into
pairing mode.
• Bring your Bluetooth-enabled device within range of the controller.
• Activate the Bluetooth function on the device that you wish to pair. Please also note the
operating instructions of the device. Follow the instructions to pair. The device ID of the
controller is “RC-B01”.
•
The fast flashing of the LED (8) stops as soon as the controller is paired with a Bluetooth
device. The LED (8) then flashes approx. every 9 seconds.
If the LED (8) only flashes every 9 seconds after the device is switched back on, the
controller is already connected to a Bluetooth device.
• To connect the controller to the last paired Bluetooth device, press and hold the
button (7) for 2 seconds.
Operating instructions
VR CONTROLLER RF-VR-CO1
Item no. 1628568
Intended use
The product is designed as an input device (such as a computer mouse) for mobile devices,
apps for virtual reality glasses such as, for example, for Google Cardboard, as well as for
tablet computers and PCs. Android, iOS and Windows operating systems are supported. It is
especially suitable for multimedia applications and supports video switchover, volume control
and other control functions. Communication between the controller and the connected device
takes place wirelessly via Bluetooth. The controller is powered by two 1.5 V batteries (AAA).
This product is intended for indoor use only. Do not use it outdoors. Contact with moisture (e.g.
in bathrooms) must be avoided under all circumstances.
For safety and approval purposes, you must not rebuild and/or modify this product. Using
the product for purposes other than those described above may damage the components. In
addition, improper use can cause hazards such as a short circuit or fire. Read the instructions
carefully and store them in a safe place. Only make this product available to third parties
together with its operating instructions.
This product complies with statutory national and European regulations. All company and
product names are trademarks of their respective owners. All rights reserved.
Package contents
• Controller
• 2x AAA batteries
• Operating instructions
Up-to-date operating instructions
To download the latest operating instructions, visit www.conrad.com/downloads or scan the QR
code on this page. Follow the instructions on the website.
Explanation of symbols
The symbol with an exclamation mark in a triangle is used to highlight important
information in these operating instructions. Always read this information carefully.
The arrow symbol alerts the user to the presence of important tips and notes on
using the device.
Safety instructions
Read the operating instructions and safety information carefully. If you do
not follow the safety information and information on proper handling in these
operating instructions, we will assume no liability for any resulting personal
injury or damage to property. Such cases will invalidate the warranty/
guarantee.
a) General information
• The device is not a toy. Keep it out of the reach of children and pets.
• Do not leave packaging material lying around carelessly. It may become a
dangerous toy for children.
• Protect the product from extreme temperatures, direct sunlight, strong jolts, high
humidity, moisture, flammable gases, vapours and solvents.
• Do not place the product under any mechanical stress.
• If it is no longer possible to operate the product safely, stop using it and prevent
unauthorised use. Safe operation can no longer be guaranteed if the product:
- is visibly damaged,
- is no longer working properly,
- has been stored for extended periods in poor ambient conditions or
- has been subjected to any serious transport-related stress.
• Always handle the product carefully. Jolts, impacts or a fall even from a low height
may damage the product.
• Consult a technician if you are not sure how to use or connect the product, or if
you have concerns about safety.
•
Maintenance, modifications and repairs must be carried out by a technician or a
specialist repair centre.
• If you have questions which remain unanswered by these operating instructions,
contact our technical support service or other technical personnel.


