


3
Operating Instructions
RF-GM-400 Lightweight gaming mouse
Item no: 2376407
1 Intended use
The product is a wired gaming mouse. Use the mouse support software to configure the mouse settings.
The product is intended for indoor use only. Do not use it outdoors.
If you use the product for purposes other than those described, the product may be damaged.
Improper use can result in short circuits, fires, or other hazards.
The product complies with the statutory national and European requirements.
For safety and approval purposes, you must not rebuild and/or modify the product.
Read the operating instructions carefully and store them in a safe place. Make this product available to
third parties only together with the operating instructions.
All company names and product names are trademarks of their respective owners. All rights reserved.
2 Delivery contents
■
Product
■
Operating instructions
3 Latest product information
Download the latest product information at
www.conrad.com/downloads
or scan the QR code shown. Fol-
low the instructions on the website.
4 Description of symbols
The symbol with the exclamation mark in the triangle is used to indicate important informa-
tion in this document. Always read this information carefully.
5 Safety instructions
Read the operating instructions carefully and especially observe the safety informa-
tion. If you do not follow the safety instructions and information on proper handling,
we assume no liability for any resulting personal injury or damage to property. Such
cases will invalidate the warranty/guarantee.
5.1 General
■
The product is not a toy. Keep it out of the reach of children and pets.
■
Do not leave packaging material lying around carelessly. This may become dangerous playing mater-
ial for children.
5.2 Operating environment
■
Do not place the product under any mechanical stress.
■
Protect the appliance from extreme temperatures, strong jolts, flammable gases, steam and solvents.
■
Protect the product from direct sunlight.
5.3 Connected devices
■
Also observe the safety and operating instructions of any other devices which are connected to the
product.
6 Product overview
1
2
3
5
4
6
7
1
2
3
4
Right button
Scroll wheel and button
Left button
DPI selection button
Select between DPI (speed) levels.
5
6
7
Forward/Backward
Backlight mode switch button
Switch between backlight modes
Optical sensor
7 Connecting the mouse
To use the mouse, connect it to the PC.
1. Unwind the cable.
2. Connect the USB plug to a USB port (min. USB 2.0) on the PC.
8 Configuring the mouse
Use the software to create user profiles and configure them to match your application needs. Under user
profiles, configure the backlight settings, record and assign macros to buttons, and adjust the mouse per-
formance. Switch between user profiles when using the mouse.
Before you configure the mouse:
1. Connect the mouse to the PC.
2. Start the software
RF-GM-400
.
8.1 Creating and switching profiles
Create user profiles to personalize mouse settings. Switch between profiles when using the mouse.
Creating a new profile
1. In the software, open the
Customize
tab.
2. Under
Profile
, click
●●● > Adjunction
.
3. Enter a profile name and confirm.
4. Click
Apply
to save the settings.
Switching profiles
1. Under
Profile
, select the profile you want to switch to.
2. Click
Apply
to save the settings.
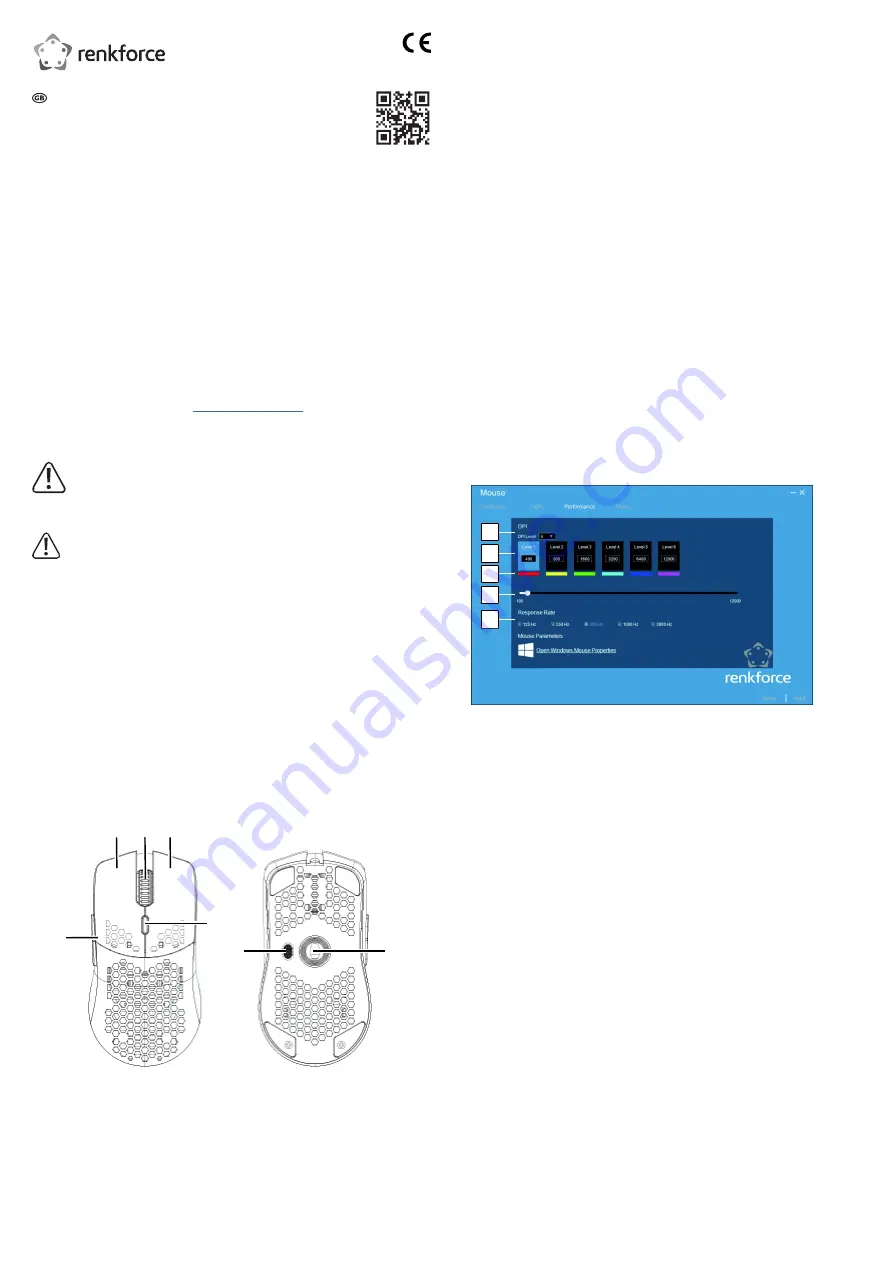
8.2 Adjusting the performance
Configure the DPI settings (mouse pointer speed) of available DPI levels and the response rate of the
mouse.
Interface
1
2
3
4
5
1 DPI levels
Configure how many DPI levels are available un-
der a user profile.
2 Mouse pointer speed (DPI)
The higher the setting the faster the mouse pointer
moves.
3 Colour of DPI level
Assign backlight colours to DPI levels.
4 Speed selection
Set the DPI value (speed) for each DPI level.
5 Response rate
Set how often a status update between mouse and
PC occurs. The higher the value the higher the up-
date frequency.
Procedure
P
RECONDITIONS
:
a
You have selected the user profile you want to customize.
1. In the software, open the
Performance
tab.
2. Adjust the performance settings.
3. Click
Apply
to save the settings.
8.3 Configuring the backlight
Configure available backlight modes.
P
RECONDITIONS
:
a
You have selected the user profile you want to customize.
1. In the software, open the
Light
tab.
2. Select a backlight mode under
Mode
.
3. Adjust the backlight mode settings.
Pay attention to the behaviour of the colour mode (
ColorMode
):
Customize
: Mix and set your own colour.
DPI
: Backlight matches the DPI colour of the selected DPI level.
Cycle
: Backlight cycles through different colours.
4. Click
Apply
to save the settings.