Renkforce 2521582 Скачать руководство пользователя страница 5

8 How to connect

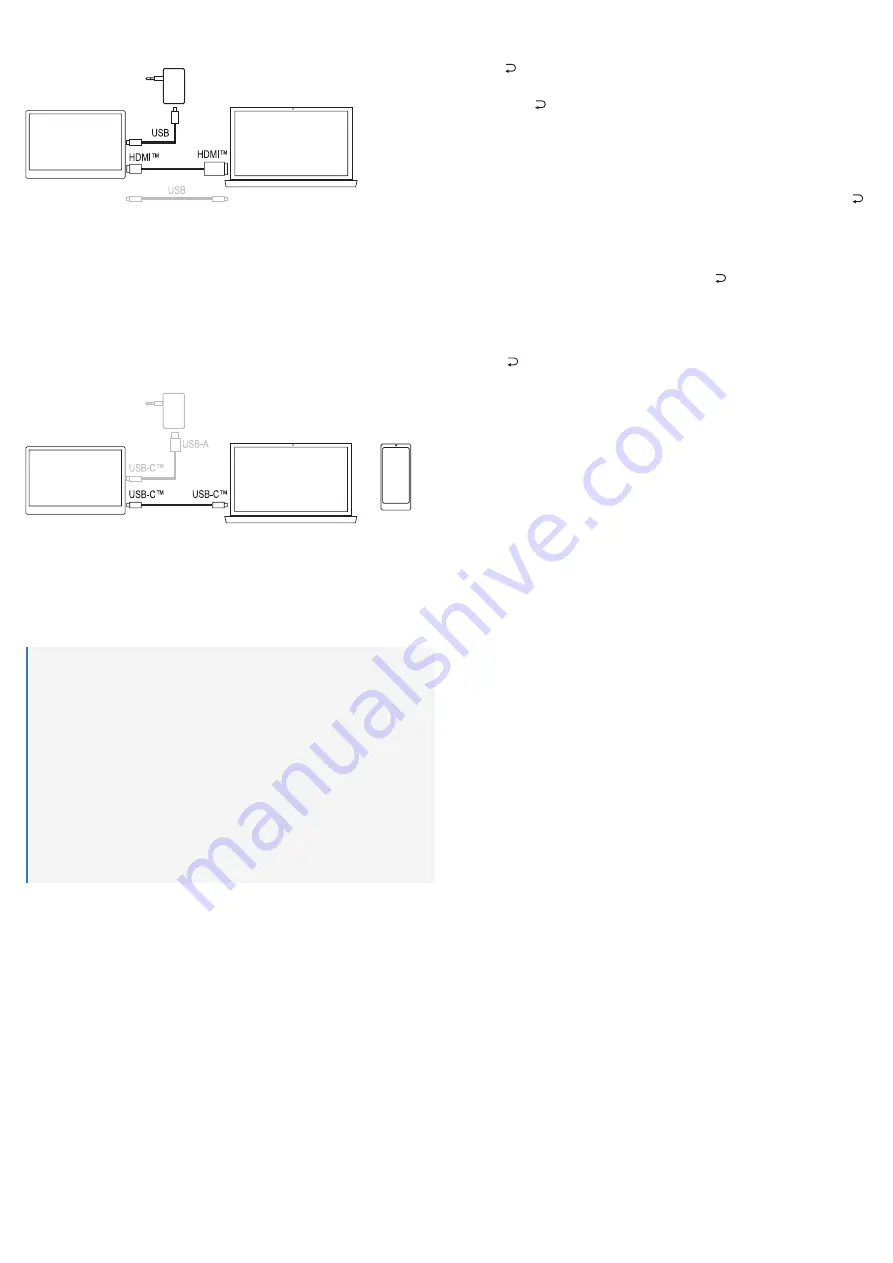
8.1 Video connection via HDMI


Use the supplied cable to connect the Mini-HDMI socket 

(11)

 on the monitor to the video 

output of the playback device you are using (e.g. a PC).


Connect a suitable USB power adapter (not included) to the USB-C™ port 

(8)

 for the power 

supply. This port supports USB-PD. If you are using a conventional USB power adapter 

with an output voltage of 5 V/DC, it must be able to supply a minimum output current of 2 A 

(3 A recommended when setting a higher brightness).


The data connection for a USB keyboard/mouse connected to the microUSB socket 

(6)

 is 

only possible via the USB-C™ video socket 

(9)

.


You can use the two supplied USB cables according to the available connections (USB-C™ 

or USB-A) for the USB power supply or PC.

8.2 Video connection via USB-C™


The USB-C™ port 

(9)

 can be used both as a video input and power input. This port is also 

used for a USB keyboard/mouse connected to the MicroUSB port 

(6)

.


If the playback device connected (e.g. a smartphone) is not powerful enough power to 

supply the monitor, a USB power adapter (shown in grey in the picture above) must be 

connected to the USB-C™ port 

(8)

. This port supports USB-PD. When using a conventional 

USB power adapter with an output voltage of 5 V/DC, it must be able to supply a minimum 

output current of 2 A (3 A recommended when setting a higher brightness).

Important:


A single cable is sufficient for a latter-day PC offering all functional features via USB-

C™ (video data, power supply, USB data).


There are many devices with a USB-C™ port that allow no video connection. Always 

observe the operating instructions for such devices!


When playing a Nintendo Switch™ game console, ensure that the video signal does 

not exceed 720p when the monitor is supplied by a 5 V/DC power adapter. 

When using a USB-PD power adapter, the game console can be charged and set to 

a higher video signal (1080p).


A USB-PD power adapter used must provide a minimum output power of 15 W. When 

used in connection with a Nintendo Switch™, at least 30 W or more is recommended 

to ensure charging.


The monitor can also be connected to a power bank, which should have a minimum 

output power of 18 W.

9 Operation

Switching the monitor on/off

Keep the “ ” button pressed for approx. 3 seconds to switch the monitor on or off.

Selecting input

Briefly press the “

” button; in a small window that appears at the top right, the currently active 

input is highlighted in colour. Use the “+” or “-” button to select the desired input and confirm 

your selection with the “MENU” button.

Adjusting brightness

Briefly press the “–” button. Use the “+” button to increase the brightness and the “–” button to 

decrease the brightness. Hold down the respective button for a quick adjustment. The current 

brightness appears as a bar display with the corresponding numerical value. Press the “ ” 

button to exit the setup (or do not press any button for a few seconds).

Calling up and using the setup menu (OSD)

Briefly press the “MENU” button to call up the setup menu. If you do not press any button for a 

few seconds (10 seconds by default; can be adjusted from 5 to 100 seconds; see menu “OSD 

Setup”), the display will go out automatically (or press the “ ” button).
The active menu item or the active setting function is highlighted in colour. Use the “+” or “–” 

button to change the menu item or adjust the setting (hold down the respective button for a 

quick adjustment).

The “MENU” button is used to confirm a selection in the setup menu.

Press the “ ” button to return to the previous setup menu or to exit the setup menu.

“Luminance” menu

“Brightness” function: Change brightness
“Contrast” function: Change contrast
“Color Preset Mode” function: Select colour preset
“DCR” function: Switch dynamic contrast ratio adjustment on/off
“HDR” function: Switch HDR (“High Dynamic Range”) adjustment on/off/Auto

“Image Setup” menu

“Image Ratio” function: Switch the image format (“wide”/16:9 or 4:3)

“Color Setup” menu

“Color Temp” function: Select colour temperature (“User” setting allows manual adjustment of 

the colour values for “Red” “Green” and “Blue”).

“OSD Setup” menu

“Language” function: Select language
“Transparence” function: Change transparency of the setup menu
“H.Position” function: Change the horizontal position of the setup menu
“V.Position” function: Change the vertical position of the setup menu
“Timeout” function: Select the setup menu automatic exit time

“Reset” menu

“Reset” function: Reset all settings to factory defaults

“Extra” menu

“Input Select” function: Select input manually (HDMI or USB-C™)
“Volume” function: Adjust volume
“Mute” function: Switch the mute function on/off

Содержание 2521582

Страница 1: ...DMI Buchse zur Verfügung Die Stromversorgung erfolgt ebenfalls über USB C entweder gleichzeitig über den für das Videosignal benutzten Eingang oder alternativ über ein separates Kabel abhängig von den vorhandenen Geräten und deren Anschlüssen Das Produkt ist ausschließlich für den Innengebrauch bestimmt Verwenden Sie es also nicht im Freien Der Kontakt mit Feuchtigkeit ist in jedem Fall zu vermeid...

Страница 2: ...en wir eine Ausgangsleistung von min 18 W 9 Bedienung Monitor ein ausschalten Halten Sie die Taste für etwa 3 Sekunden gedrückt um den Monitor ein oder auszu schalten Eingang auswählen Drücken Sie kurz die Taste so erscheint oben rechts ein kleines Fenster der momentan aktive Eingang ist farbig markiert Wählen Sie den gewünschten Eingang mit der Taste bzw aus bestätigen Sie die Auswahl mit der Tas...

Страница 3: ... www conrad com Alle Rechte einschließlich Übersetzung vorbehalten Reproduktionen jeder Art z B Fotokopie Mikroverfilmung oder die Erfassung in elektronischen Datenverarbeitungsanlagen bedürfen der schriftlichen Genehmigung des Herausgebers Nachdruck auch auszugsweise verboten Die Publikation entspricht dem technischen Stand bei Drucklegung Copyright 2022 by Conrad Electronic SE 2521582_V2_0522_02...

Страница 4: ...electric shock or other hazards This product complies with statutory national and European regulations For safety and ap proval purposes you must not rebuild and or modify the product Read the instructions carefully and store them in a safe place Always provide these operating instructions when giving the product to a third party All company and product names contained herein are trademarks of the...

Страница 5: ...Operation Switching the monitor on off Keep the button pressed for approx 3 seconds to switch the monitor on or off Selecting input Briefly press the button in a small window that appears at the top right the currently active input is highlighted in colour Use the or button to select the desired input and confirm your selection with the MENU button Adjusting brightness Briefly press the button Use...

Страница 6: ...anslation reserved Reproduction by any method e g photocopying microfilming or capturing in elec tronic data processing systems requires prior written approval from the publisher Reprinting also in part is prohibited This publication reflects the technical status at the time of printing Copyright 2022 by Conrad Electronic SE 2521582_V2_0522_02_VTP_m_en 12 Disposal All electrical and electronic equ...

Страница 7: ...e prise USB C aussi bien qu avec une prise mini HDMI L alimentation électrique se fait également via une prise USB C soit en simultanée avec l entrée utilisée pour le signal vidéo ou autrement à l aide d un câble séparé selon les appareils à disposition et leurs connexions L appareil est destiné à un usage intérieur uniquement Ne l utilisez pas en plein air Évitez dans tous les cas tout contact av...

Страница 8: ...sation Allumer éteindre le moniteur Maintenez la touche enfoncée pendant 3 secondes environ pour allumer ou éteindre le moniteur Sélectionner l entrée Lorsque vous appuyez brièvement sur la touche une petite fenêtre apparaît en haut à droite dans laquelle l entrée active est marquée en couleur Sélectionnez l entrée que vous souhaitez avec la touche ou confirmez votre choix avec la touche MENU Ajus...

Страница 9: ...Toute reproduction quelle qu elle soit p ex photocopie microfilm saisie dans des installations de traitement de données nécessite une autorisation écrite de l éditeur Il est interdit de le réimprimer même par extraits Cette publication correspond au niveau technique du moment de la mise sous presse Copyright 2022 by Conrad Electronic SE 2521582_V2_0522_02_VTP_m_fr 12 Élimination des déchets Tous l...

Страница 10: ...hones computers enz Zowel een USB C aansluiting als een mini HDMI aansluiting zijn beschik baar als video ingang De voeding wordt ook geleverd via USB C ofwel gelijktijdig via de ingang die wordt gebruikt voor het videosignaal ofwel via een aparte kabel afhankelijk van de bestaande apparaten en hun aansluitingen Het apparaat is uitsluitend bedoeld voor gebruik binnenshuis Gebruik het dus niet in d...

Страница 11: ...iseren een uit gangsvermogen van minimaal 18 W 9 Bediening Monitor in uitschakelen Houd de toets ongeveer 3 seconden ingedrukt om de monitor in of uit te schakelen Ingang selecteren Als u kort op de toets drukt verschijnt rechtsboven een klein venster de momenteel actieve ingang wordt in kleur gemarkeerd Selecteer de gewenste ingang met de toets of bevestig de selectie met de toets MENU Helderheid...

Страница 12: ...onrad com Alle rechten voorbehouden met inbegrip van vertalingen Reproducties van welke aard dan ook bijvoorbeeld fotokopie microverfilming of de registratie in elektronische gegevensverwerkingsapparatuur vereisen de schriftelijke toestemming van de uitgever Nadruk ook van uittreksels verboden De publicatie is een weergave van de technische stand bij het ter perse gaan Copyright 2022 by Conrad Ele...

Отзывы: