background image

P a g e

 | 

25 


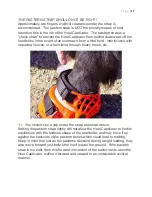
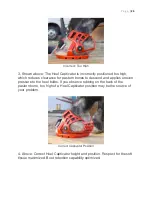
Incorrect: Too High 

 
3. Shown above: The Heel Captivator is incorrectly positioned too high, 
which reduces clearance for pastern bones to descend and applies uneven 
pressure to the heel bulbs. If you observe rubbing on the back of the 
pastern bone, too high of a Heel Captivator position may be the source of 
your problem. 


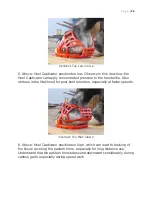
Correct Captivator Position 

 
4. Above: Correct Heel Captivator height and position. Respect for the soft 
tissue maximized. Boot retention capability optimized. 


Содержание Hoof Boots

Страница 1: ...ng for natural flexion of both the hoof and the pastern The boot is comprised of a high tech polymer compound that is extremely durable and designed to provide grip and traction on a variety of surfaces It is designed for a hoof trimmed in a natural barefoot style featuring a short toe low heels and mustang roll on the wall The Renegade is ideal for high performance equine sports They re extremely...

Страница 2: ...es out of the tread This will vary depending upon the way the horse moves the type of terrain ridden upon and the speed traveled thereto If your horse lands toe first or toe heavy you may experience significantly less mileage in the toe region and more wear and tear on the boot structure A horse should not be moving in this manner and as such there is no warranty for tread wear and no warranty for...

Страница 3: ...splaying a naturally trimmed low heel Heels that are allowed to grow too high or trimmed in a high fashion are not desirable for optimal boot use and performance An unnaturally high heel that will impact boot fit and function ...

Страница 4: ...me high heeled untrimmed hoof fit inside a boot shell Note the green arrow displaying the bulge in the sidewall of the boot caused by the pressure of the high heels A naturally low trimmed heel fit inside the same boot ...

Страница 5: ... less than optimal HORSE performance It should also be noted that the high heeled hoof form and its often associated steep pastern angles greatly reduces the length of stride and diminishes the leg column s ability to properly suspend the weight of the horse and absorb shock which may lead to a shorter useful competitive life of the horse If your horse has high heels what should you do The two hoo...

Страница 6: ...or further advice How to Measure and Size for Renegade Hoof Boots Hoof Width is the distance measured at the widest point of the hoof Hoof Length is the distance measured from the toe to the rearmost point of weight bearing colored line above Boot Width Hoof Width AND Boot Length Hoof Length here means greater than Directly below are tables depicting Renegade Hoof Boot sizes and their correspondin...

Страница 7: ...es contact us anyway we might be able to customize at no extra cost Step 1 Width The best time to measure hooves for boots is when the given horse gets a natural trim featuring a low heel a short toe and a mustang roll The mustang roll is important because the inside corners of the Renegade are filleted or rounded to accept the shape of the rounded hoof wall edge mustang roll Taking measurements a...

Страница 8: ...which fits loose is more stable than a boot which fits too tight If the boot shell does not fit easily onto the hoof or if you cannot seat the toe into the boot with a tap from the palm or your hand the boots are too tight Understand that as hooves grow longer they also get wider If the width of your horse s hoof is exactly the same as a particular boot size you should consider the trimming interv...

Страница 9: ...l sitting further back in the boot base than it would otherwise If you find the boot size selected in step 1 is too short go up one numerical boot size to gain additional length This will result in some extra boot width but as noted previously the Renegade need not be fitted tightly and for most situations some extra width is OK If you will be riding in deep mud crossing streams with rocks and bou...

Страница 10: ...ustomers or if you are unsure as to whether or not your hoof form will allow the hoof to seat well in the toe of the boot the standard cut back option would be recommended here To achieve high levels of performance with proper hoof form the max cut back option may be selected Further Information Understanding Hoof Length And the Rearmost Point of Weight Bearing It s easy to see and understand hoof...

Страница 11: ...heel first which is natural Some trimmers will also intentionally round the heels to help promote a heel first landing and to help mimic the rounded heels found in the wild hoof using a trimming technique known as a Reverse Breakover Such trimming methods are recommended and will not negatively impact the fit of the boot Fortunately the measurement does not need to be an exact science The closest ...

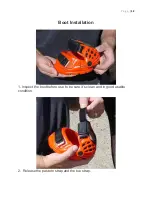
Страница 12: ...P a g e 12 Boot Installation 1 Inspect the boot before use to be sure it s clean and in good usable condition 2 Release the pastern strap and the toe strap ...

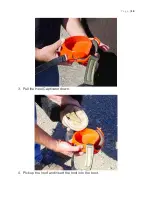
Страница 13: ...P a g e 13 3 Pull the Heel Captivator down 4 Pick up the hoof and insert the hoof into the boot ...

Страница 14: ...P a g e 14 5 Make sure the boot is centered on the hoof 6 Gently seat the boot onto the hoof with the palm of your hand ...

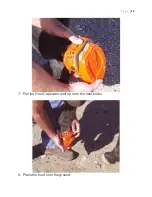
Страница 15: ...P a g e 15 7 Pull the Heel Captivator well up onto the heel bulbs 8 Place the hoof onto the ground ...

Страница 16: ... 16 9 Double check the Heel Captivator position 10 Temporarily fasten the toe strap to keep it from lying on the ground Then fasten the pastern strap but make sure this strap has some clearance to the pastern ...

Страница 17: ... when riding through heavy brush etc 11 You should see a gap under the strap as shown above Setting the pastern strap tightly will not allow the Heel Captivator to find its equilibrium with the bulbous shape of the heel bulbs and may force it up against the backside of the pastern bones which could lead to rubbing Keep in mind that just as the pasterns descend during weight loading they also move ...

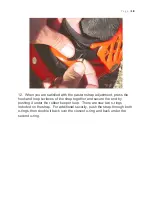
Страница 18: ... and loop surfaces of the strap together and secure the end by pushing it under the rubber keeper loop There are now two o rings included on the strap For additional security push the strap through both o rings then double it back over the closest o ring and back under the second o ring ...

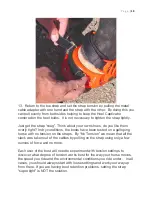
Страница 19: ...he boots have been tested on a galloping horse with no tension on the straps By No Tension we mean that all the slack was taken out of the cables by pulling on the strap using only a few ounces of force and no more Each user of the boot will need to experiment with tension settings to discover what degree of tension works best for the way your horse moves the speed you ride and the environmental c...

Страница 20: ...nd of the strap by pushing it under the rubber keeper loop As with the pastern straps the toe straps now come with two o rings and can be secured in the same fashion Push the strap through both o rings then double it back over the closest o ring and back under the second o ring ...

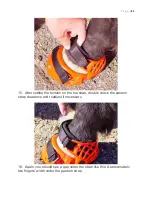
Страница 21: ...er setting the tension on the toe strap double check the pastern strap clearance and readjust if necessary 16 Again you should see a gap under the strap like this Approximately two fingers width under the pastern strap ...

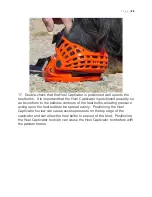
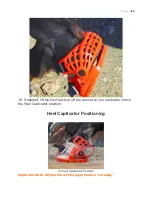
Страница 22: ...nform to the bulbous contours of the heel bulbs allowing pressure acting upon the heel bulbs to be spread evenly Positioning the Heel Captivator too low can cause excess pressure on the top edge of the captivator and can allow the heel bulbs to pop out of the boot Positioning the Heel Captivator too high can cause the Heel Captivator to interfere with the pastern bones ...

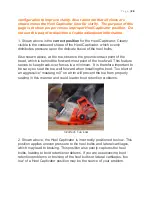
Страница 23: ...18 If needed lift the hoof back up off the ground so you can better check the Heel Captivator position Heel Captivator Positioning Correct Captivator Position Important Note All photos on this page feature cutaway ...

Страница 24: ...rd most point of the hoof wall This feature serves to keep break over forces to a minimum It is therefore important to be sure you seat the toe well forward when installing the boot Too blunt of an aggressive mustang roll on a trim will prevent the toe from properly seating in this manner and could lead to boot retention problems Incorrect Too Low 2 Shown above the Heel Captivator is incorrectly p...

Страница 25: ...s to descend and applies uneven pressure to the heel bulbs If you observe rubbing on the back of the pastern bone too high of a Heel Captivator position may be the source of your problem Correct Captivator Position 4 Above Correct Heel Captivator height and position Respect for the soft tissue maximized Boot retention capability optimized ...

Страница 26: ...ulbs Also obvious is the likelihood for poor boot retention especially at faster speeds Incorrect Too High View 2 6 Above Heel Captivator position too high which can lead to bruising of the tissue covering the pastern bone especially for long distance use Understand that the pastern bones descend downward considerably during various gaits especially during speed work ...

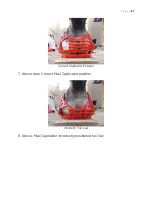
Страница 27: ...P a g e 27 Correct Captivator Position 7 Above view Correct Heel Captivator position Incorrect Too Low 8 Above Heel Captivator incorrectly positioned too low ...

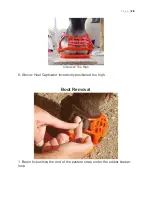
Страница 28: ...P a g e 28 Incorrect Too High 9 Above Heel Captivator incorrectly positioned too high Boot Removal 1 Begin by pushing the end of the pastern strap under the rubber keeper loop ...

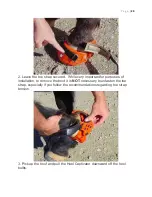
Страница 29: ... important for purposes of installation to remove the boot it is NOT necessary to unfasten the toe strap especially if you follow the recommendations regarding toe strap tension 3 Pick up the hoof and pull the Heel Captivator downward off the heel bulbs ...

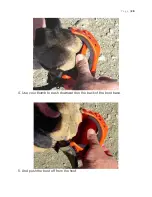
Страница 30: ...P a g e 30 4 Use your thumb to push downward on the back of the boot base 5 And push the boot off from the hoof ...

Страница 31: ...d mud on the sticking surfaces of the straps will reduce their holding power and may cause boot retention problems These straps are considered wear items and may need to be replaced periodically but if you keep them clean and free from dried mud they can last the life of the boot When finished cleaning reinsert the pastern strap and store in a dry place out of direct sunlight ...

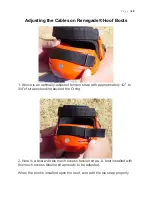
Страница 32: ...sted tension strap with approximately 1 2 to 3 4 of strap extending beyond the O ring 2 Here is a boot with too much excess tension strap A boot installed with this much excess tension strap needs to be adjusted When the boot is installed upon the hoof and with the toe strap properly ...

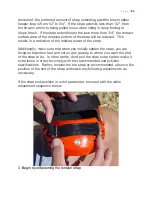
Страница 33: ...holding power of the strap Additionally make sure that when you initially tighten the strap you are doing so based on feel and not on any goal as to where you want the end of the strap to be In other words don t pull the strap extra tight or make it extra loose in order to comply with the recommended end position specifications Rather tension the toe strap as recommended observe the position of th...

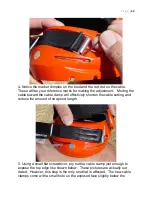
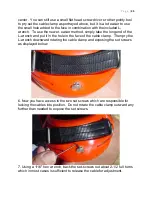
Страница 34: ...le clamp will effectively shorten the cable setting and reduce the amount of strap end length 5 Using a small flat screwdriver pry out the cable clamp just enough to expose the top edge like shown below These pictures are actually out dated However this step is the only one that is affected The new cable clamps come with a small hole on the exposed face slightly below the ...

Страница 35: ...he L wrench and put it in the hole in the face of the cable clamp Then pry the L wrench downward rotating the cable clamp and exposing the set screws as displayed below 6 Now you have access to the two set screws which are responsible for locking the cables into position Do not rotate the cable clamp outward any further than needed to expose the set screws 7 Using a 1 16 hex wrench back the set sc...

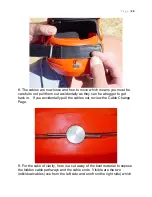
Страница 36: ...as they can be a bugger to get back in If you accidentally pull the cables out review the Cable Change Page 9 For the sake of clarity here is a cut away of the boot material to expose the hidden cable pathways and the cable ends Visible are the two individual cables one from the left side and one from the right side which ...

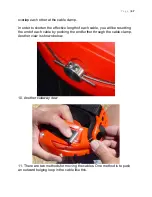
Страница 37: ... length of each cable you will be resetting the end of each cable by pushing the end further through the cable clamp Another view is shown below 10 Another cutaway view 11 There are two methods for moving the cables One method is to push an outward bulging loop in the cable like this ...

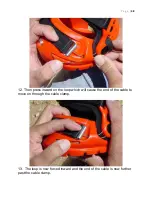
Страница 38: ...g e 38 12 Then press inward on the loop which will cause the end of the cable to move on through the cable clamp 13 The loop is now forced inward and the end of the cable is now further past the cable clamp ...

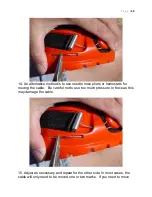
Страница 39: ...pliers or hemostats for moving the cable Be careful not to use too much pressure or force as this may damage the cable 15 Adjust as necessary and repeat for the other side In most cases the cable will only need to be moved one or two marks If you need to move ...

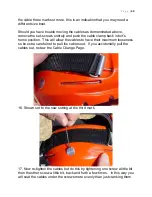
Страница 40: ...This will allow the cables to have their maximum looseness so be extra careful not to pull the cables out If you accidentally pull the cables out review the Cable Change Page 16 Shown set to the new setting at the third mark 17 Now re tighten the cables but do this by tightening one screw a little bit then the other screw a little bit back and forth a few times In this way you will seat the cables...

Страница 41: ...his will more likely ensure that the cables lay side by side so as to receive even pressure from the set screws 18 It is not necessary to get the screws super tight They only need to be goodly snug Using too much force may strip the screw heads or damage the cable 19 Push the cable clamp back into its home position You may use the L wrench and the small hole in the face of the cable clamp in the r...

Страница 42: ...2 fashion as from its exposure in step 5 to do this 20 You are now finished with the cable adjustment so put the boot back on your horse and check the new strap position Make any further adjustments if necessary ...

Страница 43: ... of labor However to reduce overall downtime and shipping costs you may want to consider doing the cable replacement yourself The following instructions will help you do this and as always feel free to call us at any time for one on one technical support 1 Begin by removing the Phillips head screw from the Pulley Button Be sure not to lose this screw 2 If the Pulley Button rotates grab it from bot...

Страница 44: ...on with a small tool like an L Hex Wrench or similar object 4 Push both cables in the direction of the arrow They won t move far but this will provide clearance so the inner piece of the pulley button can be free Continue applying this force on through the next step ...

Страница 45: ...iver push the inner half of the Pulley Button inward and out of its hole Be careful not to poke yourself with the tool 6 The cable loop is now free from the Heel Captivator If you are changing two cables repeat for the opposite side ...

Страница 46: ...Wrench shown here L Hex wrench supplied in your accessory pack into the small hole on the face of the cable clamp and rotate it outward 8 Insert your Hex Wrench into one of the set screws and rotate the clamp out further into the position shown below ...

Страница 47: ...ilar thread lube Take note that the Pro Wrench is precision ground from very hard drill rod steel and can remove tight screws when the L Wrench cannot The L Hex wrench we supply in the accessory pack is of the very finest quality available and made in the USA but by the very nature of how these types of wrenches are manufactured they do not work quite as well as the Pro Wrench The Pro Wrench is a ...

Страница 48: ...e Clamp all the way back flush into its hole Be careful now because any cables you want to stay in place can easily pull out 11 Remove the damaged cable from the cable Guide Ways 12 Install a new cable into the top Guide Way hole first ...

Страница 49: ...ock insertion of a new cable Therefore you must push the previously installed cable end further through the Cable Clamp tunnel and out through the side where the new cable is being installed This way you can install the new cable past the end of the remaining cable without the ends butting heads Shown in the next steps is how you do this 14 Considering that you still have one cable remaining go to...

Страница 50: ...the end of the cable that is good enough 15 Above you can see the opposing cable 16 It s easy now to insert the new cable without the cable ends butting heads inside the tunnel It is also beneficial to put a slight bend to the end of the cable in the direction of the curvature of the boot to reduce snagging ...

Страница 51: ...P a g e 51 17 Push the new cable on through until you can also see the end poke out on its opposing side as shown below 18 The arrows depict what the cables are doing inside the clamp ...

Страница 52: ...a slightly different angle Run the screws down into the hole until they just start making contact with the cable Now tighten one screw a little and then the other back and forth about four times with the final tightening quite snug Understand the set screws are what is locking the cables together If you don t get them tight enough the cables will pull out during use Having said this it is also pos...

Страница 53: ...eel and can even tighten and remove set screws with stripped out sockets 21 Now insert the cable loop into the slot on the end of the Heel Captivator 22 Be sure the cable loop is all the way back into the slot which clears the ...

Страница 54: ... on the inside then it is fully inserted if not then push it a little harder until it is or check that the cable is clear and try again 23 Insert the small half of the pulley button from the outside 24 Insert the Philips head screw tighten and you are finished If you have trouble with any of these steps please contact us for further assistance ...

Страница 55: ...s much faster The studs are factory applied and bonded in place not meant to be easily removable The amount of stud sticking out is standardly less than that shown in the pictures Cutback Options No Additional Charge Standard Cutback 1 4 inch Max Cutback 3 8 This custom option will remove either 1 4 or 3 8 of excess length from the back of the boot This is a good option for horses that overreach a...

Страница 56: ...ses to help improve movement and thus circulation to promote healing This option will add about 60 grams or 2 ounces to the weight of the boot The Renegade Pro Comp Glue On Originally developed as a specialized glue on in 2001 and now patented after a recent design update the Renegade Pro Comp Glue On provides an easily installed alternative to the strap on hoof boot when extra protection is neede...

Страница 57: ...eks Available in all the usual Renegade colors and in sizes 00 0 1 2 and 2W sizes same as strap on boots Colors We are excited to offer Renegade Hoof Boots in 8 different colors to fit a wide range of horse coat and attitude Sport Orange Dragon Fire Red ...

Страница 58: ...P a g e 58 Yellow Gold Arizona Copper Burgundy Blitz ...

Страница 59: ...P a g e 59 Metallic Jade Choco Latte Black Knight ...

Страница 60: ...burn California The Tevis Cup is considered to be the toughest 100 mile endurance competition in the world Out of 169 starters only 87 finished for a completion rate of just 51 Linda and LEAF met the ultimate challenge being the first in history to complete the entire 100 mile Tevis event with a barefooted horse using strap on type hoof boots with no metal teeth without using any accessories such ...

Отзывы: