background image


ZXT-310 

(Z-Wave-to-AV IR Extender) 

Operating Instructions 


Introduction


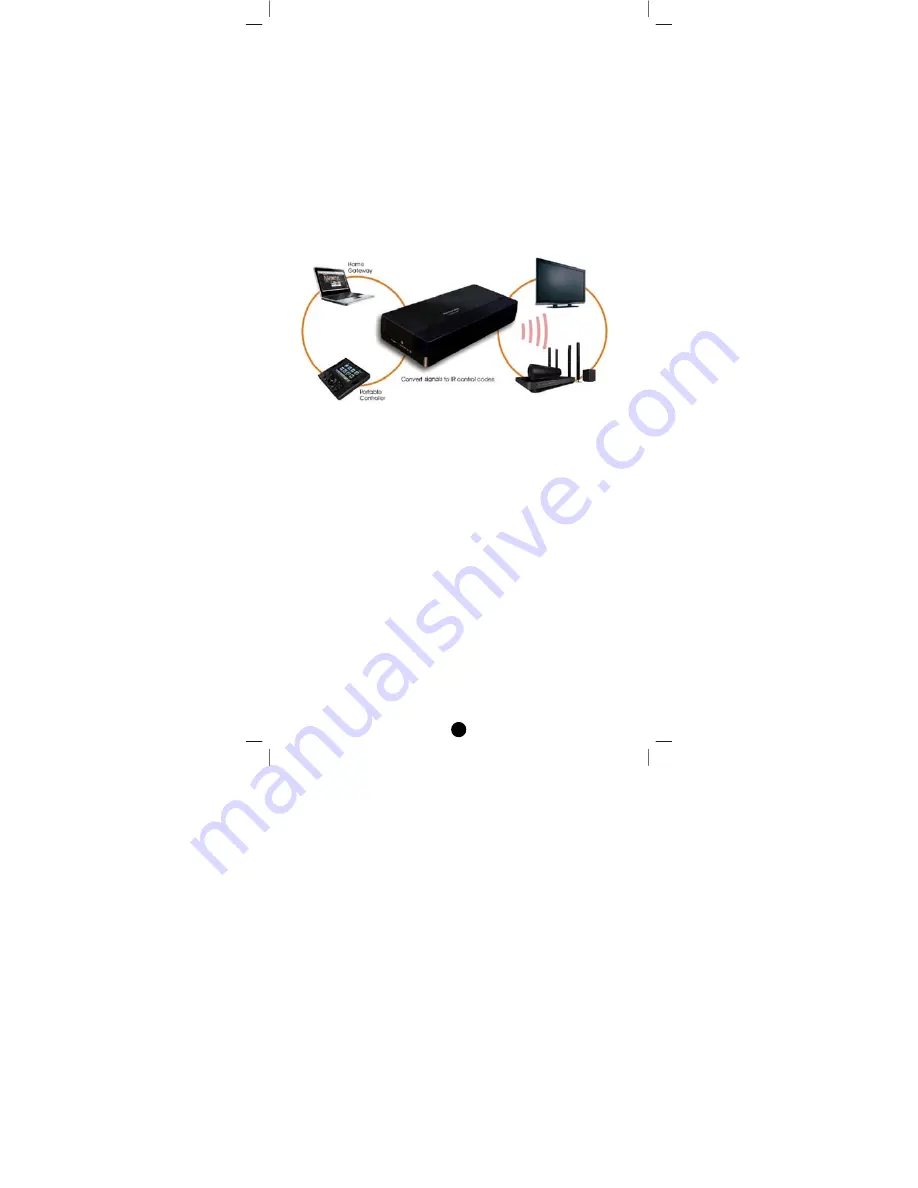
ZXT

310


is


a


Z

Wave

to

AV


IR


Extender


(Figure


1)


and


it


works


with


any


Z

Wave


compliant


controller


or


gateway


by


translating


Z

Wave


Simple


AV


command


to


IR


control


code.


User


can


set


the


IR


code


from


the


built

in


code


library


of


ZXT

310,


or


use


the


learning


function


of


ZXT

310


through


any


Z

Wave


controller


or


gateway.


Figure 1.  Operation diagram 


It


also


supports


Z

Wave


networks


with


multiple


gateways


and


controllers.


Like


every


Z

Wave


accessory,


the


user


will


need


to


include


the


ZXT

310


into


his


Z

Wave


network


using


the


primary


controller.


Then,


the


user


can


use


either


the


primary


controller


or


secondary


controller


to


configure


and


setup


the


ZXT

310


using


Z

Wave’s


configuration


command


class.


Once


the


configuration


and


setup


is


completed,


the


controller


can


use


Z

Wave’s


“Simple


AV


commands


class”


to


control


their


IR

controlled


AV


equipment


with


the


ZXT

310.


User


can


enjoy


fully


wireless


control


and


home


automation


system


anywhere


at


home.


Содержание ZXT-310

Страница 1: ...1 ZXT 310 Z Wave to AV IR Extender Firmware Version V1 0 V1 1 V1 2 ...

Страница 2: ...le AV channel 9 IR Code Selection 10 IR Port Mapping 11 IR Output Power 12 IR Code Learning 13 Reset ZXT 310 to factory default 14 ZXT 310 Information 15 IR Transmission mode 15 End Point Selection Control 16 Z Wave Configuration Parameters 17 Installation 21 Mounting the ZXT 310 to a wall 21 Wireless Information 23 Maintenance 23 Frequently Asked Questions 23 Technical Specifications 25 Checking ...

Страница 3: ...n diagram It also supports Z Wave networks with multiple gateways and controllers Like every Z Wave accessory the user will need to include the ZXT 310 into his Z Wave network using the primary controller Then the user can use either the primary controller or secondary controller to configure and setup the ZXT 310 using Z Wave s configuration command class Once the configuration and setup is compl...

Страница 4: ...any knowledge related to IR control code It also eliminates the need for complex set up procedures and proprietary Z Wave commands to configure the system The IR code library supports various brand name of AV equipment found in the today s market User can use his controller or gateway to send a 4 digits AV IR code number include the brand selection using standard Z Wave configuration command Host ...

Страница 5: ...unique ID code so that controllers not in the network cannot control the system Primary Controller The first controller is used to set up your devices and network Only the Primary Controller can be used to include or delete modules from a network It is recommended that you mark the primary controller for each network for ease in modifying your network Network Wide Inclusion NWI Network Wide Inclus...

Страница 6: ...e INSTALLATION if it is needed to mount the ZXT 310 to a wall Power up the ZXT 310 by the supplied AC DC adaptor L CAUTION Be sure to always use the supplied AC DC adaptor Do not try to power up other device with the supplied AC DC adaptor This could damage the AC DC adaptor or the connected device Please carefully read through the following then store the manual for future reference ...

Страница 7: ...LED flashes once then keep on 2 Refer to your primary controller instructions to process the inclusion setup procedure 3 Press the PROG button on ZXT 310 LED flashes twice then keep on Device inclusion completed Note 1 Red LED flashes 6 times means the setup process is failed Please redo the process again Note 2 If you can t add the ZXT 310 to network it might have been included in another Z Wave ...

Страница 8: ...us on ZXT 310 1 Make sure ZXT 310 switched to Channel 1 EP1 LED flashes once then keep on 2 Refer to your primary controller instructions to process the exclusion setup procedure 3 Press the PROG button on ZXT 310 LED flashes twice then keep on Device exclusion completed ...

Страница 9: ...t Simple AV Channel is a Z Wave virtual channel and it is not related to IR Port output User can use the IR Port Mapping function to map the IR port output to Simple AV Channel AV device Figure 3 Z Wave to IR Channel EP and IR Ports Device End point no IR code no IR output port no IR output power Device icon 1 Device icon 2 Device icon 3 Device icon 4 Device icon 5 Device icon 6 Configuration data...

Страница 10: ...XT 310 1 Make sure ZXT 310 switched to Channel 1 EP1 LED flashes once then keep on 2 Refer to your primary controller instructions to process the configuration setup procedure Parameter 27 Value 0001 Refer to IR code list of ZXT 310 3 Press the PROG button on ZXT 310 LED flashes twice then keep on Entering device code successful Note 1 Red LED flashes 6 times means that the setup process is failed...

Страница 11: ...er instructions to process the configuration setup procedure Parameter 29 Value 01 Enter the IR port number 1 6 which you want to transmit the IR signal 3 Press the PROG button on ZXT 310 LED flashes twice then keep on Set IR Port output successful Note 1 Red LED flashes 6 times means that the setup process is failed Please redo the process again Note 2 All the Simple AV Channel Z Wave to IR Chann...

Страница 12: ... primary controller instructions to process the configuration setup procedure Parameter 28 0x1C Value 255 0xFF Set IR output power level by entering 0 0x00 Normal power mode 255 0xFF High power mode default is in high power mode 3 Press the PROG button on ZXT 310 LED flashes twice then keep on Set IR Power level successful Note 1 Red LED flashes 6 times means that the setup process is failed Pleas...

Страница 13: ...l has completed if necessary before process the following setup Step Setup Key LED Indication Status on ZXT 310 1 Make sure ZXT 310 switched to Channel 1 EP1 LED flashes once then keep on 2 Refer to your primary controller instructions to process the configuration setup procedure Parameter 25 0x19 Value 0001 0x0001 Z Wave Cmd e g if POWER key is going to be learnt input the value 39 0x27 3 Place t...

Страница 14: ...witched to power off Press the key on original remote before learning mode timeout Keep away from incandescent light and direct sunlight during learning Make sure IR Transmitter of your original remote alight with learning diode of ZXT 310 you may also slight adjust closer or further away the distance of two devices Some of remotes the IR transmitter in hidden behind lens and may not installed cen...

Страница 15: ...ill report the supported command class IR Transmission Mode Set IR transmission mode for IR transmission Step Setup Key LED Indication Status on ZXT 310 1 Make sure ZXT 310 switched to Channel 1 EP1 LED flashes once then keep on 2 Refer to your primary controller instructions to process the configuration setup procedure Parameter 31 0x1F Value 255 0xFF Set IR output power level by entering 0 0x00 ...

Страница 16: ...nnel 1 EP1 LED flashes once then keep on 2 Refer to your primary controller instructions to process the configuration setup procedure Parameter 38 0x26 Value 1 0x01 EP1 2 0x02 EP2 3 0x03 EP3 4 0x04 EP4 5 0x05 EP5 6 0x06 EP6 Enter the Endpoint number 1 6 which you want to configure 3 Press the PROG button on ZXT 310 LED flashes twice then keep on End point selection successful Note 1 Red LED flashe...

Страница 17: ... The status value 1 3 4 will be reset to 0 when ZXT 310 receive a get command to this parameter 1 0 0x00 IR channel idle 1 0x01 OK 2 0x02 Downloading 3 0x03 Command Full 4 0x04 Operation Fail Default idle 0x00 23 to 24 0x17 to 0x18 Reserved For internal reference only N A 25 0x19 The Simple AV command number or key going to be learned Any incoming operation may probably to wait up to 15s to releas...

Страница 18: ... 1 default 2 0x02 IR Port 2 3 0x03 IR Port 3 4 0x04 IR Port 4 5 0x05 IR Port 5 6 0x06 IR Port 6 30 0x1E Reserved For internal reference only N A 31 0x1F IR transmission mode 1 0 0x00 Continuous IR transmission mode default 255 0xFF Single shot IR transmission mode 32 to 35 0x20 to 0x23 Reserved For internal reference only N A 36 0x24 Check Library Version Read Only 4 Byte 1 2 Firmware Version Byte...

Страница 19: ...L Mapping Information BASIC Set Value 0x00 will map to Simple AV key ID Power Off 0x00F7 BASIC set Value 0xFF will map to Simple AV key ID Power 0x0027 AV Command to IR Control Code US BR CN Mapping Table ...

Страница 20: ...Command to IR Control Code EU AU IN RU IL Mapping Table L Information If you are using Gateway or other z wave controllers to operate ZXT 310 Please follow the instruction from the gateway or other controller ...

Страница 21: ...EDURE PRECAUTIONS Do not modify parts or use the ZXT 310 in ways other than its intended use Doing so could cause the ZXT 310 to fall and result in an injury Be sure to fully check that there are no electrical wires or pipes inside the wall before mounting If any of the screws are loose the ZXT 310 can fall and cause an injury Do not mount the ZXT 310 with the screws still loose Check that the two...

Страница 22: ...e screw mounting positions are shown in the figure below Note 1 When mounting the screws to the wall leave a space between the wall and screw cap as shown in the figure 3 Insert the ZXT 310 key holes onto the two screws mounted to the wall and then slide downward to secure in place 4 After securing the ZXT 310 to the wall connect the AC DC adaptor and cables to the ZXT 310 Note 1 Check that the ZX...

Страница 23: ...n boxes which could reduce the range by up to 20 to 30 Maintenance 1 Do not expose your unit to dust strong sunlight humidity high temperatures or mechanical shocks 2 Do not use corrosive or abrasive cleansers on your unit 3 Keep the unit dust free by wiping it with a soft dry cloth 4 Do not disassemble your unit it contains no user serviceable parts Frequently Asked Questions Q Why won t my unit ...

Страница 24: ...nt to a Scene Group Q How to select my AV equipment IR code from ZXT 310 A You should refer to the code list and look into the Device Brand and try the code no sequentially until you find the right code You can record down your device code under the table for future reference after setting up the ZXT 310 correctly Q ZXT 310 supports external IR emitters but there is no response on the IR emitter s...

Страница 25: ...Technical Specifications Model No BW8371US ZXT 310US BW8371EU ZXT 310EU BW8371AU ZXT 310AU BW8371IN ZXT 310IN BW8371RU ZXT 310RU BW8371BR ZXT 310BR BW8371IL ZXT 310IL BW8371CN ZXT 310CN RF Frequency 908 42MHz ZXT 310US 868 42MHz ZXT 310EU 921 42MHz ZXT 310AU 865 22MHz ZXT 310IN 869 02MHz ZXT 310RU 921 42MHz ZXT 310BR 916 02MHz ZXT 310IL 868 42MHz ZXT 310CN RF operating distance up to 80ft outdoor ...

Страница 26: ...ction against harmful interference in a residential installation This equipment generates uses and can radiate radio frequency energy and if not installed and used in accordance with the instructions may cause harmful interference to radio communications However there is no guarantee that interference will not occur in a particular installation If this equipment does cause harmful interference to ...

Страница 27: ...l government for information regarding the collection systems available There is no user serviceable parts in this unit The socket outlet shall be installed near the equipment and shall be easily accessible Use only power supplies listed in the user instructions Caution Risk of explosion if battery is replaced by an incorrect type Dispose of used batteries according to the instructions Printed in ...

Отзывы: