background image

11

105020

OWNER’S MANUAL

For more information, visit www.desatech.com

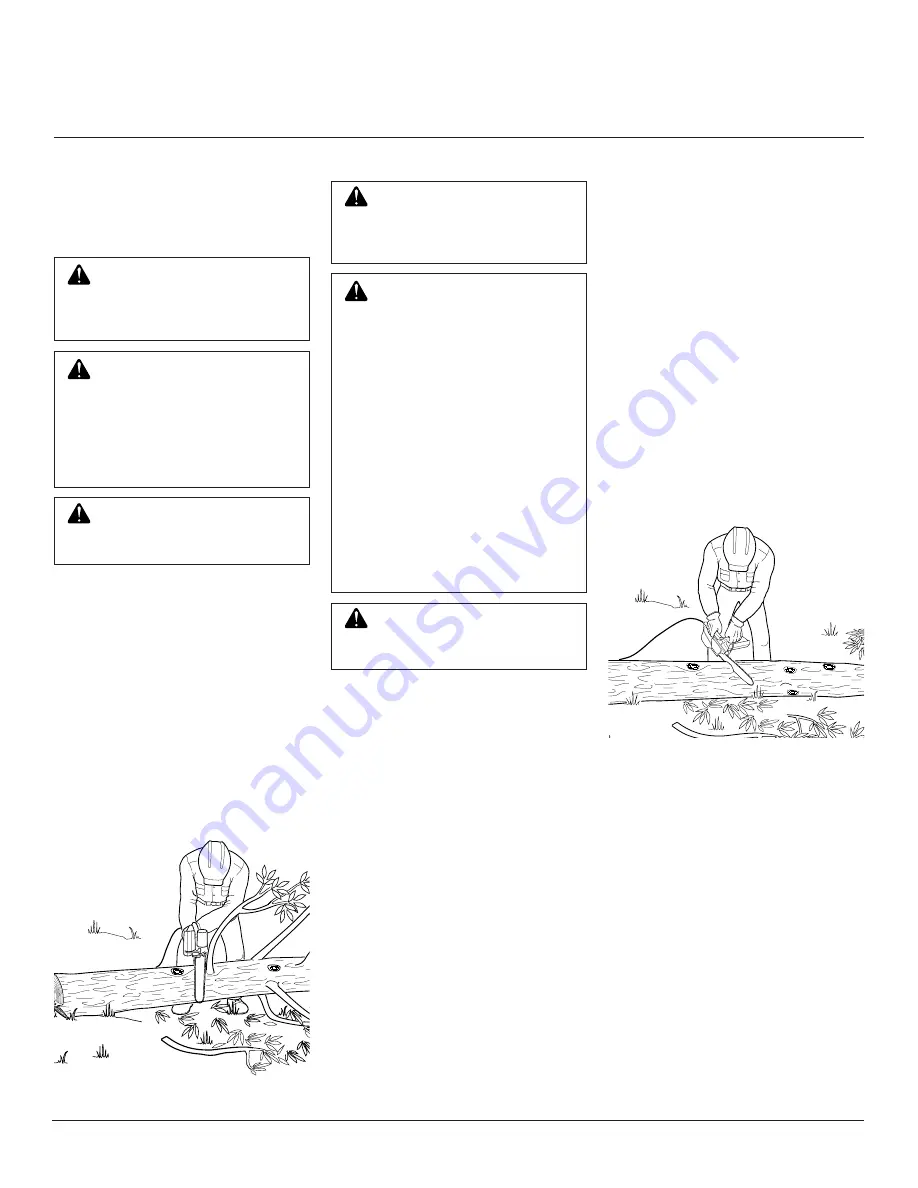
LIMBING A TREE

Figure 13 - Limbing A Tree

BUCKING A LOG

Figure 14 - Bucking Log With Entire
Length On Ground

OPERATING CHAIN
SAW

Continued

Continued

Limbing is removing branches from a fallen
tree. Make sure your footing is firm. Keep
feet apart. Divide your weight evenly on
both feet. Do not remove larger limbs un-
der tree that support log off ground. Remove
each limb with one cut (see Figure 13). Clear
cut limbs from work area often. This will
help maintain a safe work area.

Make sure you start your cut where limb
will not pinch saw during cutting. To avoid
pinching, start cut on freely hanging limbs
from above limb. Start cut on limbs under
tension from under limb. If pinch occurs,
turn saw off, lift limb, and remove saw.

 CAUTION: Seek professional

help if facing conditions beyond
your ability.

 WARNING: When cutting limb

that is under tension, use extreme
caution. Be alert for wood spring-
ing back. When wood tension is
released, limb could spring back
and strike operator causing se-
vere injury or death.

  WARNING: Avoid kickback.

Kickback can result in severe in-
jury or death. See 

Kickback, page

3, to avoid risk of kickback.

Bucking a log is cutting a log into sections.
Make sure your footing is firm. Keep feet
apart. Divide your weight evenly on both feet.
Stand slightly to left of saw. This keeps your
body from being in direct line with chain.
When possible, raise log or section off ground.
Do this by using limbs, logs, chocks, etc.

When cutting through log, maintain control
by reducing cutting pressure near end of cut.
Do not relax your grip on chain saw handles.
Do not let moving chain touch ground.
Ground will dull moving chain. After cut-
ting through log, release trigger to turn saw
off before moving saw.

Follow directions below to buck a log.

Entire Length Of Log On
Ground

Cut log from top (see Figure 14).

 CAUTION: Seek professional

help if facing conditions beyond
your ability.

 WARNING:

• If on slope, make sure log will

not roll down hill. Secure log
by using wooden stakes. Drive
wooden stakes into ground on
downhill side of log. Stand on
uphill side of log while cutting.
Log may roll after cutting.

• Never try cutting through two

logs at same time. This could
increase the risk of kickback.

• While cutting log, never hold

log with your hand, leg, or foot.

• While cutting log, never allow

another person to hold log.

• Turn off and unplug saw be-

fore moving from one place to
another.

  WARNING: Avoid kickback.

Kickback can result in severe in-
jury or death. See 

Kickback, page

3, to avoid risk of kickback.

Содержание EL-7 14-inch

Страница 1: ...roper use of saw can cause severe injury Keep this manual for future reference Models EL 7 16 EL 7 14 LNT 3 12 LNT 3 10 LNT 2 10 LNT 2 8 CSA Classification for this saw is 2C The consumer chain saw intended for general use by home owners cottagers etc and for such general applications as clearing pruning cutting firewood etc ...

Страница 2: ...ickback angle used as a measure of the re action of a hand held chain saw without chain brake when subjected under simu lated conditions to a rota tional kickback impulse Safety Information Warn ings Appears Throughout This Manual Pay close attention to them Below are definitions for the safety information listed throughout this manual WARNING indicates a haz ard which can cause severe personal in...

Страница 3: ...o so 7 Wear snug fitting clothes when oper ating chain saw Do not wear loose clothing or jewelry They can get caught in moving saw chain Read and understand all Safety Warnings on pages 3 through 5 Improperuseofthischainsawcan cause severe injury or death from fire electricalshock bodycontact withmovingchain orfallingwood Kickback Safety Devices On This Saw This saw has a low kickback chain and re...

Страница 4: ...th chain saw unplugged by holding front handle never use front hand guard as handle with finger off trigger with guide bar and chain to rear with scabbard in place SAFETY WARNINGS Continued Saw Maintenance and Kickback Safety Followmaintenanceinstructionsinthismanual Proper cleaning of saw and chain and guide bar maintenance can reduce chances of kick back Inspect and maintain saw after each use T...

Страница 5: ...ody Guide Bar Metal bar that extends from saw body The guide bar supports and guides chain Guide Bar Nose Tip or end of guide bar Kickback Quick backward and upward motion of guide bar Kickback may occur when tip of guide bar touches an object while chain is moving The guide bar will kick up and back towards operator Limbing Process of cutting limb s from a felled tree Low Kickback Chain Chain tha...

Страница 6: ...ORTANT Tighten guide bar nuts fingertightonly Makesureadjustingblock is in oval adjusting hole on guide bar 8 Place chain around drive sprocket then along top groove of guide bar and around guide bar nose Note Make sure cutting edges of chain are facing the right direction Position chain so cutting edges on top of guide bar face guide bar nose see Figure 3 page 7 UNPACKING 1 Remove all items from ...

Страница 7: ...l seepage from tank 4 Wipe off excess oil Note It is normal for oil to seep when saw is not in use Empty oil tank tighten oil cap and store upside down after each use to prevent seepage Mounting Stand Outs Guide Bar Bolts Guide Bar Nuts Adjusting Hole Guide Bar Tapping Screw Saw Chain Cutting Edge Towards Guide Bar Nose Front Hand Guard Drive Sprocket Adjusting Plate Adjusting Screw Sprocket Suppo...

Страница 8: ... Follow steps below to readjust saw chain tension 1 Before adjusting chain make sure guide bar nuts are only finger tight see Figure 3 page 7 Also make sure adjusting block is in oval adjusting hole on guide bar see Figures 3 and 4 page 7 2 Turn adjusting screw clockwise until all slack is out of chain see Figure 5 Note There should be no gap between side links of chain and bottom of guide bar see...

Страница 9: ...w from a cut with saw run ning at full speed Stop saw by releas ing trigger Do not use the chain brake Make sure chain has stopped before setting saw down 9 Practice until you can maintain a steady even cutting rate Figure9 FrontHandGuard SwitchLock out and Trigger Location 5 to 10 cm 2 to 4 1st Cut Pruning Undercut to avoid splintering 2nd Cut Pruning Cut to avoid pinching 6 OPERATING CHAIN SAW C...

Страница 10: ...e distance of at least twice the height of tree being felled WARNING Whenfellingatree beawareofyoursurroundings Do not endanger any person strike utilitylines orcausepropertydam age Iftreestrikesutilitylines con tact utility company at once Felling is the process of cutting down a tree Make sure your footing is firm Keep feet apart Divide your weight evenly on both feet Follow directions below to ...

Страница 11: ...sk of kickback Bucking a log is cutting a log into sections Make sure your footing is firm Keep feet apart Divideyourweightevenlyonbothfeet Stand slightly to left of saw This keeps your body from being in direct line with chain Whenpossible raiselogorsectionoffground Do this by using limbs logs chocks etc When cutting through log maintain control by reducing cutting pressure near end of cut Do not...

Страница 12: ...Guide Bar Cross Section Showing Uneven Bar Wear Keep saw body clean Use a soft cloth damp ened with a mild soap and water mixture Wipe saw body to clean CARE OF GUIDE BAR Uneven bar wear causes most guide bar prob lems Incorrectsharpeningofchaincutterand depth gauge settings often cause this When bar wears unevenly it widens guide bar groove see Figure 17 This causes chain clatter and rivet poppin...

Страница 13: ... store or chain saw supplies outlet 4 mm 5 32 round file File guide Medium sized flat file Depth gauge tool Vise Sharpening Cutters Use file guide for 30 filing 1 Adjust chain for proper tension seeSaw Chain Tension Adjustment page 8 2 Clamp guide bar in vise to hold saw steady Note Do not clamp chain 3 Press four millimeter 5 32 round file attached to file guide into groove be tweentopplateanddep...

Страница 14: ... out of children s reach in a dry place in a carrying case or with scabbard over guide bar with oil cap tight and saw upside down to prevent excess oil seepage After several hand filings have authorized service center or sharpening service machine sharpen chain This will insure even filing Replacing Saw Chain Replace chain when cutters are too worn to sharpen or when chain breaks Only use re place...

Страница 15: ...only sawdust with few large chips Saw runs slow Saw stalls easily Motorofsawdoesnotrunwhenyousqueeze trigger Motor of saw runs but chain does not move Chain does not get oil Chain comes off guide bar Saw smokes Saw leaks oil TROUBLESHOOTING REMEDY See Assembly page 6 See Sharpening Your Saw Chain page 13 Extension cord wire size too small See Extension Cords page 8 1 Press in switch lockout before...

Страница 16: ...sit www desatech com 3 4 20B 5 6 7 13 8 25 9 10 11 12 14 15 16 17 18 19 22 21 21 20 22 22 23 24 1 2 20B 20 ILLUSTRATED PARTS BREAKDOWN LNT 2 AND LNT 3 Installing Shoulder Screw or E Ring Depending On Model Shoulder Screw Installation E Ring Installation ...

Страница 17: ...Bolt 2 2 2 6 107512 01 Cap Bulb Assembly 1 1 1 7 099829 01 Cord 1 1 1 8 077399 02 Side Cover Black 1 1 1 9 076105 Thrust Disk 1 1 1 10 099252 01 Field Brush Assembly 1 __ __ 107482 01 Field Brush Assembly __ 1 1 11 059606 Drive Gear 1 1 1 12 075752 Internal Gear 1 1 1 13 108626 01 Front Hand Guard 1 1 1 14 079089 02 Motor Housing Black 1 1 1 15 NPC 4C Hex Nut 2 2 2 16 077115 Adjusting Plate Assemb...

Страница 18: ...n visit www desatech com ILLUSTRATED PARTS BREAKDOWN EL 7 6 10 15 18 16 23 14 1 2 9 4 3 25 27 21 21 17 11 20 26 12 8 19 19 5 13 22 7 24 20B 20 20B Installing Shoulder Screw or E Ring Depending On Model Shoulder Screw Installation E Ring Installation ...

Страница 19: ...e Cover Black 1 1 9 098042 01 Field Brush Assembly 1 1 10 059606 Drive Gear 1 1 11 075752 Internal Gear 1 1 12 106810 01 Sprocket Cover Black 1 1 13 108626 01 Front Hand Guard 1 1 14 076053 Motor Housing Assembly 1 1 15 097034 02 Housing Assembly Black 1 1 16 NPC 4C Hex Nut 2 2 17 077115 Adjusting Plate Assembly 1 1 18 079086 02 Oil Reservoir 1 1 19 059046 Pan Head Tap Screw 6 6 20 076905 Pan Head...

Страница 20: ...__________________________ Date Purchased ___________________________ TM IndustriesofCanada Inc 2220 Argentia Road Unit 4 Mississauga Ontario L5N 2K7 905 826 8010 FAX 905 826 8236 www desatech com Full 90 Day Warranty DESA Industries warrants each REMINGTON ELECTRIC CHAIN SAW to be free from defects in material or workmanship for 90 days from date of purchase This Warranty does not cover commercia...

Страница 21: ...isque d entraîner des blessures graves Conserver ce manuel pour pouvoir s y référer ultérieurement Modèles EL 7 16 EL 7 14 LNT 3 12 LNT 3 10 LNT 2 10 LNT 2 8 La classification ACNOR CSA de cette tronçonneuse est 2C tronçonneuse conçue pour l usage général par des particuliers propriétaires de résidences cottages etc pour des opérations générales telles le débroussaillage la taille d arbres le scia...

Страница 22: ...a chaîne SYMBOLES DESCRIPTION Ce symbole illustre l angle dereculcalculéutilisécomme mesure de la réaction d une tronçonneuse sans frein de chaîne lorsqu elle est sou mise en simulation à une impulsion de recul rotative Des avertissements con cernantlasécuritéfigurent dans ce manuel Bien les observer Leurs dé finitions sont les suivantes AVERTISSEMENTindiqueun risque pouvant entraîner des blessure...

Страница 23: ...aîne en mouvement 8 Lors de l utilisation de la tronçonneuse porter l équipement de sécurité suivant gants renforcés gants en caoutchouc si l on travaille dehors chaussures de sécurité à bout acier avec semelles antidérapantes protection des yeux telle que lunet tes de sécurité lunettes masque ou masque casque de sécurité serre tête antibruit ou bouchons d oreilles coiffe antiscalp pour retenir le...

Страница 24: ... une entaille faite par le dessous Utiliser des coins en plastique bois ou alliage léger jamais en acier ni en fer pour maintenir une entaille ouverte UTILISATION DE LA TRONÇONNEUSE 1 Rester vigilant Faire preuve de bon sens pendant l utilisation de la tronçonneuse 2 Maintenir la zone de travail propre Les endroits encombrés sont favorables aux accidents POUSSÉE ET TRACTION AVERTISSEMENT Éviter la...

Страница 25: ...Vérifier que les pièces mobiles sont bien alignées et ne sont pas coincées Vérifierquel interrupteurcommandebien la mise en marche et l arrêt du moteur Vérifier qu il n y a pas de pièces cassées ou endommagées Ne pas utiliser la tron çonneusesilesdégâtsaffectentlasécurité ou son fonctionnement Faire remettre l outil en état par un réparateur agréé 3 Se servir de l outil avec précaution Ne jamais l...

Страница 26: ...îne VOCABULAIRE DE LA TRONÇONNEUSE Suite Pointe pare chocs Dent pointue située à l avant du carter à côté de la lame guide Garderlapointepare chocscontreleboislors de l abattage ou du tronçonnage Elle facilite le maintien de la position de la tronçonneuse pendant la coupe Position normale de coupe Position à tenir pendant le tronçonnage et l abattage Poussée recul pincement Poussée brusque en arri...

Страница 27: ...scie vibre fortement et ne coupe pas 5 Mettre le guide chaîne en place sur le carter de la scie Insérer l arrière du guide chaîne entre la cale de réglage et le support du pignon IMPORTANT S assurer d insérer le bloc de réglage dans l ouverture ovale de réglage sur le guide chaîne 6 Aligner les trous sur le support du pi gnon dans l encoche centrale sur le guide chaîne ainsi que les trous dans le ...

Страница 28: ...ion Laisser la chaîne refroidir Procéder de la façon sui vante pour régler la tension 1 Avant de régler la chaîne s assurer que les écrous de la lame guide sont serrés seulement à la force des doigts Voir la figure 3 page 7 Veiller aussi à ce que le bloc de réglage soit dans le trou de réglage ovale sur la lame guide Voir les figures 3 et 4 page 7 2 Tourner la vis de réglage dans le sens horaire j...

Страница 29: ...ssus Le mo teur serait surchargé et pourrait griller 8 Pour sortir la tronçonneuse d une en taille la laisser tourner à la vitesse maxi mum L arrêter en lâchant la gâchette ne pas se servir du frein de chaîne S as surerquelachaîneestimmobiliséeavant de poser l outil sur le sol 9 S exercer à scier jusqu à ce qu on puisse maintenir une allure régulière Figure 9 Emplacement de l écran de protection a...

Страница 30: ...d abattage en mêmetemps prévoirunespace suffisant entre les différentes opérations Il faut une distance au moins égale à deux fois la hauteur de l arbre à abattre AVERTISSEMENT Lors de l abattaged unarbre bienétudier lesalentours Nemettrepersonne endanger Veillerànepasheurter de lignes de services publics et à ne pas causer de dégâts maté riels Sil arbreheurteunelignede service public contacter im...

Страница 31: ...es capacités il lui est conseillé de faire appel à un professionnel Le tronçonnage d une bille se fait en la coupant en tronçons Veiller à maintenir un bon équilibre Garder les pieds écartés Ré partir le poids également sur les deux pieds Se tenir légèrement à gauche de la tronçon neuse Ceci évite que le corps ne soit en prolongement direct de la chaîne Autant que possible soulever la bille ou le ...

Страница 32: ...montrant une usure inégale Maintenir propre le carter de la tronçon neuse Utiliser un chiffon doux imprégné d un mélange d eau et de savon doux Es suyer le carter ENTRETIEN DE LA LAME GUIDE La plupart des problèmes de lame guide sont causés par son usure inégale La cause en est souvent l affûtage incorrect des taillants de la chaîne et le réglage incorrect deslimiteursdeprofondeur Lorsquelalame gu...

Страница 33: ...a teurestcontraintdeforcersurlachaînepour la faire entrer dans le bois et si le sciage ne produit que de la sciure avec peu de gros copeaux c est que la chaîne est émoussée Outils nécessaires pour affûter la chaîne Ces outils peuvent être achetés chez le con cessionnairelocal dansunequincaillerieou undépôtdefourniturespourtronçonneuses lime ronde de 4 mm 5 32 po outil pour limiteur de profondeur l...

Страница 34: ...s de 30 jours procéder de la façon suivante 1 Vidanger le réservoir d huile 2 Déposer la lame guide et la chaîne et les nettoyer Pour ce faire les tremper dans un solvant à base de pétrole ou dans un mélange d eau et de savon doux 3 Sécher la lame guide et la chaîne 4 Placer la chaîne dans un récipient rem pli d huile Ceci l empêche de rouiller 5 Passer une légère couche d huile sur la surface de ...

Страница 35: ...orcée La taille ne produit que de la sciure avec quelques gros copeaux Lachaînetournelentement Ellecalefacile ment Lemoteurdelatronçonneusenemarchepas quand on appuie sur la gâchette Le moteur de la tronçonneuse marche mais la chaîne ne bouge pas L huile n arrive pas à la chaîne La chaîne saute hors de la lame guide La tronçonneuse fume L huile fuit DÉPANNAGE REMÈDE Voir Montage page 6 Voir Affûta...

Страница 36: ...itez www desatech com DÉTAIL DES PIÈCES ILLUSTRÉES LNT 2 ET LNT 3 3 4 20B 5 6 7 13 8 25 9 10 11 12 14 15 16 17 18 19 22 21 21 20 22 22 23 24 1 2 20B 20 Installation du boulon à embase ou de l agrafe en E selon le modèle Installation du boulon à embase Installation de l agrafe en E ...

Страница 37: ... pans 2 2 2 6 107512 01 Ensemble bouchon bulle 1 1 1 7 099829 01 Cordon 1 1 1 8 077399 02 Capot latéral noir 1 1 1 9 076105 Disque de poussée 1 1 1 10 099252 01 Ensemble champ balai 1 __ __ 107482 01 Ensemble champ balai __ 1 1 11 059606 Pignon d entraînement 1 1 1 12 075752 Pignon interne 1 1 1 13 108626 01S Écran de protection avant de la main 1 1 1 14 079089 02 Carter moteur noir 1 1 1 15 NPC 4...

Страница 38: ... visitez www desatech com DÉTAIL DES PIÈCES ILLUSTRÉES EL 7 6 10 15 18 16 23 14 1 2 9 4 3 25 27 21 21 17 11 20 26 12 8 19 19 5 13 22 7 24 20B 20 20B Installation du boulon à embase ou de l agrafe en E selon le modèle Installation du boulon à embase Installation de l agrafe en E ...

Страница 39: ...latéral noir 1 1 9 098042 01 Ensemble champ balai 1 1 10 059606 Pignon d entraînement 1 1 11 075752 Pignon interne 1 1 12 106810 01 Couvre pignon noir 1 1 13 108626 01 Écran de protection avant de la main 1 1 14 076053 Carter moteur 1 1 15 097034 02 Ensemble carter noir 1 1 16 NPC 4C Écrou à six pans 2 2 17 077115 Ensemble plaque de réglage 1 1 18 079086 02 Réservoir d huile 1 1 19 059046 Vis auto...

Страница 40: ..._________________________ Date Purchased ___________________________ IndustriesofCanada Inc 2220 Argentia Road Unit 4 Mississauga Ontario L5N 2K7 905 826 8010 FAX 905 826 8236 www desatech com Garantie de 90 jours DESA Industries garantit que chaque tronçonneuse électrique est exempte de défauts de matériaux et de fabrication pendant 90 jours à partir de la date d achat Cette garantie ne couvre ni...

Отзывы: