background image

11

4. Bitrate


Hier können Sie einstellen, ob die Bitrate angezeigt 
werden soll oder nicht.  

5. REC. USB

Wählen Sie für Aufnahmen USB1 oder USB2 aus 
(Werkseinstellung ist USB1).

6. REC. Bitrate

Wählen Sie eine Bitrate für Aufnahmen aus: 32000, 
40000, 48000, 56000, 64000, 80000, 96000, 
112000, 128000 (default), 160000, 192000, 224000, 
256000, 320000. 

7. Version


Hier wird die aktuelle Firmware des Players angezeigt. 
Aufgrund der modularen Programmierweise gibt es 
drei verschiedene Werte, die angezeigt werden können. 

8. Load Defaults


Mit der Einstellung „Load Defaults“ können Sie den 
Player auf die Werkseinstellungen zurücksetzen. 
Sämtliche Player-Einstellungen werden dabei in den 
Originalzustand zurückgesetzt. Bestätigen Sie das 
Zurücksetzen mit dem Track Select-Encoder -16-. 

9. Exit & Save


Um die individuell eingestellten Parameter zu überneh-
men und das Menü zu verlassen, bestätigen Sie den 
Punkt „Exit & Save“ mit dem Track Select Encoder -16-.

5. Anhang

5.1 Database Builder Software

Im Reloop Support-Forum (www.reloopdj.com/forum) 
können Sie im Download Center in der Kategorie „Software 
updates“ das Programm „Reloop Database Builder“ herun-
terladen. Dieses Programm analysiert den USB-Datenträger 
und legt spezielle Index-Dateien an, damit der Medien-Player 
schneller und einfacher auf Musikdateien zugreifen kann. 
Zudem hat man die Möglichkeit, nach bestimmten Kriterien 
wie Titel oder Interpret interaktiv zu suchen (siehe auch 
Kapitel „Geräteeinstellungen“, Punkt 1, „Playlist“).

Mindeste Systemanforderungen:
Betriebssystem: Microsoft Windows XP (SP3), Vista 
(SP2) CPU: Intel Pentium 4, 1GHz Prozessor oder besser, 
Intel Centrino Mobile Technology 1.6 GHz, 512 MB RAM
Festplattenspeicher: mindestens 100 MB freier Festplat-
tenspeicher benötigt

Gehen Sie wie folgt vor:
1. Reloop Database Builder Software-Installation 
Führen Sie das Installationsprogramm des Database 
Builder aus. Im ersten Schritt klicken Sie auf „Next“. 
 
Wählen Sie hier den Ordner, in dem der Database Buil-
der gespeichert werden soll und bestätigen mit „Next“. 

Das Programm kann nun installiert werden. Klicken Sie 
auf „Install“.


4. Bit Rate


Here you can determine whether the bit rate should be 
displayed or not.

5. REC. USB

Select the recording device between USB1 and USB2 
(default setting is USB1).

6. REC. Bitrate

Select the REC. Bitrate between 32000, 40000, 
48000, 56000, 64000, 80000, 96000, 112000, 
128000 (default), 160000, 192000, 224000, 256000, 
320000. 

7. Version


Here the player‘s current firmware is displayed. Due 

to the modular way of programming there are three 
values that can be displayed.

8. Load Defaults 

With the “Load Default” adjustment it is possible to return 
the player to the default settings. All player adjustments 

are thereby set back to their original status. Confirm the 

setting back via the Track Select Encoder -16-. 

9. Exit & Save


In order to save the individually adjusted settings and 

exit the menu confirm the item “Exit & Save” via the 

Track Select Encoder -16-. 

5. Appendix 

5.1 Database Builder Software

In the Reloop support forum (www.reloopdj.com/
forum) you can download the Reloop  Database Builder 
from the Download Center in the category “Software 
Updates”. This software is capable of analyzing USB 

data carriers, creating special index files, allowing fast 
and easy access to music files. Moreover it is possible 

to search interactively for certain criteria such as title 
or artist (also see chapter “Device Settings”, item 1 
“Playlist”). 
 
Minimum system requirements:
Operating system: Microsoft Windows XP (SP3), Vista 
(SP2), CPU: Intel Pentium 4, 1 GHz processor or better, 
Intel Centrino Mobile Technology 1.6 GHz, 512 MB RAM 
Hard disk: at least 100 MB free storage space required 
 
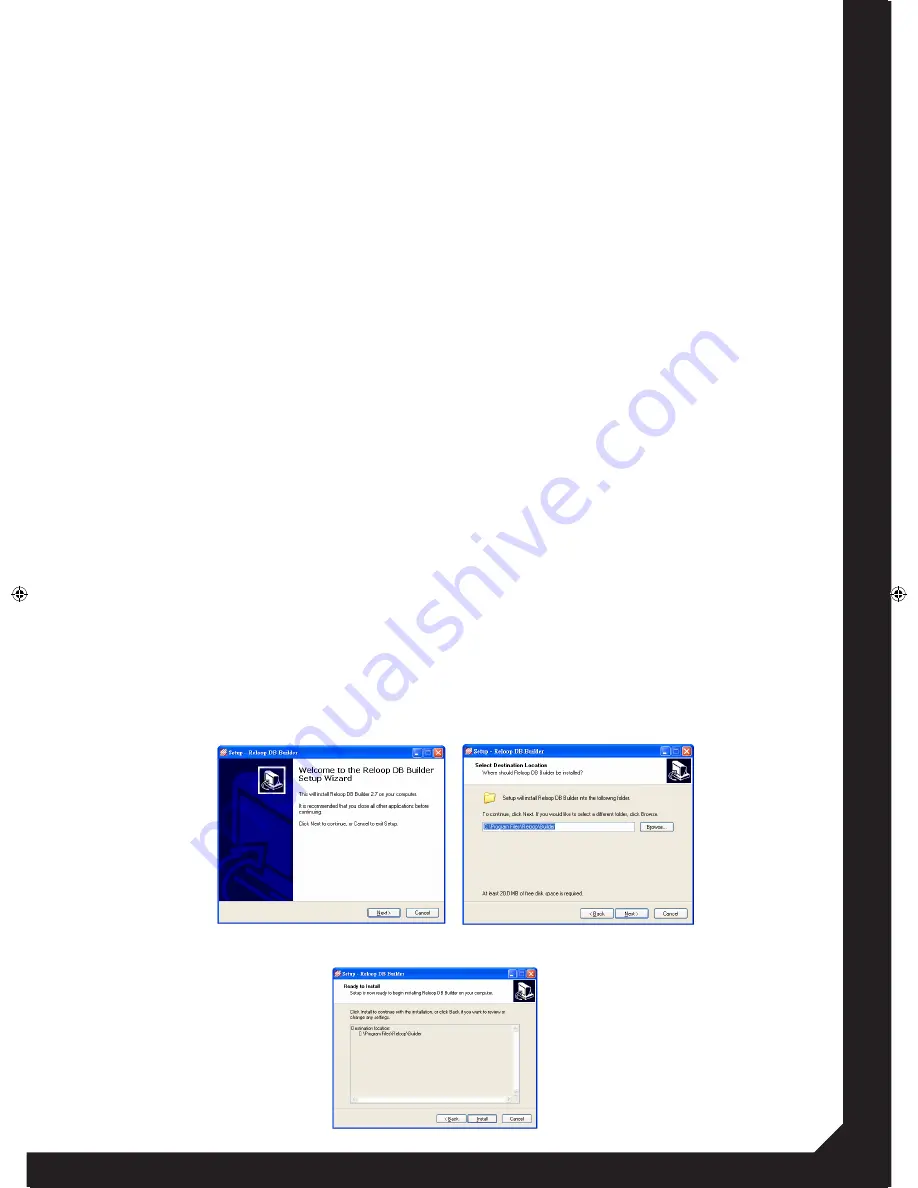
Proceed as follows: 
1. Reloop Database Builder Software Installation 
Carry out the Database Builder‘s installation program. 

As first step click the “Next” button.


Here you can select the folder that you would like to 

use in order to store the Database Builder and confirm 

via “Next”.

The program can now be installed. Click the “Install” 
button. 

Les informations ID3 Tag passent en boucle sans fin 
dans l‘affichage.


4.Débit binaire


Vous pouvez ici régler si le débit binaire doit être 

affiché ou non. 

5. REC. USB

Select the recording device between USB1 and USB2 
(default setting is USB1).

6. REC. Bitrate

Select the REC. Bitrate between 32000, 40000, 
48000, 56000, 64000, 80000, 96000, 112000, 
128000 (default), 160000, 192000, 224000, 256000, 
320000. 

5.Version


Affiche la version actuelle du micrologiciel du lecteur. 

En raison de la programmation modulaire, trois 

valeurs différentes peuvent être affichées.


6.Load Defaults


Le réglage „Load Defaults“ permet de réinitialiser le 
lecteur aux réglages d‘usine. Tous les réglages du lecteur 
sont alors réinitialisés à leurs valeurs d‘origine. Valider la 
réinitialisation avec le Track Select-Encoder -16-. 

7.Exit & Save


Pour appliquer les paramètres réglés individuellement 

et quitter le menu, confirmer l‘option Exit & Save avec 

le Track Select Encoder -16-.

5. Annexe

5.1 Logiciel Database Builder

Dans le forum d‘assistance Reloop (www.reloopdj.com/
forum), vous  pouvez télécharger le programme „Reloop 
Database Builder“ dans la rubrique „Software updates“. Ce 
programme analyse le support de données USB et créé des 
fichiers d‘indexation spéciaux afin que le lecteur de support 
puisse accéder plus rapidement et aisément aux fichiers 
audio. Il permet en outre la recherche interactive selon des 
critères définis tels que titre ou interprète (voir aussi chapitre 
„Réglages de l‘appareil“, paragraphe 1, „Liste de lecture“).

Configuration minimum :

Système d‘exploitation : Microsoft Windows XP (SP3), 
Vista (SP2)
Processeur : Intel Pentium 4, 1GHz ou plus, Intel Cen-
trino Mobile Technology 1.6 GHz, RAM 512 MO
Disque dur : au moins 100 MO disponibles

Procéder comme suit :
1.Installation du logiciel Reloop Database Builder 
Exécuter le programme d‘installation du Database 
Builder. À la première étape, cliquer sur „Next“. 

Sélectionner le répertoire dans lequel le programme 
Database Builder doit être installé et valider avec 
„Next“.

Le programme peut désormais être installé. Cliquer 
sur „Install“. 

RMP1660USB.indd   11

03.07.2014   16:06:12

Содержание RMP-1660 b

Страница 1: ...n manual carefully before initial operation All persons involved in the installation setting up operation maintenance and service of this device must be appropriately qualified and observe this operation manual in detail This product complies with the requirements of the applicable European and national regulations Conformity has been proven The respective statements and documents are deposited at...

Страница 2: ...er is not liable for any damage to property or for personal injury caused by improper handling or non observance of the safety instructions This device left the works in perfect condition To maintain this condition and to ensure a risk free ope ration the user must observe the safety instructions and warnings contained in this operation manual For reasons of safety and certification CE the unau th...

Страница 3: ...ualified service technician before re use Damage caused by fluids inside the device is excluded from the warranty Do not operate the device under extremely hot in excess of 35 C or extremely cold below 5 C conditions Keep the device away from direct exposure to the sun and heat sources such as radiators ovens etc even during transport in a closed vehicle Never cover the cooling fan or vents Always...

Страница 4: ...he device regularly for damage to the mains line or the casing as well as for wear of wear parts such as rotary and sliding switches If it is to be assumed that the safe operation is no longer feasible then the device must be disconnected and secured against accidental use Always disconnect mains plug from the outlet It must be assumed that a safe operation is no longer feasible if the device bear...

Страница 5: ...6 XLR Audio Output symmetrical 27 RCA Audio Output asymmetrical 1 2 Remote Control Designation 28 Open Close Button 29 Search Buttons 30 Track Select Buttons 31 Folder Select Buttons 32 Volume Control 33 Mute Button 34 Keylock Button 35 Pitch Buttons 36 Single Continue Button 37 Cue Button 38 Stop Button 39 Play Pause Button 40 Loop Section 41 Media Select Buttons 11 Touche Loop In 12 Touche Loop ...

Страница 6: ...e keylock function is active When active the track s key is kept when changing the its pitch H Loop Display If a loop has been set and stored it will be shown as Loop on the display I Reloop Display The last stored loop can be called up and activated via the Reloop Button 13 This will be confirmed via the blinking Reloop symbol J Auto Cue Display By pressing and holding the Single Continue Button ...

Страница 7: ... the CD tray 2 Insert the CD Press the Open Close Button once again in order to close the CD tray ATTENTION Never try to close the CD tray manually as this could damage the mechanism USB Connect a standard external USB device such as an USB stick or USB hard disk with power supply of its own to one of the USB ports 3 or 25 Please make sure that the used data carrier and its stored media files are ...

Страница 8: ...ete USB device is played When reaching the end of a CD or a USB device s folder playback will restart from the beginning if the repeat function is active see next paragraph Otherwise it switch to the next folder Apart from these two modes it is also possible to activate the repeat mode This can be de activated by pressing the Folder Button 18 for a longer period The current status can be read via ...

Страница 9: ...utton 12 40 will be pressed again the player then returns seamlessly to playback mode By means of the Reloop Button 13 40 you can activate the stored loop In order to stop the seamless loop press the Loop Out Button 12 40 By shortly pressing the Reloop Button 13 40 the last set loop will return to the loop in point and then played again 3 9 BPM Function The media player disposes of an automatic BP...

Страница 10: ...lly to this Artist If this criteria has been selected it is possible to conti nuously and alphabetically navigate through the artist structure by turning the Track Select Encoder 16 The Track Buttons 30 on the remote control behave analogically to this Album If this criteria has been selected it is possible to conti nuously and alphabetically navigate through the album structure by turning the Tra...

Страница 11: ...ppendix 5 1 Database Builder Software In the Reloop support forum www reloopdj com forum you can download the Reloop Database Builder from the Download Center in the category Software Updates This software is capable of analyzing USB data carriers creating special index files allowing fast and easy access to music files Moreover it is possible to search interactively for certain criteria such as t...

Страница 12: ...ep 2 Using the Reloop Database Builder In order to use the Reloop Database Builder and analy ze your USB storage device proceed as follows Start the installed program As first step select the desired USB storage device and then click the Build button Your USB device will now be analyzed After a successful analysis you can exit the program L installation du programme est exécutée Pour finaliser l i...

Страница 13: ...ilder some problems may occur under Windows Vista and Windows 7 Please observe the following trouble shooting It is not possible to carry out the Database Builder This could be caused by restricted user settings Click on the right mouse button and select the option Carry out as administrator As next step click on Allow in order to carry out the Database Builder programme Votre support de données U...

Страница 14: ...has been formated in a not supported file system The external USB hard disk requires more power than the Reloop media player is able to provide There are no compatible MP3 files on the USB device Use the Media Select Button 5 41 in order to select the correct USB port Please format the device correspondingly The supported file systems can be found in the chapter Technical specifications If you are...

Страница 15: ...Hz 60 dB TCD782 TRK18 XLR Output Level 8 22 dBm 2V 0 5 dB 8 22 dBm 2V 1 dB 1 kHz 0 dB TCD782 TRK2 Note 1 With 20 kHz Low Pass Filter 2 With 20 kHz Low Pass Filter IHF A weighted CD PLAYABILITY ITEM TYPICAL LIMIT CONDITION Interruption 1 mm 0 7 mm TCD 725 Black Dot 1 mm 0 6 mm TCD 725 Finger Prints 75 um 65 um TCD 725 Eccentricity 140 um 140 um TCD 712 without track jump Vertical Deviation 1 mm 0 5...

Страница 16: ...Reloop Distribution Global Distribution GmbH Schuckertstrasse 28 48153 Muenster Germany ...

Отзывы: