5
ENGLISH
OPERATION
1.
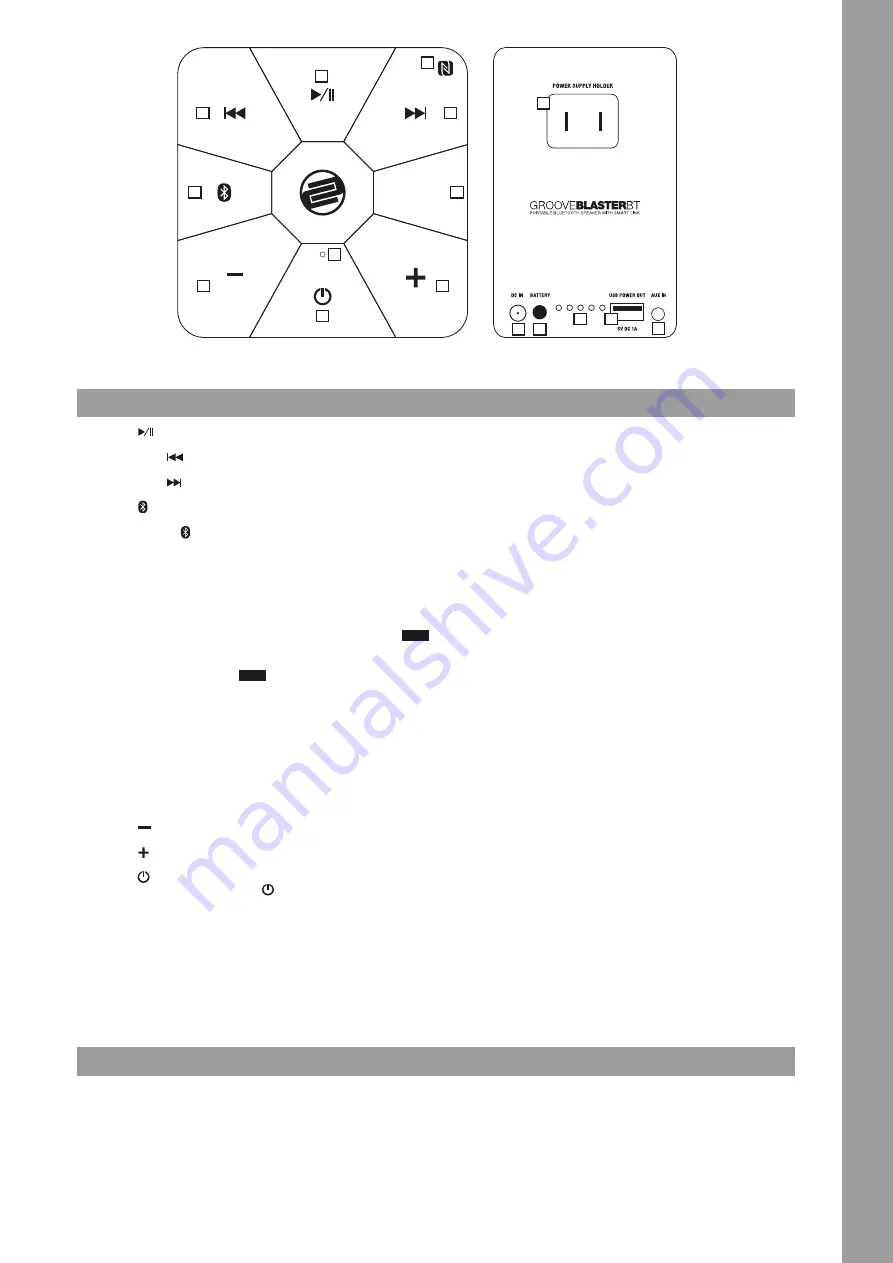
Press
, to start/pause playback.
2.
By pressing
you will skip back to the previous track.
3.
By pressing
you will skip forward to the next track.
4.
Press to pair your external playback device with the Groove
Blaster BT. Please also refer to the manual of your playback device.
When pressing
, a voice will say „Bluetooth on“. After successful
pairing the voice will tell you „Bluetooth connected“.
NOTE! If you turn your Groove Blaster BT back on, the Bluetooth
function will automatically be active and the Groove Blaster BT
will pair with the last used playback device automatically (if the
Bluetooth function of your playback device is on).
5.
If you would like to link two Groove Blaster BT speakers, press
SPEAKER
PAIRING
on both devices.
NOTE! When you press the
SPEAKER
PAIRING
, a voice will say „Pairing“. After
the link has been successfully established, the voice will say
„Pairing successful“. This procedure can take up to 15 seconds.
NOTE! If only one Groove Blaster BT is being used, the output
signal is a ixed mono signal. If two Groove Blaster BT speakers
are being used in link mode, the outputsignal will be stereo.
NOTE! It is possible only in Bluetooth mode to link two Groove
Blaster BT speakers. If the Aux Input -15- is being used with an
external playback device, it is not possible to link two speakers.
6.
Press
to decrease volume.
7.
Press
to increase volume.
8.
Press to turn on the Groove Blaster BT. A voice will say “Power
on“. To turn off the device, press
for several seconds. A voice will
say “Power off“ shortly before the Groove Blaster BT will go out.
NOTE! If the Groove Blaster BT is not sufficiently charged upon
turning it on, the control panel will blink shortly and a voice will
say “Power off“ before turning off again. In this case charge your
Groove Blaster BT or use it via the included power supply unit.
9. Receiver
10. NFC
If your external playback device (smartphone) disposes of NFC,
activate this function. Place your NFC compatible device above the
NFC logo on the control panel in order to carry out NFC detection.
Make sure to place your device‘s NFC chip as close as possible to the
NFC logo on the control panel.
NOTE! For a successful NFC detection, please remove all covers,
RFID blockers or magnetic metal plates that could disturb
detection. Should the NFC detection not work, pair your speaker
via Bluetooth.
11. PSU Connection
Connect the included power supply unit to the PSU Connection -11-
and plug it into a shock-proof outlet.
12. Charging Status Button
Press this button -12- to check the Groove Blaster BT‘s load status.
13. Status LEDs
While charging, the Status LEDs -13- will blink one after the other.
As soon as the Groove Blaster BT is fully charged, all LEDs will be
permanentely lit.
14. USB Port
Connect an external USB device (5V, 2A) to this port in order to
charge your device.
NOTE! This USB port is intended for charging only. In order to
charge an external device, the Groove Blaster BT has to be turned
on.
15. Aux Input
It is possible to connect an external playback device (e.g. CD player)
via 3.5 mm jack to the Aux Input -15-. If the Groove Blaster BT is
already turned on while connecting an eternal playback device, a
voice will say “audio mode on“.
NOTE! In aux mode it is not possible to link two Groove Blaster
BT speakers.
16. Hollow Connector
You can plug your PSU into this connector during transport. In case
you have a plug adapter connected, reove it first.
SPEAKER
PAIRING
1
12
2
13
3
14
4
15
5
16
6
7
8
9
10
11
TECHNICAL SPECIFICATIONS
- Output Power:
.........
2x 12 W + 2x 5 W
- Speakers:
..................
2x 76 mm + 2x 25 mm (mid/tweeter), 1x 152 mm (woofer)
- Battery Capacity:
....
(Li-Ion): 7.4 V / 6.6 AH / 48.84 W
- Connections:
............
1x 3.5 mm Stereo Jack, USB A, Hollow Connector
- Dimensions:
..............
18 x 18 x 43 cm
- Weight:
......................
4.4 kg (incl. PSU)


