
2
The power supply cable must be run directly to the
steam generator from the fuse or circuit breaker
panel. The factory supplied cord set must be run from
the steam generator to the timer control. The control
through the class 2 voltage circuitry, activates a
contactor in the steam generator.
3. FINAL INSTALLATION
ELECTRICAL
(According to Local Electrical Code)
Check to ensure that the RELAX-A-MIST
TM
steam
generator has been installed according to the steam
generator installation instructions.
Caution:
Identify modular connector lock position
before inserting into female connections on
steam unit or switch.
a) At the steam generator electric box, side panel,
remove the protective label from the modular female
plug marked
“Remove to Insert Modular
Connector”
. Note: There may be a second plug for
Optional Automatic Drain.
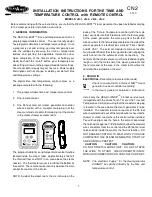
b) Insert the male plug of the 25 foot timer cord set, with
the retaining tab to bottom, into the steam
generator electrical box female plug. The female socket
is marked "TIMER SWITCH” and “24 VAC". (The other
female plug is for the optional automatic drain feature.
This female plug may be sealed with a blank plastic cover
if the auto drain option was not factory ordered.).
c)
Insert the other end of the 25 foot steam generator
connection cord set onto the male plug of the
programmable time and temperature control.
DO NOT CUT FACTORY WIRING TO INSTALL THE
TIME AND TEMPERATURE CONTROL.
DO NOT FORCE MODULAR CONNECTIONS.
DO NOT ADHERE TIME AND TEMPERATURE
CONTROL TO THE WALL UNTIL THE CONTROL
PRETEST IS SUCCESSFULLY COMPLETED.
d) Once the control pretest is completed, tuck the
excess cord behind the switch into the wall or
electrical box if provided. Peel and stick the control to
the wall. If a gap appears between the wall and the
switch, the perimeter of the switch may be sealed
with silicone, or if single gang electrical box is
provided, adjust the electrical box so as not to
protrude through the finished surface of the wall.
DISCLAIMER
The above information represents suggestions only. Each steam room is unique. RELAX-A-MIST manufactures steam
generators only and therefore can not warrant information given regarding steam room materials or construction techniques.
Final selection of the steam room temperature setting and duration of stay is at the discretion of the operators or owners.
STEAM GENERATOR START UP and CONTROL PRETEST
To start, make sure that the electrical and water supplies are turned off and that the programmable switch is not illuminated.
Turn on the water supply to the steam generator. No water will enter as the electricity is still off at this point.
Turn on the electrical supply to the steam generator at the electrical panel or power supply switch to start the pretest.
When the correct voltage is supplied to the steam generator the control will illuminate the digits to display 3 bars. Press the
”on/off”
button. This will illuminate the display in the control to show numbers (changes from bars) and will energize the
steam generator contactor coil which will be noticeable by an audible "click". When the steam unit’s contactors close, the
water level device and water valve will be energized. The water entering the boiler will be audible in the form of several short
"spurts". The water will stop entering the boiler when the optimum water level has been achieved. The contactor and water
valve are indicated by a red LED light and a green LED light illuminating on the circuit board in the steam generator electrical
box. Once the steam unit water level is satisfied, the green LED light will turn off and the red LED light will remain illuminated,
indicating the steam unit is in the heating mode. Turn off the control as the pretest is now complete.
Peel and stick the control to the wall in the shower or steam room. Press the “on/off” button and start the steam unit.
Approximately 2 minutes after starting the control the steam generator will produce steam and it will be entering the shower
or steam room. The first time the generator is turned on (during the start up), there may be an initial burst of hot water from
the steam nozzle until the steam line has come up to temperature. The water from this start up test should be captured as
it may contain impurities from the soldering process during the rough-in connection of the steam lines. When the steam room
has heated to the control’s programmed set point, sit back and enjoy, RELAX-A-MIST
TM
.


