background image

Content

I. General Information

  .  .  .  .  .  .  .  .  .  .  .  .  .  .  .  .  .  .  .  .  .  .  .  .  .  .  .  .  .  .  .  .  .  .  .  .  .  .  . 6

Notes on the electromagnetic compatibility (EMC)  .  .  .  .  .  .  .  .  .  .  .  .  .  .  .  .  .  . 6
Storage of the user manual  .  .  .  .  .  .  .  .  .  .  .  .  .  .  .  .  .  .  .  .  .  .  .  .  .  .  .  .  .  .  .  .  .  .  .  . 6
Product description  .  .  .  .  .  .  .  .  .  .  .  .  .  .  .  .  .  .  .  .  .  .  .  .  .  .  .  .  .  .  .  .  .  .  .  .  .  .  .  .  .  . 7
Medical Device   .  .  .  .  .  .  .  .  .  .  .  .  .  .  .  .  .  .  .  .  .  .  .  .  .  .  .  .  .  .  .  .  .  .  .  .  .  .  .  .  .  .  .  .  . 7
Purpose  .  .  .  .  .  .  .  .  .  .  .  .  .  .  .  .  .  .  .  .  .  .  .  .  .  .  .  .  .  .  .  .  .  .  .  .  .  .  .  .  .  .  .  .  .  .  .  .  .  .  . 7
Evolution and lifetime of products  .  .  .  .  .  .  .  .  .  .  .  .  .  .  .  .  .  .  .  .  .  .  .  .  .  .  .  .  .  .  . 8
Combination with other products  .  .  .  .  .  .  .  .  .  .  .  .  .  .  .  .  .  .  .  .  .  .  .  .  .  .  .  .  .  .  .  . 8
Precautions by alteration of the performance of the device  .  .  .  .  .  .  .  .  .  .  . 8
Reinstatement and installation   .  .  .  .  .  .  .  .  .  .  .  .  .  .  .  .  .  .  .  .  .  .  .  .  .  .  .  .  .  .  .  .  . 8
Cleaning of the system  .  .  .  .  .  .  .  .  .  .  .  .  .  .  .  .  .  .  .  .  .  .  .  .  .  .  .  .  .  .  .  .  .  .  .  .  .  .  . 8
Special advice for transport and storage   .  .  .  .  .  .  .  .  .  .  .  .  .  .  .  .  .  .  .  .  .  .  .  .  . 9
Disposal of the unit according to EU directive 2002/96/EEC  .  .  .  .  .  .  .  .  .  . 9
Safety instructions  .  .  .  .  .  .  .  .  .  .  .  .  .  .  .  .  .  .  .  .  .  .  .  .  .  .  .  .  .  .  .  .  .  .  .  .  .  .  .  .  .  . 10

II.  Instructions on the adequate use of the electronic magnifier 

MANO touch 4

  .  .  .  .  .  .  .  .  .  .  .  .  .  .  .  .  .  .  .  .  .  .  .  .  .  .  .  .  .  .  .  .  .  .  .  .  .  .  .  .  .  .  . 11

Scope of delivery  .  .  .  .  .  .  .  .  .  .  .  .  .  .  .  .  .  .  .  .  .  .  .  .  .  .  .  .  .  .  .  .  .  .  .  .  .  .  .  .  .  .  . 11
Available as an option  .  .  .  .  .  .  .  .  .  .  .  .  .  .  .  .  .  .  .  .  .  .  .  .  .  .  .  .  .  .  .  .  .  .  .  .  .  .  . 11
Characteristics  .  .  .  .  .  .  .  .  .  .  .  .  .  .  .  .  .  .  .  .  .  .  .  .  .  .  .  .  .  .  .  .  .  .  .  .  .  .  .  .  .  .  .  .  . 11
Description of Ports and Controls  .  .  .  .  .  .  .  .  .  .  .  .  .  .  .  .  .  .  .  .  .  .  .  .  .  .  .  .  .  . 12
Description of the controls  .  .  .  .  .  .  .  .  .  .  .  .  .  .  .  .  .  .  .  .  .  .  .  .  .  .  .  .  .  .  .  .  .  .  .  . 12
Touch display   .  .  .  .  .  .  .  .  .  .  .  .  .  .  .  .  .  .  .  .  .  .  .  .  .  .  .  .  .  .  .  .  .  .  .  .  .  .  .  .  .  .  .  .  . 13
Connections .  .  .  .  .  .  .  .  .  .  .  .  .  .  .  .  .  .  .  .  .  .  .  .  .  .  .  .  .  .  .  .  .  .  .  .  .  .  .  .  .  .  .  .  .  .  . 13
Touch screen functions  .  .  .  .  .  .  .  .  .  .  .  .  .  .  .  .  .  .  .  .  .  .  .  .  .  .  .  .  .  .  .  .  .  .  .  .  .  . 14
Using the interface   .  .  .  .  .  .  .  .  .  .  .  .  .  .  .  .  .  .  .  .  .  .  .  .  .  .  .  .  .  .  .  .  .  .  .  .  .  .  .  .  . 14
Description of the menu functions  .  .  .  .  .  .  .  .  .  .  .  .  .  .  .  .  .  .  .  .  .  .  .  .  .  .  .  .  .  . 15
Menu options  .  .  .  .  .  .  .  .  .  .  .  .  .  .  .  .  .  .  .  .  .  .  .  .  .  .  .  .  .  .  .  .  .  .  .  .  .  .  .  .  .  .  .  .  .  . 15
Colour mode  .  .  .  .  .  .  .  .  .  .  .  .  .  .  .  .  .  .  .  .  .  .  .  .  .  .  .  .  .  .  .  .  .  .  .  .  .  .  .  .  .  .  .  .  .  . 16
Back (to previous view)  .  .  .  .  .  .  .  .  .  .  .  .  .  .  .  .  .  .  .  .  .  .  .  .  .  .  .  .  .  .  .  .  .  .  .  .  .  . 17
Brightness  .  .  .  .  .  .  .  .  .  .  .  .  .  .  .  .  .  .  .  .  .  .  .  .  .  .  .  .  .  .  .  .  .  .  .  .  .  .  .  .  .  .  .  .  .  .  .  . 17
Contrast  .  .  .  .  .  .  .  .  .  .  .  .  .  .  .  .  .  .  .  .  .  .  .  .  .  .  .  .  .  .  .  .  .  .  .  .  .  .  .  .  .  .  .  .  .  .  .  .  .  . 17

Содержание MANO touch 4

Страница 1: ...MANOtouch4 EN User manual Please read this user manual carefully prior to installation use and maintenance for your own safety and in order to avoid damages on your system ...

Страница 2: ......

Страница 3: ......

Страница 4: ...tem 8 Special advice for transport and storage 9 Disposal of the unit according to EU directive 2002 96 EEC 9 Safety instructions 10 II Instructions on the adequate use of the electronic magnifier MANOtouch4 11 Scope of delivery 11 Available as an option 11 Characteristics 11 Description of Ports and Controls 12 Description of the controls 12 Touch display 13 Connections 13 Touch screen functions ...

Страница 5: ...d adjustments 19 Color scheme icon settings 22 Image gallery 23 Battery use 24 Replacement of batteries 25 Disposal of batteries 25 Protective circuit of the battery 25 Trouble shooting 26 Technical details 27 Warranty Information 28 Notes 29 ...

Страница 6: ...g system simultaneously with other systems however the possibility of disturbances of the system or other systems should not be neglected For this reason it should be ensured that the system is not placed directly beside or on top of another system If the set up of this system in the proximity of medical measuring devices cannot be avoided the operator of these devices has to be informed that it i...

Страница 7: ...ng writing stand distance view mode trapezoid balance time display HDMI port auto ON OFF auto focus ON OFF inductive charger available as an option due to its light weight and its comfortable design MANOtouch4 can be comfortably used at home or on the go Medical Device MANOtouch4 is classified as a medical device class I according to 93 42 EEC Annexe IX standard 12 For the distribution to countrie...

Страница 8: ...ker Vision GmbH or with a licensed distributor Precautions by alteration of the performance of the device Should any of the technical features or performances change please turn OFF the device Switch OFF the device and disconnect the power sup ply from the socket Please do not switch on the device again Refer directly to your authorized dealer or to Reinecker Vision GmbH Service Centre Reinstateme...

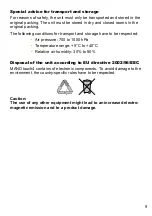
Страница 9: ... transport and storage have to be respected Air pressure 700 to 1000 hPa Temperature range 5 C to 40 C Relative air humidity 30 to 80 Disposal of the unit according to EU directive 2002 96 EEC MANOtouch4 contains of electronic components To avoid damage to the environment the country specific rules have to be respected Caution The use of any other equipment might lead to an increased electro magne...

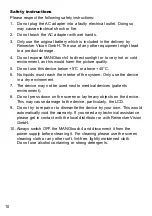
Страница 10: ...quids must reach the interior of the system Only use the device in a dry environment 7 The device may not be used next to medical devices patients environment 8 Do not press down on the screen or lay heavy objects on the device This may cause damage to the device particularly the LCD 9 Do not try to repair or to dismantle the device by your own This would automatically void the warranty If you nee...

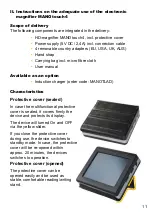
Страница 11: ...an option Induction charger order code MANOTLAD Characteristics Protective cover sealed In case the multifunctional protective cover is sealed it covers firmly the device and protects its display The device will turned On and OFF via the yellow slider If you close the protective cover during use the device switches to standby mode In case the protective cover will be re opened within approx 20 min...

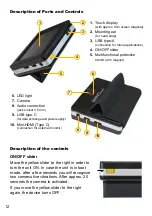
Страница 12: ...ds the camera is activated If you move the yellow slider to the right again the device turns OFF 1 Touch display with approx 9cm screen diagonal 2 Mounting ear for hand strap 3 USB type A connection for future applications 4 ON OFF slider 5 Multifunctional protective cover with magnet 6 LED light 7 Camera 8 Audio connection jack socket 3 5 mm 9 USB type C for data exchange and power supply 10 Mini...

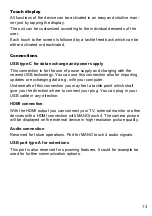
Страница 13: ...or importing updates or exchanging data e g with your computer Underneath of this connection you may feel a tactile point which shall give you the direction where to connect your plug You can plug in your USB cable in any direction HDMI connection With the HDMI output you can connect your TV external monitor or other devices with a HDMI connection with MANOtouch4 The camera picture will be display...

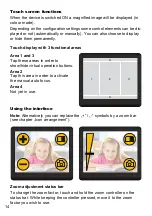
Страница 14: ...with 3 functional areas Area 1 and 3 Tap these areas in order to show hide virtual operation buttons Area 2 Tap this area in order to activate the manual auto focus Area 4 Not yet in use Using the interface Note Alternatively you can replace the symbols by a zoom bar see chapter Icon arrangement Zoom adjustment status bar To change the zoom factor touch and hold the zoom controller on the status b...

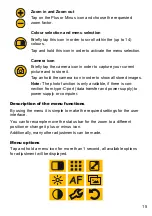
Страница 15: ...era icon in order to show all stored images Note The photo function is only available if there is con nection from type C port data transfer and power supply to power supply or computer Description of the menu functions By using the menu it is simple to make the required settings for the user interface You can for example move the status bar for the zoom to a different position or change it plus o...

Страница 16: ...r to activate them All other colours are deactivated Brief tap previous colour selections brief tap next colour selections true colors Grey scale black font white background white font black background black font green background green font black background black font yellow background yellow font black background blue font yellow background yellow font blue background red font white background wh...

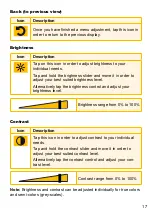
Страница 17: ...rightness to your individual needs Tap and hold the brighness slider and move it in order to adjust your best suited brightness level Alternatively tap the brightness control and adjust your brightness level Brightness range from 0 to 100 Icon Description Tap this icon in order to adjust contrast to your individual needs Tap and hold the contrast slider and move it in order to adjust your best sui...

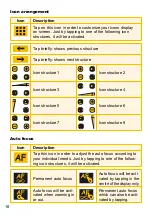
Страница 18: ...re 2 Icon structure 3 Icon structure 4 Icon structure 5 Icon structure 6 Icon structure 7 Icon structure 8 Icon Description Tap this icon in order to adjust the auto focus according to your individual needs Just by tapping to one of the follow ing icon structures it will be activated Permanent auto focus Auto focus will be acti vated by tapping in the centre of the display only Auto focus will be ...

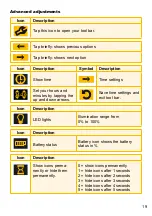
Страница 19: ... tapping the up and down arrows Save time settings and exit tool bar Icon Description LED lights Illumination range from 0 to 100 Icon Description Battery status Battery icon shows the battery status in Icon Description Show icons perma nently or hide them permanently 0 show icons permanently 1 hide icons after 1 seconds 2 hide icons after 2 seconds 3 hide icons after 3 seconds 4 hide icons after ...

Страница 20: ...possibilities to minimize this effect in order to see a real picture With distortion correction Without distortion correction Icon Tap this icon in order to select from three possibili ties 5 5 Selection 1 Tap or in order to adjust the balance value which ranges from 10 to 10 11 Selection 2 Manual range from 55 to 30 Selection 3 Trapezoid balance OFF ...

Страница 21: ...adjustment When you select an icon by touching it it will be confirmed by a green arrow Touch this icon again the green icon will disappear Factory reset A Recall user adjustment A A Save user adjustment A B Recall user adjustment B B Save user adjustment B Your selection will be recalled when exit Icon Description Intensity of vibration Intensität der Vibration in 6 Stufen einstellbar 3 0 Vibrati...

Страница 22: ...Tap this icon in order to individually set your icons The chosen setting will be activated by tapping Tap briefly shows previous icon view Tap briefly shows next icon view You can adjust various icon settings according to your individual preferences ...

Страница 23: ... tapping this icon in full screen mode you will lead back to the picture gallery To delete a picture from the gallery tap and hold it for approx 2 sec until the X icon appears To revoke the dele tion process tap and hold the deleted picture for approx 2 sec until the X icon disappears Tap and hold the semi colored picture in the center until 2 arrows appear on screen Move your finger in direction ...

Страница 24: ...l 3 When the battery status indicator on the screen shows no bar means that the battery level is low and the battery shall be charged 4 Charging time of the battery takes approx 4 hours When fully charged operating time is approx 3 hours depending on the brightness adjusted Note If the battery status is low the unit turns off automatically If this happens just connect your unit with a power supply...

Страница 25: ...Otouch4 is now ready for operation Disposal of batteries Batteries must be disposed according to the country specific rules They shall never be burned Let neither your children nor your pets play with batteries Protective circuit of the battery Despite of the protective circuit of the battery it is prohibited to generate a short circuit by any metal to the battery In that case there is a risk of e...

Страница 26: ...l focus is set In this mode MANOtouch4 only focuses if the focus button is pressed To avoid this you can change from manual focus to auto focus mode in the menu setting Make sure that no dust comes into contact with the camera lens Clean the lens with the cleaning cloth provided Display is too dark or too bright If no image can be seen on the screen try adjusting brightness or contrast Derating of...

Страница 27: ...s Brightness of screen approx 500 cd m2 Color Mode 14 color modes Image memory approx 100 pictures LED lights Continuous OFF Clock display via buttons combination Reading stand included in the delivery Battery Lithium Polymer battery replaceable Power supply 100 240 VAC 50 60 Hz secondary 5 VDC 2 4 A Operating time approx 3 hours depending on the brightness adjusted Charging time approx 4 hours We...

Страница 28: ...invalidation of the warranty 4 Interventions from persons other than Reinecker Vision GmbH authorised specialists may lead to invalidity of warranty 5 Partial warranty is valid for light sources serving to illuminate the reading object batteries and other parts subject to wear and tear 6 If a warranty claim is necessary the system has to be returned to the manufacturer in Alsbach Hähnlein or to yo...

Страница 29: ...Notes ...

Страница 30: ......

Страница 31: ...Type MANOtouch4 MANOT040 Serial number Manufacturer Reinecker Vision GmbH Final examination Power supply 100 VAC 240 VAC 50 60 Hz Via power supply unit 5V DC 2 4A Power consumption max 12 watt ...

Страница 32: ...ren dort ansässigen Händler Reinecker Vision GmbH International Contact sales department customer relations Sandwiesenstraße 19 DE 64665 Alsbach Hähnlein customer service Erlenweg 3 DE 64665 Alsbach Hähnlein Tel 49 6257 9311 0 Fax 49 6257 9311 8230 E Mail international reineckervision de www reineckervision com Reinecker Vision GmbH Zentrale Vertrieb Kundenberatung Sandwiesenstraße 19 64665 Alsbac...

Отзывы: