background image


 39

ES


11  5.  Funciones del software 


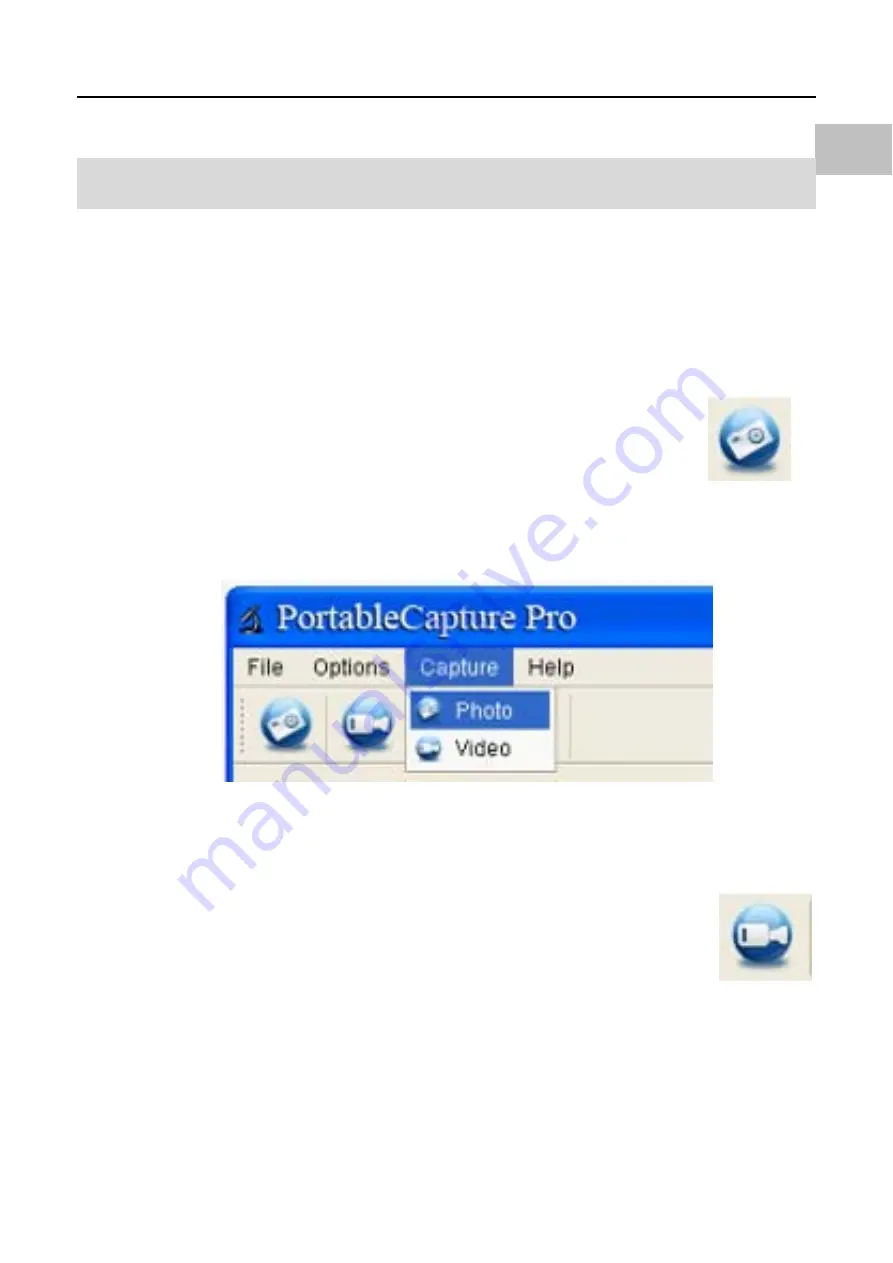
11.1  Captura de Foto 

a. Haga clic en el icono de acceso directo “Foto” 


en la barra del menú principal. 

b. Haga clic en “Capturar > Foto”. 


11.2 Captura 

de 

Vídeo 

a. Haga clic en el icono de acceso directo “Vídeo” 


en la barra del menú principal. 

b. Haga clic en “Capturar > Vídeo”. 

Содержание 66134

Страница 1: ...Mobiles freistehendes LCD DIGITALMIKROSKOP Bedienung sanleitung...

Страница 2: ...9 4 3 Symbole auf dem Bildschirm 11 4 4 Mikroskop einschalten 12 4 5 Mikroskop ausschalten 12 4 6 Aufnahme 13 4 7 Download auf Computer 21 4 8 Vorschau auf Computer 21 4 9 Akku laden 22 4 10 Anschluss...

Страница 3: ...Mikroskop starten 36 11 Softwarefunktionen 37 11 1 Foto aufnehmen 37 11 2 Video aufnehmen 37 11 3 Timer Foto Video 38 11 4 Kalibrierung und Messung 39 11 4 1 Kalibrierung 39 11 4 2 Messung 43 11 4 3...

Страница 4: ...stets korrekt zu bedienen Benutzen Sie das LCD Digitalmikroskop nicht in Umgebungen in denen solche Ger te verboten sind Unsachgem e Benutzung kann zu schweren Unf llen f hren ffnen Sie nicht das Geh...

Страница 5: ...chen Sie das LCD Digitalmikroskop mit einem weichen trockenen Tuch ab FCC Hinweis Dieses Ger t wurde getestet und entspricht den Bestimmungen f r Digitalger te Klasse B in bereinstimmung mit den FCC R...

Страница 6: ...5 DE 2 Vorbereitung 2 1 Lieferumfang LCD Digitalmikroskop Netzteil Lithium Akku USB Kabel TV Kabel CD Kurzanleitung Reinigungstuch Kalibrierungskarte...

Страница 7: ...ktion Nr Funktion 1 3 5 LCD Display 9 LED Helligkeitsregler 2 microSD Slot 10 Zoom 3 Einstellrad B 11 5 V DC Eingang 4 Mikroskopr hre 12 TV Ausgang 5 Objekttisch 13 USB Port 6 Einstellrad A 14 Batteri...

Страница 8: ...ayback left Wiedergabe Pfeiltaste links Menu Setup Einstellungen Confirm Best tigung Color Mode Up Farbmodus Pfeiltaste aufw rts Down Pfeiltaste abw rts Power on off Ein Aus LED Dimmer LED Helligkeit...

Страница 9: ...am Computer Unterst tzt microSD Karten bis zu 32 GB Treiber f r Windows XP SP2 Vista Win7 und Mac OS 10 6 10 7 Direktanschluss Treiberinstallation nicht notwendig kostenlos herunterladen Lithium Akku...

Страница 10: ...Siehe Kapitel 4 9 zum Laden des Akkus 4 2 microSD Karte nicht mitgeliefert einsetzen Die microSD Karte nicht mitgeliefert wird zur Speicherung Ihrer Bilder und Videos ben tigt microSD Karte einsetzen...

Страница 11: ...im Einsetzen der Karte keine Kraft auf das kann Mikroskop und microSD Karte besch digen Richten Sie die microSD Karte neu aus siehe Abbildung und versuchen Sie es noch einmal Die microSD Karte muss vo...

Страница 12: ...3 Symbole auf dem Bildschirm Symbol Bedeutung Standbildaufnahme Timer Aufnahme Laufende Bildnummer Gesamtzahl m glicher Bilder bei aktueller Aufl sung microSDKarte eingesetzt Aktuelle Aufl sung Akkua...

Страница 13: ...das Vergr erungsrad nach unten 4 4 Mikroskop einschalten Dr cken Sie Ein Aus um das Mikroskop einzuschalten Press on off button Ein Aus dr cken 4 5 Mikroskop ausschalten 1 Ein Aus dr cken 2 Automatis...

Страница 14: ...13 DE 4 6 Aufnahme WheelC Einstellrad C WheelB Einstellrad B WheelA Einstellrad A Object Stage Objekttisch 1 Schalten Sie das Mikroskop ein und legen Sie das zu betrachtende Objekt auf den Objekttisch...

Страница 15: ...ct onto the stage Objekt auf Objekttisch legen 2 Drehen Sie Einstellrad A um das Objekt dicht an die Mikroskopr hre zu bringen Rotate Wheel A to bring the stage Einstellrad A drehen um den Objekttisch...

Страница 16: ...e Einstellrad C nach links um die Verriegelung zu l sen 3 Drehen Sie Einstellrad B um die Bildsch rfe einzustellen Einstellrad B drehen um die Bildsch rfe einzustellen Rotate Wheel B to get a fine foc...

Страница 17: ...E Rotate Wheel C clockwise to lock the stage Einstellrad C nach rechts drehen um den Objekttisch zu verriegeln 5 Bild oder Video aufnehmen Dr cken Sie die Aufnahmetaste um ein Bild oder Video aufzuneh...

Страница 18: ...e links um den Videomodus aufzurufen Das Videosymbol wird oben links im Bild angezeigt 2 Dr cken Sie die Aufnahmetaste um die Videoaufnahme zu starten Dr cken Sie die Taste erneut um die Aufnahme zu b...

Страница 19: ...E 2 Dr cken Sie die Pfeiltasten aufw rts abw rts um das gew nschte Bild oder den Videoclip auszuw hlen 3 L schen Im Wiedergabemodus dr cken Sie zum Aufrufen des Untermen s dann best tigen Sie die L sc...

Страница 20: ...edergabemodus dr cken Sie zum Aufrufen des Untermen s dann best tigen Sie den berschreibschutz 5 Diashow Im Wiedergabemodus dr cken Sie zum Aufrufen des Untermen s dann w hlen Sie das Intervall und be...

Страница 21: ...rschaumodus dr cken Sie um zwischen Farbe Positiv Negativ umzuschalten 8 Vergr ern dr cken Sie das Zoom Einstellrad nach oben 9 Verkleinern dr cken Sie das Zoom Einstellrad nach unten Zoom in Vergr er...

Страница 22: ...Computer 1 Schlie en Sie das Mikroskop ber USB Kabel am Computer an 2 W hlen Sie Massenspeicher um die gespeicherten Bilder und Videos anzuzeigen 4 8 Vorschau auf Computer 1 Schlie en Sie das Mikrosko...

Страница 23: ...ehen ber die Software PortableCapture zur Verf gung 4 9 Akku laden Vor der Benutzung des Mikroskops m ssen Sie den Akku laden 1 Schlie en Sie den kleinen Stecker des Netzteils am DC Eingang auf der R...

Страница 24: ...rd schwach und die Bildqualit t verschlechtert sich Schlie en Sie das Netzteil wieder zum Laden an 4 10 Anschluss an Fernseher Video in on TV monitor Videoeingang auf Fernseher Video out Videoausgang...

Страница 25: ...formationen zur Lage der Anschl sse 3 Schalten Sie den Fernseher ein Stellen Sie den Fernseher auf den entsprechenden Kanal ein Die Vergr erungen werden nun auf dem Fernsehbildschirm angezeigt 5 Die M...

Страница 26: ...men I stellen Sie die Aufl sung auf VGA 1 3M 3M 5M 8M 12M ein 2 Dr cken Sie OK zur Best tigung 5 1 2 Timer 1 Im Hauptmen I stellen Sie den Timer ein Frames Hier geben Sie die Bildanzahl mit den Pfeilt...

Страница 27: ...zwischen den Bildern 2 Dr cken Sie OK zur Best tigung und dr cken Sie Men Einstellungen zur R ckkehr in den Vorschaumodus Dann dr cken Sie die Aufnahmetaste 8 um die Aufnahme zu starten W hrend der a...

Страница 28: ...dbilder zur Verf gung 5 1 3 Quality Im Hauptmen I w hlen Sie die Qualit t als Super Fine Fine oder Normal Diese Auswahl f hrt zu unterschiedlicher Bildkompression 5 1 4 Sharpness Im Hauptmen I w hlen...

Страница 29: ...feiltaste links um Hauptmen IIaufzurufen Hier stellen Sie die Sprache Energiesparschaltung Datumstempel TV Ausgang Datum und Uhrzeit Formatierung microSD Karte Systemr ckstellung und Version ein 5 2 1...

Страница 30: ...29 DE 5 2 2 Power Save 1 Im Hauptmen II w hlen Sie die Energiesparschaltung zum Ausschalten des Mikroskops im Ruhezustand 5 2 3 Date Stamp 1 Im Hauptmen II w hlen Sie den Datumstempel als...

Страница 31: ...Uhrzeit werden auf den Aufnahmen vermerkt Date Nur das Datum wird auf den Aufnahmen vermerkt Off Weder Datum noch Uhrzeit werden auf den Aufnahmen vermerkt 5 2 4 TV Out Im Hauptmen II w hlen Sie den T...

Страница 32: ...atum und Uhrzeit stellen Sie mit den Pfeiltasten links rechts aufw rts abw rts ein 2 Das Datumformat stellen Sie als YY MM DD Jahr Monat Tag DD MM YY Tag Monat Jahr oder MM DD YY Monat Tag Jahr ein 5...

Страница 33: ...Systemr ckstellung Im Hauptmen II w hlen Sie Default um das System zu den Werkseinstellungen zur ckzustellen 5 2 8 Version Im Hauptmen II w hlen Sie Version um die aktuelle Firmware Version des Ger ts...

Страница 34: ...h Betriebszeit 2 Stunden Ladezeit 5 Stunden Bildfrequenz 30 fps Netzteil Eingang 100 240 V 50 60 Hz Ausgang 5 V 1 A OSD Sprachen Englisch Deutsch Franz sisch Spanisch Italienisch Portugiesisch Japanis...

Страница 35: ...op ist am Fernseher angeschlossen es erscheint jedoch kein Bild auf dem Bildschirm Vergewissern Sie sich dass der Fernseher eingeschaltet ist Stellen Sie den Fernseher auf den korrekten Videoeingang e...

Страница 36: ...folgendes Men wird automatisch angezeigt 1 PortableCapture Pro Software installieren Klicken Sie auf PortableCapture Pro Software und rebooten Sie das System wenn Sie dazu aufgefordert werden 2 Sie k...

Страница 37: ...oskop starten Schlie en Sie das Mikroskop am USB Port Ihres PC an wie auf Seite 20 dargestellt dann starten Sie die Software durch Klicken auf das Symbol auf dem Desktop der nachstehende Bildschirm wi...

Страница 38: ...nktionen 11 1 Foto aufnehmen a Klicken Sie auf das Symbol Foto in der Men leiste b Klicken Sie auf Capture Photo 11 2 Video aufnehmen a Klicken Sie auf das Symbol Video in der Men leiste b Klicken Sie...

Страница 39: ...38 DE 11 3 Timer Foto Video Klicken Sie auf das Symbol Timer in der Men leiste Unter Timer Photo k nnen Sie Startzeit Intervall und...

Страница 40: ...Unter Timer Video k nnen Sie Startzeit Intervall und Gesamtzahl der Videos einstellen 11 4 Kalibrierung und Messung Bitte f hren Sie vor der Messung eine Kalibrierung durch 11 4 1 Kalibrierung W hlen...

Страница 41: ...die Sch rfe des Mikroskops und dann die Vergr erung ein bis das Bild klar ist Nehmen Sie ein Bild des gew hlten Bereichs auf wenn die Skala parallel zum Kreuz ist wie nachstehend dargestellt 2 Doppel...

Страница 42: ...e auf den Anfangs und Endpunkt eines bekannten Wertes Ein Dialogfenster wird angezeigt in welchem Sie den genauen Wert des Messbeispiels als Actual dimension eintragen Die Software kalibriert die Verg...

Страница 43: ...linie muss parallel zur Skala verlaufen 4 Messen Sie nun mit Any Angle Line unter dem Messsymbol den Wert erneut Entspricht der Messwert der Software in etwa dem genauen Wert der Skala so ist die Kali...

Страница 44: ...Sie auf das Bild zum Aufrufen des Messmen s Unter dem Messsymbol w hlen Sie die gew nschte Messoption 1 Any Angle Line Messung Zum Messen einer geraden Linie klicken Sie auf einen Punkt und ziehen Sie...

Страница 45: ...ziehen Sie eine Linie bis zum Kreisradius Radius Umfang und Fl che des Kreises werden angezeigt 4 Diameter Circle Messung Klicken Sie auf einen Punkt und ziehen Sie eine Linie bis zum Kreisdurchmesser...

Страница 46: ...t Magnification Reset Picture Magnification wie nachstehend dargestellt Dann starten Sie die Kalibrierung erneut Einzelheiten zur Kalibrierung siehe Seite 37 2 ndern Sie die Vergr erungsrate und nehme...

Страница 47: ...on Set Picture Magnification ein Dialogfenster wird angezeigt Geben Sie die Vergr erungsrate ein und klicken Sie auf OK 3 M chten Sie Bilder mit der gleichen Vergr erungsrate aufnehmen so klicken Sie...

Страница 48: ...Sie k nnen mit der Messung direkt beginnen 11 4 4 Zeichnen und Text Sie k nnen im Bild zeichnen oder Text hinzuf gen und f r sp tere Analysen speichern 1 Klicken Sie auf das Symbol zur Auswahl der Ze...

Страница 49: ...48 DE 2 Klicken Sie auf das Symbol und stellen Sie die Schrift im Ausklappmen ein wie nachstehend dargestellt...

Страница 50: ...m Hauptmen Foto aufnehmen Zur Aufnahme von Einzelbildern Videoaufzeichnung Start Stopp Timer f r Foto Video Startzeit Intervall und Gesamtzahl Bilder Videos einstellen Vollbildmodus dr cken Sie ESC od...

Страница 51: ...50 DE 12 2 Hauptmen 12 2 1 Datei Bildverzeichnis Verzeichnis zum Speichern der aufgenommenen Bilder einstellen Videoverzeichnis Verzeichnis zum Speichern der aufgenommenen Videos einstellen...

Страница 52: ...schaubildes ndern Date Time System Datum Uhrzeit auf Vorschaufenster einstellen Language OSD Sprache w hlen Crossing Kreuz auf Vorschaufenster anzeigen Fullscreen mode Vollbildmodus aufrufen Klicken S...

Страница 53: ...52 DE 12 2 3 Capture Photo Foto aufnehmen Video Videoclip aufzeichnen...

Страница 54: ...53 DE 12 2 4 Messmen Speichern unter R ckg ngig machen Kopieren nach Zwischenablag e Zeichnen Datei kopieren Textnotiz Zur ck Messung Weiter Kalibrierung Wiederherstelle n...

Страница 55: ...ng bedeutet dass das Ger t am Ende seiner Nutzungstauglichkeit getrennt vom Hausm ll entsorgt werden muss In der EU gibt es getrennte Sammelsysteme f r Elektroschrott F r weitere Informationen wenden...

Страница 56: ......

Страница 57: ...Meanings 11 z Turn on the Microscope 12 z Turn off the Microscope 12 z How to Capture 13 z Download to Computer 20 z Preview on Computer 20 z Charge Battery 21 z Connect to TV 22 5 Menu Introductions...

Страница 58: ...are Introductions 35 Preview size 35 Rotate Image 36 Date Time 36 Language 37 Full Screen 38 Capture 39 Edit Photos 40 Edit Video 42 Quit PortableCapture 43 4 Measurement 44 5 PortableCapture for Mac...

Страница 59: ...roscope is operated correctly Never operate LCD Digital Microscope where operation of such devices is restricted Improper use creates the risk of serious accident Do not try to open the case of LCD Di...

Страница 60: ...D Digital Microscope to the nearest authorized service center for repair Never attempt to repair LCD Digital Microscope on your own LCD Digital Microscope may become slightly warm during use This does...

Страница 61: ...Rules These limits are designed to provide reasonable protection against harmful interference in a residential installation CAUTION To comply with the limits for a Class B digital device pursuant to...

Страница 62: ...6 2 Preparation Standard accessories LCD Digital Microscope AC adaptor Lithium Battery USB cable TV cable CD QSG Cleaning fabric Calibration chart...

Страница 63: ...ions 1 3 5 LCD display 9 LED brightness dimmer 2 MicroSD card slot 10 Zoom 3 Wheel B 11 5v DC in 4 Microscope tube 12 TV out 5 Object stage 13 USB port 6 Wheel A 14 Battery compartment 7 Wheel C 15 Ba...

Страница 64: ...mage sensor up to 12M by interpolation z 20x 250x 500x magnification z Photo Video z Timer z Measurement when working on computer z Support MicroSD card up to 32GB z Driver free to download for Window...

Страница 65: ...stall battery 1 Open the battery door by sliding its door latch 2 Insert the lithium battery to the battery compartment according to the polarities shown in the compartment Note Before using the micro...

Страница 66: ...n off the microscope 2 Insert the MicroSD card into the MicroSD card slot gently press in until card is latched Note Do not force the card into the slot forcing may damage microscope and the MicroSD m...

Страница 67: ...11 4 3 Display Icons Meanings EN...

Страница 68: ...qty that could be captured based on the current resolution MicroSD inserted Current resolution Battery electricity indicator Note The icon displays can be switched on off by pressing Zoom Wheel downwa...

Страница 69: ...13 4 5 Turn off the Microscope 1 Press on off button 2 By Power Save Please refer to Section 5 2 2 for Power Save setup...

Страница 70: ...14 4 6 How to Capture...

Страница 71: ...rn on the microscope put object to be observed onto the object stage 2 Rotate Wheel A to bring the object near to the microscope tube If wheel A is locked rotate wheel C counter clockwise to release t...

Страница 72: ...16 3 Rotate Wheel B to get fine focus 4 When a clear focus got rotate Wheel C clockwise to lock the object stage...

Страница 73: ...d Video Press Capture button to take a photo or record video 1 Press Playback Left to enter video mode as follows There is video icon on the left corner 2 Press Capture button to start recording video...

Страница 74: ...k Left to enter play back mode as follows There is review icon on the left corner 2 Press UP DOWN to select among captured pictures and video clips 3 Delete At play back mode press to enter sub menu a...

Страница 75: ...ct At play back mode press to enter sub menu as follows then confirm protect pictures from delete 5 Slide Show At play back mode press to enter sub menu as follows select interval time and then confir...

Страница 76: ...20 7 Color Mode At preview status press to switch among Color Positive Negative 8 Zoom in push Zoom Wheel upwardly 9 Zoom out push Zoom Wheel downwardly Note The zoom ranges from 1x 4 0x...

Страница 77: ...Preview on Computer 1 Connect the microscope to computer by USB cable 2 Choose PC Camera mode 3 Start PortableCapture software Please refer to Part II on how to use the microscope by PortableCapture...

Страница 78: ...nd corner of the unit will be in red to show that the battery is charging 2 When the battery is finished charging the battery indicator LED will be in off Unplug the unit 3 You can now use your micros...

Страница 79: ...the RCA plug on the video cable into one of your television s yellow video input connectors Refer to your television s manual for more information on locating these connectors 3 Turn on the televisio...

Страница 80: ...Press to enter main menu as follows Here you can setup Resolution Timer Quality Sharpness 5 1 1 Set Resolution 1 From the main menu choose Resolution and select a resolution between VGA 1 3M 3M 5M 8M...

Страница 81: ...r setup Frames input quantity of frames you want to take by UP DOWN and LEFT RIGHT The above setup means 32 frames Interval input interval time between frame capture by UP DOWN and LEFT RIGHT The abov...

Страница 82: ...screen 4 When all frames captured microscope will return to normal preview 5 If you need to stop auto capture during the capture process press Capture one time Interval capture is only effective in s...

Страница 83: ...harpness and then select among Super Fine Fine Normal 5 2 Main Menu Press to enter main menu I and then press LEFT to enter Main Menu as follows Here you can setup Language Power Save Date Stamp TV Ou...

Страница 84: ...n menu choose Language and then select a target language by UP DOWN 5 2 2 Power Save 1 From the main menu choose Power Save and then select among the following a target time for the microscope to powe...

Страница 85: ...e Date or Off Date Time both date and time will be marked on images taken Date on date will be marked on images taken Off None of date and time info will be marked on images taken 5 2 4 TV Out From th...

Страница 86: ...menu choose Date Time to setup date and time 1 Setup date and time by LEFT RIGHT UP DOWN 2 Setup date mode among YY MM DD DD MM YY and MM DD YY 5 2 5 Format SD From the main menu choose Format SD to...

Страница 87: ...31 5 2 6 System Reset From the main menu choose Sys Reset to reset the system back to default 5 2 7 Version From the main menu choose Version to view the current machine version...

Страница 88: ...battery Working time 2 hours Charging time 5 hours Frame rate 30fps Adaptor Input 100 240V 50 60Hz Output 5V 1A OSD languages English Germany French Spanish Italian Portugese Japanese Chinese Software...

Страница 89: ...on the television screen Ensure that the television is on Switch to the appropriate video input channel on your television Ensure that the video cable is securely connected to the Microscope Video out...

Страница 90: ...ROM Drive and this will automatically display the following interface 1 Install the PortableCapture Pro software Click PortableCapture Pro software and then reboot the system when asked 2 You can als...

Страница 91: ...t the Microscope Connect your Microscope to your PC USB port as shown on Page20 start the software by clicking the icon generated on the desktop after installation and you will see the following scree...

Страница 92: ...36 5 Software functions Capture Photo a Click Photo shortcut icon in the main menu bar b Click Capture Photo Capture Video a Click Video shortcut icon in the main menu bar b Click Capture Video...

Страница 93: ...deo Click Timer shortcut icon in the main menu bar Under Timer photo you can set the start time interval time and total picture number Under Timer video you can set the start time interval time and to...

Страница 94: ...38 Calibration and Measurement Please make calibration before measurement Calibration Display Crossing from Options Crossing It s used to check the dial is parallel or not...

Страница 95: ...ched dial and then adjust the magnification till the picture is clear Take a picture for the selected area when the dial is parallel to the crossing as below 2 Double click on the picture to enter int...

Страница 96: ...log will popup as below and you need to enter the exact value of the measurement sample into Actual dimension Then the software will automatically calibrate the magnification rate Click OK and the adj...

Страница 97: ...1 4 Now you can use Any angle Line under Measurement icon to measure the value again If the value you measure by software is nearly the same as the exact value of the dial means the calibration finish...

Страница 98: ...ure any continuous desired length Simply click and drag from one point to other desired points and then release the click 3 Radius Circle Measurement Simply click and extend out to the desired radius...

Страница 99: ...rate and adjust focus to capture picture please calibrate the magnification rate again 1 Double click to open the picture Click Reset magnification Reset picture magnification as below And then start...

Страница 100: ...and capture several pictures click on the picture to enter into measurement interface And click Set magnification Set picture magnification now a dialog will show up as below enter the magnification...

Страница 101: ...u want to use the same magnification rate to capture pictures just click Set magnification Set capture magnification Now all pictures will use the same magnification rate and you can start measurement...

Страница 102: ...can draw or add a text on the picture and save for later analysis 1 Click icon to choose any kinds of drawing under the pull down manual as below 2 Click icon and set the font for the text in the pop...

Страница 103: ...ns Main Interface Icons Capture photo It s used to capture photo one by one Start Stop record video Timer for photo video Set the start time interval time and total photo video number Full screen mode...

Страница 104: ...48 Main Menu File Photos Directory set the directory to store photos taken Videos Directory set the directory to store video taken...

Страница 105: ...ge preview size Date Time set to display system date time on preview window Language choose different OSD language Crossing display cross on preview window Fullscreen mode enter into full screen Click...

Страница 106: ...50 Capture Photo take a photo Video record a video clip...

Страница 107: ...51 Measurement Interface Instructions Save as Redo Copy to clipboard Draw Copy file Text note Previous Measurement Next Calibration Undo...

Страница 108: ...al and electronic equipment should be disposed at the end of its life separately from your household waste There are separate collection systems for recycling in the EU For more information please con...

Страница 109: ...Port til y Aut nomo MICROSCOPIO DIGITAL LCD Manual de Usuario...

Страница 110: ...4 Encender el Microscopio 12 4 5 Apagar el Microscopio 12 4 6 C mo Capturar 13 4 7 Descargar a un Ordenador 21 4 8 Previsualizar en un Ordenador 21 4 9 Cargar la Bater a 22 4 10 Conectarlo a un TV 23...

Страница 111: ...39 11 1 Captura de Foto 39 11 2 Captura de V deo 39 11 3 Temporizador Foto V deo 40 11 4 Calibraci n y Medici n 42 11 4 1 Calibraci n 42 11 4 2 Medici n 46 11 4 3 Cambiar calibraci n 47 11 4 4 Dibujo...

Страница 112: ...lice correctamente Nunca utilice el Microscopio LCD Digital donde el uso de tales dispositivos est restringido El uso incorrecto crea un riesgo de accidente grave No trate de abrir la caja del Microsc...

Страница 113: ...Microscopio LCD Digital fr telo con un pa o suave y seco Aviso FCC Este equipo ha sido probado y se ha demostrado que cumple con los l mites para los dispositivos digitales de Clase B seg n la Parte...

Страница 114: ...5 ES 2 Preparaci n 2 1 Accesorios est ndar Microscopio LCD Digital Adaptador de CA Bater a de Litio Cable USB Cable de TV CD Gu a de Instalaci n R pida Pa o de limpieza Gr fico de calibraci n...

Страница 115: ...3 5 9 Regulador de brillo del LED 2 Ranura de tarjeta MicroSD 10 Zoom 3 Rueda B 11 Entrada de CC 5V 4 Tubo del microscopio 12 Salida de TV 5 Plataforma del objeto 13 Puerto USB 6 Rueda A 14 Compartim...

Страница 116: ...ta MicroSD Playback left Reproducci n izquierda Menu Setup Men Configuraci n Confirm Confirmar Color Mode Up Modo Color Subir Down Bajar Power on off Encendido Apagado LED Dimmer Regulador del LED Zoo...

Страница 117: ...MicroSD de hasta 32 GB Controladores gratuitos para Windows XP SP2 Vista Win7 y Mac OS 10 6 10 7 para descargar conexi n directa no se requiere la instalaci n de controladores Bater a Recargable de Io...

Страница 118: ...o recargar la bater a 4 2 Insertar una tarjeta MicroSD no incluida Debe insertar una tarjeta MicroSD no incluida para grabar y almacenar sus im genes y v deos Insertar la tarjeta de memoria MicroSD 1...

Страница 119: ...de da ar el microscopio y la tarjeta de memoria MicroSD Alinee la posici n de la tarjeta MicroSD como est marcado y pruebe de nuevo La tarjeta de memoria MicroSD debe estar formateada antes de captura...

Страница 120: ...dos ICONO Significado Capturar imagen fija Captura con temporizador Cantidad de im genes capturadas Cantidad total de im genes que se podr an capturar seg n la resoluci n actual MicroSD insertada Reso...

Страница 121: ...a Rueda 2 Zoom hacia abajo en vertical 4 4 Encender el Microscopio Pulse el bot n de encendido apagado para encenderlo Press on off button Pulse el bot n de encendido apagado 4 5 Apagar el Microscopio...

Страница 122: ...13 ES Secci n 5 2 2 para configurar el Ahorro de Energ a 4 6 C mo Capturar WheelC Rueda C WheelB Rueda B WheelA Rueda A Object Stage Plataforma del objeto 1 Encienda el microscopio ponga el objeto a...

Страница 123: ...14 ES observar sobre la plataforma del objeto Put object onto the stage Ponga el objeto sobre la plataforma 2 Gire la Rueda A para acercar el objeto hacia el tubo del microscopio...

Страница 124: ...Rueda A est bloqueada gire la Rueda C en sentido contrario de las agujas del reloj para soltar el bloqueo 3 Gire la Rueda B para afinar el enfoque Rotate Wheel B to get a fine focus Gire la Rueda B p...

Страница 125: ...eel C clockwise to lock the stage Gire la Rueda C en sentido de las agujas del reloj para bloquear la plataforma 5 Tomar una Fotograf a o Grabar un V deo Pulse el bot n Captura para tomar una foto o g...

Страница 126: ...cci n Izquierda para acceder al modo v deo como sigue Aparece un icono de V deo en la esquina izquierda 2 Pulse el bot n Capturapara empezar a grabar un v deo P lselo otra vez para detenerlo 6 Reprodu...

Страница 127: ...18 ES 2 Pulse ARRIBA ABAJO para seleccionar entre las im genes y v deos capturados 3 Borrar En el modo de reproducci n pulse para acceder al submen como sigue despu s confirme la eliminaci n...

Страница 128: ...cci n pulse para acceder al submen como sigue despu s confirme la protecci n frente al borrado de las im genes 5 Presentaci n de Diapositivas En el modo de reproducci n pulse para acceder al submen co...

Страница 129: ...n el estado de vista previa pulse para alternar entre Color Positivo Negativo 8 Acercar Zoom pulse la Rueda de Zoom hacia arriba 9 Alejar Zoom pulse la Rueda de Zoom hacia abajo Zoom in Acercar Zoom Z...

Страница 130: ...ador 1 Conecte el microscopio a un ordenador mediante un cable USB 2 Escoja Almacenamiento masivo y podr ver las fotograf as y los v deos almacenados 4 8 Previsualizar en un Ordenador 1 Conecte el mic...

Страница 131: ...n disponibles por el software PortableCapture 4 9 Cargar la Bater a Antes de utilizar el microscopio debe cargar su bater a 1 Conecte el extremo peque o del adaptador de corriente en el puerto de ent...

Страница 132: ...ando la bater a est baja habr un indicador de poca energ a en la esquina inferior derecha del panel el LED frontal se ver m s d bil y la calidad de la imagen ser m s pobre En ese momento deber conecta...

Страница 133: ...A del cable de v deo en una de las entradas amarillas de v deo de su televisor Consulte el manual de su televisor para m s informaci n acerca de la localizaci n de estos conectores 3 Encienda el telev...

Страница 134: ...ipal I Pulse para entrar en el men principal I como sigue Aqu puede ajustar la Resoluci n Temporizador Calidad Nitidez 5 1 1 Ajustar la Resoluci n 1 Desde el men principal I escoja Resoluci n y selecc...

Страница 135: ...r 1 Desde el men principal I escoja Temporizador y a continuaci n introduzca la configuraci n del Temporizador Fotogramas introduzca la cantidad de fotogramas que desee tomar con ARRIBA ABAJO y DERECH...

Страница 136: ...en Einstellungen para el estado de previsualizaci n Despu s pulse Captura 8 para iniciar la captura autom tica Durante el estado de Captura autom tica aparece en la esquina izquierda de la pantalla 3...

Страница 137: ...coja Calidad y despu s seleccione entre S per Fina Fina Normal Las tres selecciones tendr n como consecuencia distintas relaciones de compresi n de imagen 5 1 4 Nitidez Desde el men principal I escoja...

Страница 138: ...e IZQUIERDA para entrar en el Men PrincipalIIcomo sigue Aqu puede ajustar el Idioma Ahorro e Energ a Sello de Fecha Salida de TV Fecha y Hora Formatear SD Restaurar Sistema Versi n 5 2 1 Idioma Desde...

Страница 139: ...incipal II escoja Ahorro de Energ a y despu s seleccione entre los siguientes un tiempo para que el microscopio se apague si no se usan las teclas 5 2 3 Sello de Fecha 1 Desde el men principal II esco...

Страница 140: ...car n en las im genes tomadas Fecha s lo se marcar la fecha en las im genes tomadas Desactivado Ni la fecha ni la hora se marcar n en las im genes tomadas 5 2 4 Salida de TV Desde el men principal II...

Страница 141: ...Fecha Hora Desde el men principal II escoja Fecha Hora para definir la fecha y la hora 1 Establezca la fecha y la hora con IZQUIERDA DERECHA ARRIBA ABAJO 2 Establezca el modo entre YY MM DD DD MM YY...

Страница 142: ...D Desde el men principal II escoja Formatear SD para formatear la tarjeta MicroSD insertada 5 2 7 Restaurar Sistema Desde el men principal II escoja Restaurar Sistema para restaurar el sistema a su co...

Страница 143: ...3 5 pulgadas relaci n 4 3 Fuentes luminosas 8 LEDs con brillo ajustable Fuentes de alimentaci n Bater a de iones de Litio de 3 7V 800mAh Tiempo de funcionamiento 2 horas Tiempo de carga 5 horas Frecue...

Страница 144: ...est correctamente colocado bajo la lente Hay manchas e imperfecciones en la pantalla Limpie la pantalla y la lente cuidadosamente con un pa o suave El microscopio est conectado al televisor pero no ap...

Страница 145: ...orriente conectado y enchufado a la toma de corriente o La bater a no se carga Microscopio Aseg rese de que la toma de corriente tenga electricidad y no falle Si la toma de corriente est conectada a u...

Страница 146: ...e CD ROM y autom ticamente aparecer la siguiente interfaz 1 Instale el software PortableCapture Pro Haga clic en PortableCapture Pro software y reinicie el sistema cuando se lo pida 2 Tambi n puede ex...

Страница 147: ...l Microscopio Conecte su Microscopio al puerto USB de su PC como se indica en la p gina 20 inicie el software haciendo clic en el icono creado en el escritorio tras la instalaci n y ver la siguiente p...

Страница 148: ...a de Foto a Haga clic en el icono de acceso directo Foto en la barra del men principal b Haga clic en Capturar Foto 11 2 Captura de V deo a Haga clic en el icono de acceso directo V deo en la barra de...

Страница 149: ...40 ES 11 3 Temporizador Foto V deo Haga clic en el icono de acceso directo Temporizador en la barra del men principal...

Страница 150: ...rizador de foto puede establecer ha hora de inicio el intervalo de tiempo y el n mero total de im genes Bajo el temporizador de v deo puede establecer ha hora de inicio el intervalo de tiempo y el n m...

Страница 151: ...n Visualice las l neas cruzadas en Options Crossing Se utilizan para comprobar si el dial est paralelo o no 1 Enfoque el microscopio al dial y despu s ajuste el aumento hasta que la imagen se vea clar...

Страница 152: ...43 ES 2 Haga doble clic en la imagen para entrar en la interfaz de medici n como a continuaci n 3 Haga clic en el icono de Calibraci n y despu s mueva el rat n a la imagen Haga clic en los...

Страница 153: ...acto de la prueba de medici n en Dimensi n real Entonces el software calibrar autom ticamente la tasa de aumento Haga clic en OK y la tasa de aumento ajustada aparecer en la esquina superior derecha O...

Страница 154: ...45 ES Medici n para medir el valor de nuevo Si el valor que mide con el software es casi el mismo que el valor exacto del dial significa que la calibraci n est hecha...

Страница 155: ...ongitud continua deseada Simplemente haga clic y arrastre desde un punto hasta los otros que desee y despu s suelte el rat n 3 Medici n de radio de c rculo Simplemente haga clic y exti ndalo hasta el...

Страница 156: ...co para capturar una imagen por favor calibre de nuevo la tasa de aumento 1 Haga doble clic para abrir la imagen haga clic en Reset magnification Reset picture magnification como a continuaci n Y desp...

Страница 157: ...varias im genes haga clic en la imagen para entrar en la interfaz de medici n Y haga clic en Set magnification Set picture magnification Ahora aparecer un di logo como el de abajo introduzca la tasa...

Страница 158: ...mplemente haga clic en Set magnification Set capture magnification Ahora todas las im genes utilizar n la misma tasa de aumento y podr comenzar directamente la medici n 11 4 4 Dibujo y Texto Puede dib...

Страница 159: ...50 ES 1 Haga clic en el icono para escoger un tipo de dibujo el men desplegable como se ve abajo 2 Haga clic en el icono y establezca fuente para el texto en el di logo emergente como se ve abajo...

Страница 160: ...Interfaz Capturar Foto Se utiliza para capturar fotos una a una Iniciar Detener la grabaci n de v deo Temporizador de foto v deo Establecer ha hora de inicio el intervalo de tiempo y el n mero total...

Страница 161: ...52 ES 12 2 Men Principal 12 2 1 Archivo Directorio de Fotos defina el directorio en el que almacenar las fotos tomadas Directorio de V deos defina el directorio en el que almacenar los v deos tomados...

Страница 162: ...Hora ajuste para mostrar la hora fecha del sistema en la ventana de previsualizaci n Idioma escoger diferentes idiomas para el OSD Cruzado muestra la cruz en la ventana de previsualizaci n Modo de pan...

Страница 163: ...54 ES 12 2 3 Captura Foto tomar una foto V deo grabar un v deo...

Страница 164: ...55 ES 12 2 4 Instrucciones de la Interfaz de Medici n Guardar como Rehacer Copiar a portapapeles Dibujo Copiar archivo Nota de texto Anterior Medici n Siguiente Calibraci n Deshacer...

Страница 165: ...l ctrico y electr nico debe eliminarse al final de su vida til de manera separada del resto de su basura dom stica Hay sistemas de recogida selectiva para el reciclaje en la UE Para m s informaci n po...

Страница 166: ...Portatif et autonome MICROSCOPE NUM RIQUE AVEC CRAN LCD Guide d utilisation...

Страница 167: ...pe 13 4 6 Proc dure de capture 14 4 7 T l chargement sur l ordinateur 22 4 8 Aper u sur l ordinateur 22 4 9 Chargement de la pile 23 4 10 Branchement un t l viseur 24 5 Structure des menus 26 5 1 Menu...

Страница 168: ...marche du microscope 40 11 Fonctions du logiciel 41 11 1 Capture Photo 41 11 2 Capture Vid o 41 11 3 Minuteur Photo Vid o 42 11 4 Calibrage et mesure 44 11 4 1 Mesure 48 11 4 2 Modification du calibr...

Страница 169: ...du fabricant N utilisez pas votre microscope dans les environnements restreignant l utilisation de tels appareils Une mauvaise utilisation vous expose un risque d accident grave N essayez pas d acc d...

Страница 170: ...as ch ant essuyez le avec un chiffon doux et sec Avis FCC Cet quipement a t test et s est av r conforme aux limites d finies dans l article 15 du r glement FCC pour un quipement num rique de classe B...

Страница 171: ...FR 2 Pr paration 2 1 Accessoires standard Microscope num rique cran LCD Adaptateur secteur Pile au lithium C ble USB C ble t l viseur CD Guide d utilisation Chiffon de nettoyage Diagramme de calibrag...

Страница 172: ...9 LED avec intensit lumineuse r glable 2 Lecteur de carte MicroSD 10 Zoom 3 Molette B 11 Entr e CC 5 v 4 Tube du microscope 12 Sortie t l viseur 5 Platine porte objet 13 Port USB 6 Molette A 14 Compar...

Страница 173: ...MicroSD Playback left Lecture gauche Menu Setup Menu de configuration Confirm Confirmer Color Mode Up Mode couleur Haut Down Bas Power on off Mise en marche arr t LED Dimmer Intensit de l cran DEL Zo...

Страница 174: ...n Agrandissement 20x 250x 500x Photo et vid o Compteur Mesure lorsque vous travaillez sur ordinateur Prise en charge des cartes MicroSD jusqu 32 Go z Pilote t l chargeable gratuitement pour Windows XP...

Страница 175: ...croscope 4 1 Installation de la pile 1 Poussez le petit ergot bloquant le cache du compartiment de pile 2 Ins rez la pile au lithium dans son logement en respectant le sens des polarit s indiqu es l i...

Страница 176: ...te m moire MicroSD 1 teignez le microscope 2 Introduisez une carte MicroSD dans le lecteur du microscope et poussez la jusqu la verrouiller dans son logement Remarque Ne forcez pas pour introduire la...

Страница 177: ...11 FR 4 3 Description des ic nes affich es sur l cran...

Страница 178: ...apr s la r solution actuelle Carte MicroSD ins r e R solution actuelle Indicateur du niveau de charge de la pile Remarque Vous pouvez activer et d sactiver l affichage des ic nes en descendant vertic...

Страница 179: ...commutateur de marche arr t 4 5 teindre le microscope 1 Appuyez sur le commutateur de marche arr t 2 Attendez la fin du d lai avant l arr t automatique Reportez vous la section 5 2 2 pour configurer...

Страница 180: ...R 4 6 Proc dure de capture WheelC Molette C WheelB Molette B WheelA Molette A Object Stage Platine porte objet 1 Allumez le microscope et posez l objet que vous voulez observer sur la platine porte ob...

Страница 181: ...object onto the stage Posez un objet sur la platine 2 Tournez la molette A pour rapprocher l objet du tube du microscope Rotate Wheel A to bring the stage Tournez la molette A pour rapprocher l objet...

Страница 182: ...e des aiguilles d une montre pour la d verrouiller 3 Tournez la molette B pour ajuster la mise au point Rotate Wheel B to get a fine focus Tournez la molette B pour ajuster la mise au point 4 Lorsque...

Страница 183: ...the stage Tournez la molette C dans le sens des aiguilles d une montre pour verrouiller la platine 5 Prenez une photo ou d marrez l enregistrement d une vid o Appuyez sur la touche Capture pour prend...

Страница 184: ...sur la touche Capture pour prendre une photo ou enregistrer une vid o 1 Appuyez sur la touche Lecture Gauche pour passer en mode vid o comme illustr ci dessous L ic ne d une cam ra est visible en hau...

Страница 185: ...touche Lecture Gauche pour passer en mode lecture comme illustr ci dessous L ic ne du mode lecture est visible en haut et gauche de l cran 2 S lectionnez une photo ou une vid o l aide des touches HAUT...

Страница 186: ...ur pour afficher le sous menu associ illustr ci dessous Choisissez l option Protect pour prot ger une photo contre toute suppression accidentelle 5 Option Slide Show Diaporama Depuis le mode lecture a...

Страница 187: ...nfirmez par OK 7 Mode couleur Depuis le mode aper u appuyez sur pour choisir entre Color Positive Negative 8 Zoom avant poussez la molette de zoom vers le haut 9 Zoom arri re poussez la molette de zoo...

Страница 188: ...ssez Mass Storage Vous pouvez maintenant visualiser sur l ordinateur les photos et les vid os stock es sur la carte m moire du microscope 4 8 Aper u sur l ordinateur 1 Reliez le microscope l ordinateu...

Страница 189: ...tent ex cutables depuis le logiciel PortableCapture 4 9 Chargement de la pile Vous devez recharger la pile avant d utiliser votre microscope pour la premi re fois 1 Branchez l extr mit appropri e de l...

Страница 190: ...tinues Lorsque la pile n est plus suffisamment charg e l indicateur correspondant s allume en bas et droite de l cran l intensit de la DEL frontale diminue et la qualit de l image se d t riore D p che...

Страница 191: ...ur l une des entr es vid o jaune du t l viseur Pour en savoir plus sur les branchements et les connecteurs de votre t l viseur reportez vous au guide d utilisation de celui ci 3 Allumez le t l viseur...

Страница 192: ...str ci dessous Depuis ce menu vous pouvez configurer la r solution les compteurs la qualit et la nettet Resolution Timer Quality Sharpness 5 1 1 Configuration de la r solution 1 Depuis le menu princip...

Страница 193: ...puis le menu principal I choisissez Timer La page de configuration des compteurs appara t sur l cran Frames choisissez le nombre d images pour l enregistrement de vid os l aide des touches HAUT BAS et...

Страница 194: ...yez sur OK pour valider votre choix puis sur Menu de configuration pour revenir l environnement d aper u Appuyez sur la touche Capture 8 pour d marrer la capture automatique Tant que cette fonction es...

Страница 195: ...alit Depuis le menu principal I choisissez Quality et s lectionnez l une des valeurs parmi Super Fine Fine Normal Le taux de compression des images change avec la qualit que vous choisissez 5 1 4 Opti...

Страница 196: ...acc der au menu principal I puis sur la touche GAUCHE pour acc der au menu principalII illustr ci dessous Vous y trouvez les options de configuration suivantes Language Power Save Date Stamp TV Out D...

Страница 197: ...rmi celles qui sont propos es l aide des touches HAUT BAS 5 2 2 Option Power Save conomie d nergie 1 Depuis le menu principal II choisissez l option Power Save et s lectionnez un d lai parmi ceux qui...

Страница 198: ...ion pour inscrire la date et l heure sur chaque photo prise Option Date activez cette option pour n inscrire que la date sur chaque photo prise Option Off D sactiv e activez cette option pour ne rien...

Страница 199: ...issez l option Date Time pour r gler la date et l heure 1 Ajustez la date et l heure l aide des touches GAUCHE DROITE HAUT BAS 2 S lectionnez le format d affichage de la date parmi les trois qui vous...

Страница 200: ...II choisissez l option Format SD pour formater la carte MicroSD qui est ins r e dans le lecteur du microscope 5 2 7 Option System reset R initialisation Depuis le menu principal II choisissez l optio...

Страница 201: ...35 FR 5 2 8 Option Version Depuis le menu principal II choisissez l option Version pour afficher la version du logiciel qui a t install sur le microscope...

Страница 202: ...ineuse Alimentation lectrique pile au lithium ionique 3 7 V 800 mAh Autonomie de fonctionnement 2 heures dur e de chargement 5 heures Vitesse de d filement 30 images par seconde Adaptateur secteur Ent...

Страница 203: ...37 FR 7 Configuration minimale requise pour l ordinateur Syst me d exploitation Windows XP SP2 Vista Win7 Mac 10 6 10 7 Processeur Pentium 11 et sup rieure RAM 256 Mo Interface Port USB 2 0...

Страница 204: ...ifiez que vous avez allum le t l viseur S lectionnez le canal vid o appropri sur le t l viseur V rifiez que vous avez correctement branch le c ble vid o sur la sortie vid o du microscope et sur l entr...

Страница 205: ...inateur La page d accueil suivante s affiche automatiquement sur l cran 1 Installer le logiciel PortableCapture Pro Cliquez sur PortableCapture Pro software et red marrez votre ordinateur si un messag...

Страница 206: ...en marche du microscope Connectez votre microscope au port USB de votre PC comme illustr 20 lancez le logiciel en cliquant sur l ic ne cr sur le bureau lors de l installation l interface suivante app...

Страница 207: ...Capture Photo a Cliquez sur l ic ne de raccourci Photo dans la barre du menu principal b Cliquez sur Capture Photo 11 2 Capture Vid o a Cliquez sur l ic ne de raccourci Video dans la barre du menu pr...

Страница 208: ...42 FR 11 3 Minuteur Photo Vid o Cliquez sur l ic ne de raccourci Timer dans la barre du menu principal...

Страница 209: ...minuteur photo vous pouvez d finir l heure de d but l intervalle de temps et le nombre total de photos Sous Timer video minuteur vid o vous pouvez d finir l heure de d but l intervalle de temps et le...

Страница 210: ...ossing Elle permet de v rifier si le cadran est parall le ou non 1 Amenez le microscope sur le cadran que vous avez fix sur la platine porte objet et r glez le facteur d agrandissement jusqu obtenir u...

Страница 211: ...45 FR illustr ci dessous 2 Cliquez deux fois sur la photo pour acc der l interface de mesure comme illustr ci dessous 3 Cliquez sur l ic ne de calibrage et amenez le...

Страница 212: ...celle illustr e ci dessous s affiche sur l cran Tapez la valeur exacte de l chantillon de mesure dans la zone Actual dimension Le logiciel calibre automatiquement le facteur d agrandissement Cliquez s...

Страница 213: ...S lectionnez l option Any angle Line de la liste d roulante pour mesurer de nouveau la valeur Si cette valeur mesur e par le logiciel est quasiment identique la valeur exacte du cadran le calibrage es...

Страница 214: ...e longueur continue Cliquez sur un point maintenez le clic tirez jusqu aux autres points et rel chez le clic 3 Option Radius Circle Cliquez et prolongez jusqu au rayon que vous d sirez Le rayon le p r...

Страница 215: ...oint avant de prendre des photos proc dez auparavant au calibrage du nouveau facteur 1 Cliquez deux fois pour ouvrir la photo cliquez sur Reset magnification Reset picture magnification comme illustr...

Страница 216: ...vue Cliquez sur l une d elles pour acc der l interface de mesure Cliquez ensuite sur Set magnification Set picture magnification et tapez le nouveau facteur d agrandissement dans la zone correspondan...

Страница 217: ...ur d agrandissement pour les prochaines photos cliquez sur Set magnification Set capture magnification Toutes les nouvelles photos appara tront avec ce facteur d agrandissement vous permettant de comm...

Страница 218: ...texte sur la photo et l enregistrer pour une analyse ult rieure 1 Cliquez sur l ic ne pour choisir toute forme g om trique dans la liste d roulante comme illustr ci dessous 2 Cliquez sur l ic ne et ch...

Страница 219: ...53 FR...

Страница 220: ...cipale Capture Photo Utilis pour capturer des photos une par une D marrer arr ter l enregistrement vid o Minuteur photo vid o Pour d finir l heure de d but l intervalle de temps et le nombre total de...

Страница 221: ...55 FR 12 2 Menu principal 12 2 1 File Fichier Photos Directory Dossier des photos Pour d finir le dossier des photos Videos Directory Dossier des vid os Pour d finir le dossier des vid os...

Страница 222: ...fficher la date heure syst me dans la fen tre de pr visualisation Language Langue Pour choisir une langue des menus OSD Crossing curseur en croix Pour afficher un curseur en croix dans la fen tre de p...

Страница 223: ...57 FR 12 2 3 Option Capture Photo Pour prendre une photo Video vid o Pour enregistrer un clip vid o...

Страница 224: ...58 FR 12 2 4 Commandes de l interface de mesure Enregistrer sous R tablir Copier vers Presse papier Dessiner Copier un fichier Notes de texte Pr c dent Mesure Suivant Calibrage annuler...

Страница 225: ...pas vous d barrasser de votre appareil lectrique ou lectronique avec vos autres ordures m nag res Vous devez plut t le d poser aupr s des installations de recyclage mises en place par l UE Pour plus...

Страница 226: ...Portatile autonomo MICROSCOPIO DIGITALE LCD Manuale Utente...

Страница 227: ...4 4 Accendere il Microscopio 12 4 5 Spegnere il microscopio 13 4 6 Come registrare 14 4 7 Scaricare sul Computer 22 4 8 Anteprima sul Computer 23 4 9 Carica della Batteria 24 4 10 Collegarlo alla TV 2...

Страница 228: ...oftware 40 11 1 Acquisizione foto 40 11 2 Acquisizione video 40 11 3 Timer Foto Video 41 11 4 Calibratura e misurazione 42 11 4 1 Calibratura 43 11 4 2 Misurazione 47 11 4 3 Modifica calibratura 48 11...

Страница 229: ...sia utilizzato correttamente Non utilizzare mai il Microscopio Digitale LCD dove il suo funzionamento non consentito L uso improprio genera il rischio di incidenti gravi Non cercare di aprire l involu...

Страница 230: ...necessita di essere pulito strofinare con un panno soffice ed asciutto Avvertenza FCC Questo equipaggiamento stato testato ed risultato a norma con i limiti di Classe B dei dispositivi digitali come i...

Страница 231: ...5 IT 2 Preparazioni 2 1 Accessori standard Microscopio Digitale LCD Alimentatore Batteria al Litio Cavo USB Cavo TV CD...

Страница 232: ...2 2 Nomi delle parti e funzioni No Funzioni No Funzioni 1 3 5 Display LCD 9 Attenuatore luminosit LED 2 Slot d ingresso MicroSD 10 Zoom 3 Ruota B 11 DC in 5v 4 Tubo del Microscopio 12 Uscita TV 5 Por...

Страница 233: ...razione MicroSD card slot Slot d ingresso MicroSD Playback left Riproduzione sinistra Menu Setup Impostazioni Menu Confirm Conferma Color Mode Up Modalit Colore Up Down Gi Power on off Accensione Speg...

Страница 234: ...M di interpolazione Ingrandimento 20x 250x 500x Foto Video Timer Misurazione quando in funzionamento su computer Supporta Card MicroSD fino a 32GB Driver gratis da scaricare per Windows XP SP2 Vista W...

Страница 235: ...nstallazione della Batteria 1 Aprire il comparto batteria facendo scivolarne il blocco 2 Inserire la batteria al litio nel comparto batteria rispettando la polarit mostrata nel comparto Note Prima di...

Страница 236: ...i memoria MicroSD 1 Spegnere il microscopio 2 Inserire la card MicroSD nello slot della card MicroSD premere gentilmente fino a che la card sia bloccata Note Non forzare la card nello slot forzare pu...

Страница 237: ...11 IT 4 3 Icone visualizzate e Significato...

Страница 238: ...u essere acquisita sulla base della risoluzione attuale MicroSD inserita Risoluzione attuale Indicatore elettricit della batteria Note La visualizzazione dell icona pu essere attivata disattivata prem...

Страница 239: ...13 IT Press on off button Pulsante On Off 4 5 Spegnere il microscopio 1 Pulsante On Off 2 Risparmio energia Vi preghiamo di far riferimento alla sezione 5 2 2 per le impostazioni di Risparmio Energia...

Страница 240: ...14 IT 4 6 Come registrare WheelC Ruota C WheelB Ruota B WheelA Ruota A Object Stage Porta oggetto 1 Accendere il microscopio posizionare l oggetto da osservare sul porta oggetto...

Страница 241: ...15 IT Put object onto the stage Posizionare l oggetto sul porta oggetti 2 Ruotare la Ruota A per portare l oggetto vicino al tubo del microscopio...

Страница 242: ...e la rotella A bloccata ruotare la rotella C in senso anti orario per rilasciare il blocco 3 Ruotare la Rotella B per ottenere il fuoco di precisione Rotate Wheel B to get a fine focus Ruotare la Rote...

Страница 243: ...eel C clockwise to lock the stage Ruotare la Rotella C in senso orario per bloccare il porta oggetti 5 Fare una foto e registrare un video Premere il pulsante di acquisizione per fare una foto o regis...

Страница 244: ...ione Sinistra per accedere alla modalit video come segue Vi un icona video sull angolo a sinistra 2 Premere il pulsante di acquisizione per avviare la registrazione del video Premere ancora per fermar...

Страница 245: ...19 IT 2 Premere SU GIU per selezionare tra le foto ed i video acquisiti 3 Cancellare In modalit di riproduzione premere per accedere al sub menu come segue quindi confermare la cancellazione...

Страница 246: ...per accedere al sub menu come segue quindi confermare la protezione delle immagini dalla cancellazione 5 Presentazione In modalit di riproduzione premere per accedere al sub menu come segue selezionar...

Страница 247: ...21 IT 7 Modalit Colore In stato di anteprima premere per passare tra Colore Positivo Negativo 8 Zoom in Premere la Rotella di Zoom verso l alto 9 Zoom out Premere la Rotella di Zoom verso il basso...

Страница 248: ...om in Zoom out Zoom out Note Il zoom va da 1x 4 0x 4 7 Scaricare sul Computer 1 Collegare il microscopio al computer tramite il cavo USB 2 Scegliere Archiviazione di Massa e quindi potete visualizzare...

Страница 249: ...amera PC 3 Avvio software PortableCapture Vi preghiamo di fare riferimento alla Parte II su come utilizzare il Microscopio con il software PortableCapture Note Quando si lavora sul computer le funzion...

Страница 250: ...atteria all angolo estremo dell unit sar rosso per mostrare che la batteria si sta caricando 2 Quando la batteria completa il LED di indicatore batteria si spegner Scollegare l unit 3 Potete ora utili...

Страница 251: ...scopio 2 Inserire lo spinotto RCA sul cavo video in uno dei connettori di ingresso video gialli del televisore Fare riferimento al manuale della vostra televisione per maggiori informazioni sulla posi...

Страница 252: ...I Premere per accedere al menu principale come segue Qui potete impostare Risoluzione Timer Qualit Nitidezza 5 1 1 Impostare la Risoluzione 1 Dal menu principale I scegliere Risoluzione e quindi scegl...

Страница 253: ...selezione 5 1 2 Timer 1 Dal menu principale I scegliere Timer e quindi accedere a impostazione Timer Scatti inserire quantit di scatti che volete prendere utilizzando SU GIU e SINISTRA DESTRA Le impos...

Страница 254: ...a selezione e premere Impostazioni Menu per lo stato di anteprima Quindi premere Acquisizione 8 per avviare l acquisizione automatica Quando nello stato di acquisizione automatico vi nell angolo a sin...

Страница 255: ...1 3 Qualit Dal menu principale I scegliere Qualit e quindi selezionare tra Super precisa Precisa Normale Le tre selezioni comporteranno un indice differente di compressione immagine 5 1 4 Nitidezza D...

Страница 256: ...SINISTRA per accedere al Menu PrincipaleII come segue Qui potete impostare Lingua Risparmio Energia Indicazione di Data Uscita TV Data e Ora Formato SD Reset Sistema Versione 5 2 1 Lingua Dal menu pr...

Страница 257: ...egliere Risparmio Energia e quindi selezionare tra i seguenti un tempo per lo spegnimento del microscopio senza la pressione di nessun tasto 5 2 3 Indicazione della data 1 Dal menu principale II scegl...

Страница 258: ...o segnate sulle immagini prese Data la data verr segnata sulle immagini prese Spento N la data n l ora saranno segnate sulle immagini prese 5 2 4 TV out Dal menu principale II scegliere TV out e quind...

Страница 259: ...ra per impostare data e ora 1 Impostare data ed ora attraverso SINISTRA DESTRA SU GIU 2 Impostare il formato data tra AA MM GG GG MM AA e MM GG AA 5 2 6 Formattazione SD Dal menu principale II sceglie...

Страница 260: ...del Sistema Dal menu principale II scegliere Sys Reset per resettare il sistema alle impostazioni di fabbrica 5 2 8 Versione Dal menu principale II scegliere Versione per visualizzare la versione del...

Страница 261: ...8 LED ad intensit regolabile Sorgenti di alimentazione Batteria Li ion 3 7V 800mAh Tempo di utilizzo 2 ore Tempo di ricarica 5 ore Rateo di cornice 30fps Adattatore Ingresso 100 240V 50 60Hz Uscita 5V...

Страница 262: ...36 IT 7 Requisiti minimi del sistema del computer Sistema operativo Windows XP SP2 Vista Win7 Mac 10 6 10 7 CPU Pentium 11 o superiore RAM 256MB Interfaccia Porta USB 2 0...

Страница 263: ...gine appare sullo schermo della televisione Assicurarsi che il televisore sia acceso Passare sul canale di ingresso adeguato del vostro televisore Assicurarsi che il cavo video sia connesso in modo si...

Страница 264: ...comporter la visualizzazione automatica della seguente interfaccia 1 Installazione del software PortableCapture Pro Cliccare su Software PortableCapture Pro e quindi ri avviare il sistema quando vien...

Страница 265: ...io del microscopio Collegare il microscopio alla porta PC USB come mostrato a pag 20 avviare il software facendo clic sull icona generata sul desktop dopo l installazione e si vedr la seguente scherma...

Страница 266: ...ne foto a Fare clic sull icona della scorciatoia Photo nella barra del menu principale b Fare clic su Capture Photo 11 2 Acquisizione video a Fare clic sull icona della scorciatoia Video nella barra d...

Страница 267: ...41 IT 11 3 Timer Foto Video Fare clic sull icona della scorciatoia Timer nella barra del menu principale...

Страница 268: ...po di avvio l intervallo di tempo e il numero di immagini totale Sotto Timer video possibile impostare il tempo di avvio l intervallo di tempo e il numero di video totale 11 4 Calibratura e misurazion...

Страница 269: ...a per controllare se la scala graduata parallela o meno 1 Mettere a fuoco il microscopio sulla scala graduata allegata e quindi regolare l ingrandimento finch l immagine non chiara Scattare la foto de...

Страница 270: ...2 Fare doppio clic sull immagine per accedere all interfaccia di misurazione come mostrato di seguito 3 Fare clic sull icona Calibratura e spostare il mouse sull immagine Fare clic sul punto di inizio...

Страница 271: ...il valore esatto del campione di misurazione in Actual dimension Il software calibrer automaticamente il livello di ingrandimento Fare clic su Ok e il livello di ingrandimento regolato apparir nell a...

Страница 272: ...utilizzare Any angle Line sotto l icona Misurazione per misurare nuovamente il valore Se il valore misurato mediante il software quasi lo stesso del valore esatto della scala graduata significa che la...

Страница 273: ...La misurazione della linea continua consente di misurare qualsiasi lunghezza continua desiderata Fare semplicemente clic e trascinare da un punto all altro desiderato e quindi rilasciare il clic 3 Mis...

Страница 274: ...livello di ingrandimento e regolare la messa a fuoco per catturare l immagine effettuare nuovamente la calibratura del livello di ingrandimento 1 Fare doppio clic per aprire l immagine fare clic su R...

Страница 275: ...are pi immagini fare clic sull immagine per accedere all interfaccia di misurazione E fare clic su Set magnification Set picture magnification appare una finestra come mostrato di seguito immettere il...

Страница 276: ...stesso livello di ingrandimento per catturare le immagini basta fare clic su Set magnification Set capture magnification Ora tutte le immagini utilizzeranno lo stesso livello di ingrandimento e potete...

Страница 277: ...51 IT...

Страница 278: ...sto sull immagine e salvare l ultima analisi 1 Fare clic sull icona per scegliere qualsiasi tipo di disegno nella tendina a discesa come mostrato di seguito 2 Fare clic sull icona e impostare il carat...

Страница 279: ...53 IT...

Страница 280: ...ipale Acquisizione foto usata per acquisire le foto una per una Avvio Interruzione registrazione video Timer per foto video Imposta il tempo di avvio l intervallo di tempo e il numero di foto video to...

Страница 281: ...55 IT 12 2 Menu principale 12 2 1 File Cartella foto imposta la cartella per salvare le foto acquisite Cartella video imposta la cartella per salvare i video acquisiti...

Страница 282: ...a Ora si imposta per visualizzare la data ora del sistema su una finestra di anteprima Lingua scegliere una lingua OSD diversa Croce visualizza la croce sulla finestra di anteprima Modalit schermo int...

Страница 283: ...57 IT 12 2 3 Acquisizione Foto fare una foto Video registrare un video clip...

Страница 284: ...58 IT 12 2 4 Istruzioni interfaccia di misurazione Salva con nome Ripeti Copia in appunti Disegna Copia file Scrivi nota Precedente Misurazione Avanti Calibratura Annulla...

Страница 285: ...elettronico deve essere smaltito alla fine del suo utilizzo separatamente dai rifiuti comuni Vi sono sistemi di raccolta differenti per il riciclaggio nell Unione Europea Per maggiori informazioni vi...

Страница 286: ...Draagbare Zelfstaande DIGITALE LCD MICROSCOOP Gebruikers handleiding...

Страница 287: ...Betekenis 11 4 4 De microscoop inschakelen 12 4 5 De microscoop uitschakelen 13 4 6 Hoe maakt u een opname 14 4 7 Naar de computer downloaden 22 4 8 Preview op computer 22 4 9 Batterij opladen 23 4 10...

Страница 288: ...n 39 11 Softwarefuncties 40 11 1 Foto nemen 40 11 2 Video vastleggen 40 11 3 Timer Foto Video 41 11 4 Kalibratie en meting 42 11 4 1 Kalibratie 43 11 4 2 Meting 47 11 4 3 De kalibratie wijzigen 48 11...

Страница 289: ...croscoop correct functioneert Laat de digitale lcd microscoop niet functioneren als dit niet mogelijk is Een verkeerd gebruik van de microscoop kan gevaarlijk zijn Probeer de digitale lcd microscoop n...

Страница 290: ...scoop schoon met een droge en zachte doek FCC mededeling De compatibiliteit van dit apparaat met de bepalingen voor een Klasse B digitaal apparaat is aan de hand van een test volgens Deel 15 van de FC...

Страница 291: ...5 NL 2 Voorbereiden 2 1 Standaardaccessoires Digitale lcd microscoop AC adapter Lithium Batterij USB kabel TV kabel CD Snelstart handleiding Reinigingsmateriaal Kalibratie grafiek...

Страница 292: ...1 3 5 LCD display 9 Led helderheid dimmer 2 MicroSD geheugenkaart slot 10 Zoom 3 Wieltje B 11 Ingang 5v DC 4 Telescoop microscoop 12 Uitgang tv 5 Objecttafel 13 USB poort 6 Wieltje A 14 Batterijenvak...

Страница 293: ...roSD geheugenkaart slot Playback left Afspelen links Menu Setup Menu Set up Confirm Bevestigen Color Mode Up Kleur Modus Omhoog Down Omlaag Power on off Voeding aan uit LED Dimmer Led dimmer Zoom in I...

Страница 294: ...erpolatie 20x 250x 500x vergroting Foto Video Timer Meting op de computer Ondersteunt MicroSD geheugenkaart tot 32GB Zonder stuurprogramma te downloaden voor Windows XP SP2 Vista Win7 en Mac OS 10 6 1...

Страница 295: ...De batterij aanbrengen 1 Open het batterijenklepje door de schuif ervan opzij te bewegen 2 Breng de lithium batterij in het batterijenvak aan neem de aangegeven polariteit in acht Opmerking Laat de ba...

Страница 296: ...art aanbrengen 1 De microscoop uitschakelen 2 De MicroSD geheugenkaart in de sleuf schuiven en aanduwen tot hij vergrendeld is Opmerking Forceer de MicroSD geheugenkaart niet in de sleuf om schade aan...

Страница 297: ...11 NL 4 3 Display Symbolen Betekenis...

Страница 298: ...dat kan worden opgeslagen afhankelijk van de resolutie MicroSD aangebracht Huidige resolutie Indicator batterijspanning Opmerking U kunt de weergave van symbolen in uitschakelen door het zoom wieltje...

Страница 299: ...13 NL Press on off button Druk op de knop aan uit 4 5 De microscoop uitschakelen 1 Druk op de knop aan uit 2 Voor energiebesparing Zie deel 5 2 2 voor de Energiebesparing instelling...

Страница 300: ...14 NL 4 6 Hoe maakt u een opname WheelC Wieltje C WheelB Wieltje B WheelA Wieltje A Object Stage Objecttafel 1 Schakel de microscoop in en breng het te bestuderen voorwerp op de objecttafel aan...

Страница 301: ...15 NL Put object onto the stage Plaats het voorwerp op de objecttafel 2 Draai aan wieltje A en breng het voorwerp naar de telescoop van de microscoop...

Страница 302: ...ichterbij te brengen Draai wieltje C linksom om wieltje A te ontgrendelen als deze geblokkeerd is 3 Draai aan wieltje B om scherp te stellen Rotate Wheel B to get a fine focus Draai aan wieltje B om s...

Страница 303: ...NL Rotate Wheel C clockwise to lock the stage Draai wieltje C linksom om de objecttafel te vergrendelen 5 Een foto maken of een video opnemen Maak een foto of een video door op de Capture knop te druk...

Страница 304: ...re knop te drukken 1 Druk op Afspelen Links om de video modus te activeren In de hoek links ziet u het symbool video 2 Druk op de Capture knopen start de opname op Druk nogmaals op stop 6 Druk op Back...

Страница 305: ...Selecteer de genomen foto of video met een druk op UP DOWN 3 Wissen Druk in de modus afspelen op het submenu wordt geopend Bevestig vervolgens het wissen 4 Beschermen Druk in de modus afspelen op het...

Страница 306: ...20 NL wordt geopend Bevestig nu de foto s die u niet wilt wissen 5 Diashow Druk in de modus afspelen op Het submenu wordt geopend Kies de interval en bevestig met een druk op OK 7 Kleur Modus NL...

Страница 307: ...de preview staat op en kies voor Color Positive Negative 8 Inzoomen druk het zoom wieltje omhoog 9 Uitzoomen druk het zoom wieltje omlaag Zoom in Inzoomen Zoom out Uitzoomen Opmerking De zoom varieer...

Страница 308: ...mputer 2 Kies het massageheugen De opgeslagen foto s en video s worden weergegeven 4 8 Preview op computer 1 Sluit de microscoop met de usb kabel aan op de computer 2 Kies de pc camera modus 3 Start d...

Страница 309: ...op alvorens u de microscoop gebruikt 1 Steek het kleine uiteinde van de adapter in de DC IN aansluiting aan de onderkant van het apparaat Steek het andere uiteinde van de voedingskabel in een standaar...

Страница 310: ...In dit geval moet u de adapter op de microscoop aansluiten en de stekker ervan in het stopcontact steken 4 10 Aansluiten op de tv Video in on TV monitor Video in op tv scherm Video out Video uit 1 Ste...

Страница 311: ...de handleiding van uw televisie voor meer informatie 3 De tv inschakelen Schakel indien noodzakelijk over naar het ingangskanaal van uw tv De voorwerpen die u vergroot worden nu op het scherm van uw...

Страница 312: ...I Open het hoofdmenu I met een druk op In dit menu kunt u de Resolutie Timer Kwaliteit Beeldscherpte instellen 5 1 1 Resolutie instellen 1 Kies Resolution in het hoofdmenuI en selecteer n van de besch...

Страница 313: ...r bevestiging op OK 5 1 2 Timer 1 Kies Timer in het hoofdmenu I en open de timer instelling Frames voer met UP DOWN en LEFT RIGHT het aantal frames in dat u wilt nemen De bovenstaande instelling staat...

Страница 314: ...t terug te keren Start de automatische opname op met een druk op Capture 8 U ziet het symbool in de hoeks links op het scherm als de automatische opname geactiveerd is 3 De microscoop zal naar de norm...

Страница 315: ...ity in het hoofdmenu I en maak een keuze uit Super Fine Fine Normal De drie keuzes staan voor drie verschillende comprimeer waarden 5 1 4 Beeldscherpte Selecteer Sharpness in het hoofdmenu I en maak e...

Страница 316: ...en druk vervolgens op LEFT om het hoofdmenu IIte openen Hier kunt u Taal Energiebesparing Datum Afdruk Tv uit Datum en Tijd SD formatteren Reset Systeem Versie instellen 5 2 1 Taal Kies Language in he...

Страница 317: ...ing 1 Kies Power Save in het hoofdmenu II en selecteer de tijd waarna de microscoop zal worden uitgeschakeld als u op geen enkele toets drukt 5 2 3 Afdruk Datum 1 Kies Stamp Date in het hoofdmenu II e...

Страница 318: ...worden op de afbeeldingen weergegeven Date de datum wordt op de afbeeldingen weergegeven Off De datum en de tijd worden niet op de afbeeldingen weergegeven 5 2 4 Tv uit Kies TV Out in het hoofdmenu II...

Страница 319: ...de datum en de tijd in 1 Stel de datum en de tijd in met LEFT RIGHT UP DOWN 2 Kies voor de datum n van de beschikbare instellingen JJ MM DD DD MM JJ MM DD JJ 5 2 6 SD formatteren Kies Format SD in het...

Страница 320: ...Reset systeem Kies Sys Reset in het hoofdmenu II op de fabrieksinstellingen van het systeem te recupereren 5 2 8 Versie Kies Version in het hoofdmenu II om de huidige versie van het apparaat te laten...

Страница 321: ...ratio Lichtbron 8 leds met instelbare helderheid Voeding Li ion 3 7V 800mAh batterij Bedrijfsuren 2 uur Oplaadtijd 5 uur Frame rate 30fps Adapter Ingang 100 240V 50 60Hz Uitgang 5V 1A OSD talen Engels...

Страница 322: ...36 NL 7 Minimum systeemvereisten computer Besturingssysteem Windows XP SP2 Vista Win7 Mac 10 6 10 7 CPU Pentium 11 of hoger RAM 256MB Interface USB poort2 0...

Страница 323: ...op het scherm van uw tv ziet u geen beeld Controleer of de tv is ingeschakeld Schakel over naar het video ingangskanaal van uw tv Controleer of de video kabel op de video uitgang van uw microscoop en...

Страница 324: ...volgende interface wordt automatisch weergegeven 1 De PortableCapture Pro software installeren Klik PortableCapture Pro software aan en start het systeem weer op als hierom wordt gevraagd 2 U kunt ook...

Страница 325: ...Sluit uw microscoop aan op de USB poort van uw PC zoals te zien op pagina 20 start de software door op het pictogram op het bureaublad dat na installatie wordt gegenereerd te klikken en u zult het vo...

Страница 326: ...ncties 11 1 Foto nemen a Klik op het Foto snelkoppelingspictogram in de hoofdmenubalk b Klik op Capture Photo 11 2 Video vastleggen a Klik op het Video snelkoppelingspictogram in de hoofdmenubalk b Kl...

Страница 327: ...41 NL 11 3 Timer Foto Video a Klik op het Timer snelkoppelingspictogram in de hoofdmenubalk...

Страница 328: ...u de begintijd intervaltijd en het totaleaantal afbeeldingen instellen Onder Timer Video kunt u de starttijd intervaltijd en het totale aantal video s instellen 11 4 Kalibratie en meting Controleer d...

Страница 329: ...om te controleren of de schaaleenheid parallel is 1 Stel de microscoop scherp op de bijgevoegde schaaleenheid en pas vervolgens de vergroting aan tot het beeld duidelijk is Maak een foto van het gesel...

Страница 330: ...44 NL 2 Dubbelklik op de afbeelding om de metinginterface te openen zoals hieronder 3 Klik op het kalibratie pictogram en verplaats de muis naar de afbeelding Klik op de start en...

Страница 331: ...u de exacte waarde van de proefmeting in Werkelijke maten invoeren De software zal vervolgens automatisch de vergroting kalibreren Klik op OK en de aangepaste vergrotingsfactor zal in de rechter boven...

Страница 332: ...Any angle Line onder het Meten pictogram gebruiken omde waarde opnieuw te meten Als de waarde met software gemeten bijna gelijk is aan de exacte waarde van de schaaleenheid betekent het dat de kalibr...

Страница 333: ...nue lengte meten Klik eenvoudig met de muisknop op het ene punt en sleep naar het andere gewenste punt en laat vervolgens los 3 Cirkel straal meting Klik eenvoudig en strek uit tot de gewenste radius...

Страница 334: ...focus voor foto opname wilt aanpassen kalibreer de vergrotingsfactor opnieuw 1 Dubbelklik om de afbeelding te openen klik op Reset magnification Reset picture magnification zoals hieronder En start v...

Страница 335: ...rschillende foto s klik op de afbeelding om de metinginterface te openen En klik op Set magnification Set picture magnification nu zal een dialoogvenster verschijnen zoals hieronder voer de vergroting...

Страница 336: ...ezelfde vergrotingsfactor wilt gebruiken om foto s te nemen klik gewoon op Set magnification Set capture magnification Nu zullen alle afbeeldingen dezelfde vergrotingsfactor gebruiken en kunt u direct...

Страница 337: ...een tekst toevoegen en voor latere analyse opslaan 1 Klik op het pictogram om een soort tekengereedschap onder het pull down menu te selecteren zoals hieronder 2 Klik op het pictogram en selecteer ui...

Страница 338: ...ce pictogrammen Foto nemen Wordt gebruikt om n voor n een foto te nemen Start Stop opnemen van video Timer voor foto video Stel de starttijd intervaltijd en het totale aantal foto s video s in Volledi...

Страница 339: ...53 NL 12 2 Hoofdmenu 12 2 1 Bestand Photos Directory Stel de map voor het opslaan van genomen foto s in Videos Directory Stel de map voor het opslaan van opgenomen video s in...

Страница 340: ...Date Time stel het systeem voor het weergeven van de datum tijd in het preview venster in Language kies een andere OSD taal Crossing geef de kruisdraden in het preview venster weer Fullscreen mode op...

Страница 341: ...55 NL 12 2 3 Opname Foto een foto nemen Video een videoclip opnemen...

Страница 342: ...56 NL 12 2 4 MeetInterface instructies Opslaan als Opnieuw uitvoeren Kopieer naar Klembord Tekenen Kopieer bestand Tekst opmerking Vorige Meting Volgende Kalibratie Ongedaan maken...

Страница 343: ...ktrische en elektronische apparaat aan het einde van zijn levensduur gescheiden van het huisvuil moet worden ingezameld In de EU wordt afval gescheiden ingezameld Voor overige informatie wend u tot uw...

Отзывы: