14
15
English
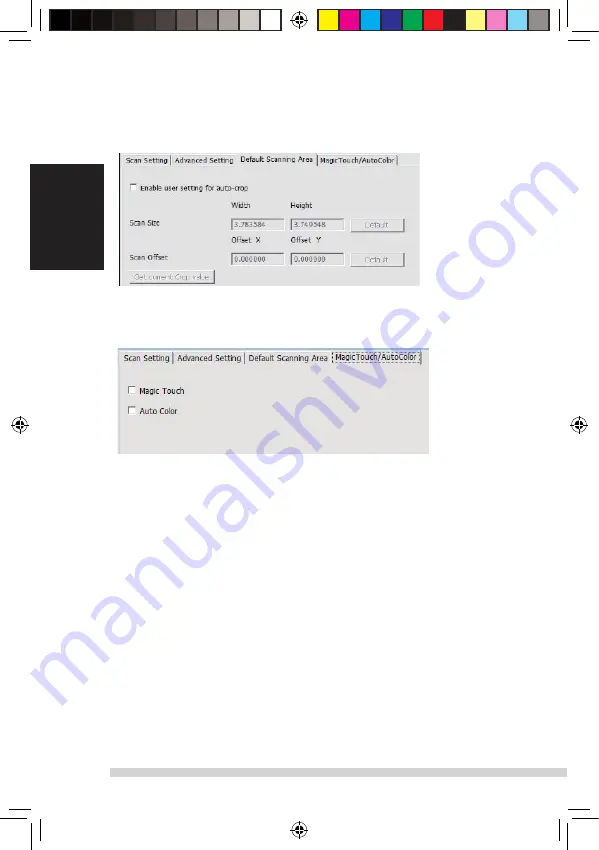
default scanning area
adjust the scanning size as well as adjust the “scan offset” setting to move
the image position of slide.
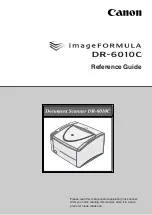
magic touch/auto Color
enable / disable magic touch and auto Color adjustment to scans.
Magic Touch
is a powerful dust and scratch removal technology that does away
with the hassle of learning complex and tedious software techniques. Being
hardware-based, it works seamlessly with the scanning process to ensure the
best possible results when bringing images into the computer. dust, scratches
and other flaws are intelligently detected and eliminated, restoring the image to
its original beauty.
scanning with magic touch requires longer scanning times, the feature is turned
off by default.
Auto Color
takes the guesswork out of the scanning process to streamline the
workflow and achieve the best results. Proprietary color enhancement
technology is applied to scanned images to provide the most accurate color
adjustment, resulting in vibrant images with optimal brightness, contrast and
saturation.
English
STEP 6 – scan
scan - scan- scan Current Frame
this begins the scan to file process
all scaned images will be saved to the directory location set previously,
the factory default locations are:
Windows:
C:\users\[Your name\documents;
MAC:
mac Hd\users\[Your name]\Pictures\Cyberview images),
STEP 7 – Exit
select “scan > exit” to close the driver. scanned image files can be open/edited
with any image editing software.
NOTE:
if using the supplied image editor, for help with this application see the users Help
from within the application
Manual-RPS10M.indd 14
23.12.2016 10:00:32
Содержание 4005039659102
Страница 1: ...English English CyberView X5 User s Manual reflecta RPS 10M Manual RPS10M indd 1 23 12 2016 10 00 30...
Страница 20: ...20 English USER INTERFACE Manual RPS10M indd 20 23 12 2016 10 00 32...
Страница 30: ...Manual RPS10M indd 30 23 12 2016 10 00 32...
Страница 31: ...reflecta RPS 10M CyberView X5 Bedienungsanleitung Manual RPS10M indd 31 23 12 2016 10 00 32...
Страница 32: ...2 Manual RPS10M indd 32 23 12 2016 10 00 33...
Страница 33: ...3 Hauptscan Standard Scanbereich 25 30 Manual RPS10M indd 33 23 12 2016 10 00 33...
Страница 34: ...4 Manual RPS10M indd 34 23 12 2016 10 00 33...
Страница 35: ...5 Manual RPS10M indd 35 23 12 2016 10 00 33...
Страница 36: ...6 Manual RPS10M indd 36 23 12 2016 10 00 33...
Страница 37: ...7 Manual RPS10M indd 37 23 12 2016 10 00 34...
Страница 38: ...unten liegt 8 Manual RPS10M indd 38 23 12 2016 10 00 34...
Страница 39: ...9 unten liegt 8 Manual RPS10M indd 39 23 12 2016 10 00 34...
Страница 40: ...iew 10 Manual RPS10M indd 40 23 12 2016 10 00 34...
Страница 41: ...11 Benutzeroberflache Manual RPS10M indd 41 23 12 2016 10 00 34...
Страница 61: ...1 ESPA OL Manual del usuario CyberView X5 ESPA OL reflecta RPS 10M Manual RPS10M indd 61 23 12 2016 10 00 36...
Страница 90: ...Manual RPS10M indd 90 23 12 2016 10 00 39...
Страница 110: ...20 FRAN AIS INTERFACE UTILISATEUR I Zone de fen tre principale FO USFT YFT Manual RPS10M indd 110 23 12 2016 10 00 43...
Страница 120: ...Manual RPS10M indd 120 23 12 2016 10 00 44...
Страница 121: ...1 ITALIANO Manuale dell utente CyberView X5 ITALIANO reflecta RPS 10M Manual RPS10M indd 121 23 12 2016 10 00 44...
Страница 127: ...7 ITALIANO Manual RPS10M indd 127 23 12 2016 10 00 45...
Страница 137: ...17 INTERFACCIA UTENTE ITALIANO Manual RPS10M indd 137 23 12 2016 10 00 46...
Страница 151: ...NEDERLANDS 1 Gebruikershandleiding CyberView X5 NEDERLANDS reflecta RPS 10M Manual RPS10M indd 151 23 12 2016 10 00 49...
Страница 157: ...7 NEDERLANDS Manual RPS10M indd 157 23 12 2016 10 00 50...
Страница 167: ...17 GEBRUIKERSINTERFACE I Hoofdvenstergebied vaste vensters NEDERLANDS Manual RPS10M indd 167 23 12 2016 10 00 51...
Страница 181: ...1 PORTUGU S Manual do Usu rio CyberView X5 PORTUGU S reflecta RPS 10M Manual RPS10M indd 181 23 12 2016 10 00 53...
Страница 200: ...20 PORTUGU S INTERFACE DO USU RIO I rea de Janela de Visualiza o BOFMBT JYBT Manual RPS10M indd 200 23 12 2016 10 00 58...


