background image

1. Lubricate skid plate surface of the hitch (see figure on cover of Manual) with automotive type chassis grease or use a plastic lube

plate to provide a lubricated surface. Plastic lube plates (Reese No. 74295) can be used to avoid messy grease.  The plastic lube
plate must not exceed 3/16 of an inch in thickness to ensure hitch will operate properly.  Lube plates must be 10 inches in
diameter or larger to properly distribute king pin weight. Use engine oil or spray lube to lubricate pivot points of moving parts
within the hitch. (See Fig. 19 - 22)

2. Before each trip or maneuver, operate the handle and check that the jaws open and close freely.

3. Visually check all bolts and nuts fastening the hitch system to the truck bed and frame to be sure they are tight.

4. See that all hitch pins are in place and the spring retaining pins are installed.

5. Visually check head pivot connection (26). Inspect cotter pins (34) in pivots to make sure they are in place and in good condition

(See Fig. 21).

WARNING:

FAILURE TO FOLLOW THESE INSTRUCTIONS MAY RESULT IN DEATH OR SERIOUS INJURY.

1. Place blocks (sometimes called “chocks”)  firmly against front and rear of each trailer wheel to prevent any possible forward or

rearward motion.  DO NOT REMOVE BLOCKS UNTIL EACH OF THE FOLLOWING STEPS AND THE PULL TEST HAVE BEEN
COMPLETED. Lower tailgate if necessary.

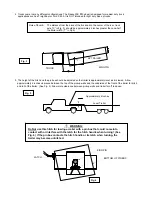
2. Using trailer jacks, adjust trailer height following the directions in the trailer manual so that bottom of trailer pin box (“A” in Fig. 8)

is ½  to 1 inch below skid plate (See “B” in Fig. 8).  During the hitching maneuver, the bottom of the trailer pin box should come in
contact with skid plate ramp (“C” in Fig. 8).

BEFORE EACH TRIP:

HITCHING PROCEDURE:

Fig. 8

CORRECT

Bottom of Pin Box (A)
1/2 To 1 Inch Below
Hitch Skid Plate (B)

Skid Plate Ramp (C)

Hitch Skid Plate (B)

Bottom of Pin Box (A)

Bottom of Pin 

Box Above

Hitch Skid Plate

Fig. 9

WRONG

IMPORTANT:  

YOU ARE RESPONSIBLE FOR SAFE HITCHING AND UNHITCHING OPERATIONS. DO NOT RELY ON 
OTHERS TO PERFORM YOUR DUTIES.  YOU MUST PERSONALLY MAKE SURE THE FOLLOWING STEPS 
ARE PERFORMED IN THE FOLLOWING ORDER!

WARNING:

Failure to follow this instruction may result in king pin being too high and coming to rest on top of closed 
jaws or not completely inside jaws. (See Fig. 9).  This could result in trailer separating from hitch.  Trailer 
separation may result in death or serious injury if anyone is under the trailer or between truck and trailer 
when separation occurs.

Содержание 30054

Страница 1: ...ual to end user 3 Have end user demonstrate that he she understands procedures 1 Read and follow this Manual every time you use hitch 2 Save this Manual and Hitch Warning Hang Tag for future reference 3 Pass on copies of Manual and Hitch Warning Hang Tag to any other user or owner of hitch DEALER INSTALLER END USER SKID PLATE SURFACE HITCH WARNING DECALS HANG TAG ...

Страница 2: ...GHT PIN WEIGHT 75 85 GROSS TRAILER WEIGHT Fig 2 GUIDELINES FOR MATCHING HITCH TRUCK AND TRAILER WARNING Failure to follow these instructions may result in death or serious injury WARNING Trailer and its contents together must not exceed truck hitch and or trailer tow ratings Towing vehicle must have a manufacturer s rated towing capacity equal to or greater than the gross trailer weight dry weight...

Страница 3: ... trailer See Fig 5 Allow more clearance between pickup walls and trailer for off road use KING PIN RV TRAILER TRUCK Fig 3 Rule of thumb The distance from the back of the truck cab to the center of the rear truck axle X in Fig 3 should be approximately 4 inches greater than one half the trailer width Y in Fig 3 Approximately 6 Inches Level Trailer Fig 5 KING PIN BOTTOM OF PIN BOX LATCH Fig 6 WARNIN...

Страница 4: ...th the long axis of the base assembly parallel to the cab back 5 Using the 4 square holes in the base as template mark pilot drill and finish drill to 5 8 dia The drilled holes must go through the deck and through the 1 2 steel plate underneath The 1 2 plate must be welded to brackets and bolted to the truck chassis 6 Bolt the base assembly in place with the four grade 5 or higher 5 8 carriage bol...

Страница 5: ...rmly against front and rear of each trailer wheel to prevent any possible forward or rearward motion DO NOT REMOVE BLOCKS UNTIL EACH OF THE FOLLOWING STEPS AND THE PULL TEST HAVE BEEN COMPLETED Lower tailgate if necessary 2 Using trailer jacks adjust trailer height following the directions in the trailer manual so that bottom of trailer pin box A in Fig 8 is to 1 inch below skid plate See B in Fig...

Страница 6: ...le See Fig 11 As king pin completely enters head jaws will spring closed around king pin and handle will return to the closed position See Fig 12 5 Use only the method described above for hitching WARNING Do not attempt to hitch by using trailer jacks to lower trailer and king pin This could result in king pin coming to rest on top of skid plate instead of within hitch opening where jaws are locat...

Страница 7: ...E IN HANDLE TRAILER HAS NOT BEEN PROPERLY CONNECTED TO HITCH DO NOT TOW Repeat steps 1 7 until trailer is properly hitched See Fig 16 King Pin Jaws closed Fig 16 Latch closed 8 With All trailer wheels still firmly blocked in front and behind each tire and Truck stationary with the emergency brake on and Trailer landing gear still resting on firm ground and supporting trailer weight Connect electri...

Страница 8: ...ks lower trailer landing gear following the directions in the Trailer Manual until feet of landing gear are resting on firm ground 3 Make sure truck is in park with the emergency brake on UNHITCHING PROCEDURE PULL TEST WARNING Trailers that are not stable or properly hitched can fall and kill you To avoid death or serious injury All trailer tires MUST be blocked in front and behind each tire AND T...

Страница 9: ...diagrams Fig 19 through 22 4 Repeat step 5 from Before Each Trip pg 5 section MAINTENANCE Fig 18 Pull Handle all the way out Fig 17 Latch Hitch Jaws Groove in Handle Groove in Handle WARNING Whenever possible avoid putting body under trailer or between truck and trailer If you need to place any part of our body under trailer or between truck and trailer All trailer tires MUST be blocked in front a...

Страница 10: ...as between both walls 22 21 34 25 27 26 Visually inspect cotter pin 34 to make sure it is in place and in good condition Fig 21 Bottom of head assembly shown without rocker plate Lubricate all pivot points with engine oil or spray lube Lubricate all pivot points with engine oil or spray lube 22 Fig 22 ...

Страница 11: ...7 INNER HANDLE ASSEMBLY 1 24 SPRING COTTER PIN 2 31 3 8 NUT 1 18 LATCH 1 25 PIVOT PIN SLEEVE 2 32 SPRING 2 19 3 8 LATCH BOLT 1 26 PIVOT PIN 2 34 COTTER PIN 3 20 SNAP RINGS 4 27 PIVOT PIN PIN 2 35 OUTTER HANDLE 1 21 ROCKER PLATE 1 28 BASE ASSEMBLY 1 36 HANDLE GRIP 17 20 35 34 34 34 26 26 23 28 24 18 19 36 25 27 29 15 16 22 21 30 31 32 1 ...

Отзывы: