background image

DETAILED SAFETY INSTRUCTIONS (continued).

The appliance should be installed in such a way and position that the air inlet and outlet through the
top are not obstructed. The appliance must not be installed within pieces of furniture or cupboards
that may stop the airflow around the unit.

The unit must be placed away from heat sources such as: radiators, heaters and other appliances gener-
ating heat.

This appliance must be connected to the electrical power supply indicated within these instructions and
on the adhesive label fixed to it.

This unit must only be connected to an earthed socket. Check if the socket works correctly before use.

The supply cable must be placed to avoid being stepped on, pierced or damaged by any object
near it.
The waste disposer must only be cleaned with a damp cloth moistened with a mild soap solution. Do
not employ cleaning products containing solvents or acids.

When long non-use periods are expected, disconnect the plug from the socket. Take care to turn off
the stopcock preventing water supply to the cistern. Empty the cistern before switching off the was-
te disposer.

Do not allow flushing of unacceptable foreign objects into the unit such as: sanitary towels, tampons,
condoms, cotton, cotton buds, scouring pads, sponges, hair, food waste, plastic bags, nappies, paper
towels, etc.

Damages that require technical support such as: Damage in the power supply cable, appliance work-
ing inadequately or incorrectly, must be repaired by qualified professionals.

Except where otherwise stated in this manual, all maintenance and repairing operations must be carried
out by qualified personnel.

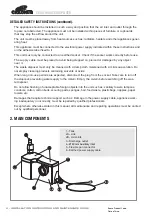
2. MAIN COMPONENTS

2 - INSTALLATION INSTRUCTIONS AND MAINTENANCE GUIDE

T-604 WASTE DISPOSER

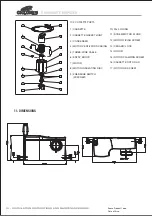
1.- Tank
2A.- Lids
2B.- Lid Joints
3.- Discharge outlet
4.-

Ø 40mm Auxiliary inlet

5.- Flexible pan connector
6.- Earthed power supply cable

Reece Product Code: 

Date of Issue: 

Содержание Ciclon L T-604

Страница 1: ...INSTALLATION INSTRUCTIONS AND MAINTENANCE GUIDE T 604 WASTE DISPOSER...

Страница 2: ......

Страница 3: ...not open the upper lids Do not manipulate the interior of the sanitary waste disposer Always seek qualified and professional help WARNING For the purpose of avoiding possible fires and elec trocution...

Страница 4: ...ion Do not employ cleaning products containing solvents or acids When long non use periods are expected disconnect the plug from the socket Take care to turn off the stopcock preventing water supply t...

Страница 5: ...ted to the auxiliary inlet connection Sewage and waste materials pass into the unit and increase the water level The pressure micro switch comes on and the pump motor is activated Depending on the hei...

Страница 6: ...receives water from the sanitary appliance by the action of gravity The graded waste pipe from the basin shower or other fixture into the the waste disposer must have a positive grade to allow drainag...

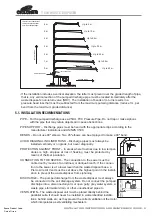
Страница 7: ...by means of thermal insulation CONNECTION TO THE SEWER The connection to the sewer must be carried out by means of an inclined or oblique branch If the connec tion to the sewer is at a lower level tha...

Страница 8: ...harge to check the operation of the pumped discharge evacuation process After the discharge there should be no pieces of toilet paper left within the toilet bowl 6 INSTRUCTIONS FOR END USERS Once inst...

Страница 9: ...g a good quality non corrosive mild soap and damp cloth In areas with a high level of water hardness and for the purpose of eliminating the lime deposits it is recommended to regularly clean the appli...

Страница 10: ...lve is blocked The auxiliary connection lacks ventilation The micro switch that activates the pump is not working properly Clean the waste pipe from the auxiliary connection and the non return valve I...

Страница 11: ...he steps in reverse order see electrical connections be low and replace the cassette cover The whole process should take 10 minutes INSTALLATION INSTRUCTIONS AND MAINTENANCE GUIDE 9 Reece Product Code...

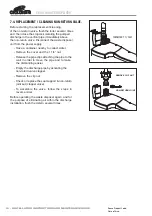
Страница 12: ...l in order to move the pipe and to make the dismantling easier Have a container nearby to collect water Empty the discharge pipe by activating the non return valve clapper Remove the clip nut Check or...

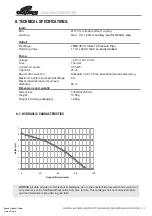
Страница 13: ...d discharge 6 m Max Graded distance of pumped discharge 62 m Dimensions and weight m m 250 x 300 x 530 s n o i s n e m i D 10 8Kg t h g i e W Weight incluiding packaging 12 2Kg NOTICE All data provide...

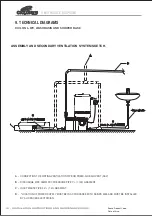
Страница 14: ...T AAV B DISCHARGE PIPE 25MM PVC PRESSURE PIPE 1 1 100 GRADIENT C INLET WASTE PIPE 2 5 1 40 GRADIENT D LOCATION OF POWER SUPPLY MUST BE IN ACCORDANCE WITH AS NZS 3000 AND MUST BE INSTALLED BY A LICENCE...

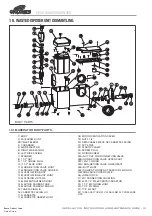
Страница 15: ...CARBON TANK LID 15 TANK FACING LID 16 CASSETTE FACING LID 17A CASSETTE 17B CASSETTE GASKET JOINT 18 MOTOR VENTILATION COVER 19 NUT 1 1 4 20 DETACHABLE PIECE OF CASSETTE FACING 21 PVCb PIPE 22 PLASTIC...

Страница 16: ...MOTOR VENTILATION CASING 5 THREE WIRE CABLE 6 ENTRY BOOTS 7 MOTOR 8 MOTOR INSULATING DISC 9 PRESSURE SWITCH W SCREW 10 22x3 O RING 11 SCREW MOTOR PLUGS 12 MOTOR FIXING SCREW 13 CERAMIC LOCK 14 ROTOR 1...

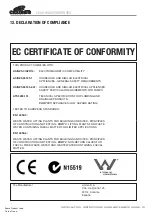
Страница 17: ...FICATION FOR PLUMBING AND DRAINAGE PRODUCTS PART 101 APPLIANCES LOW HAZARD RATING TESTED TO EUROPEAN STANDARDS EN 12050 3 WASTE WATER LIFTING PLANTS FOR BUILDINGS AND SITES PRINCIPLES OF CONSTRUCTION...

Страница 18: ...or electrical influences Warranty repairs may only be performed by our service representatives or an authorised customer service workshop Any attempt to repair the device by the customer or unauthoris...

Страница 19: ...Notes...

Страница 20: ...Reece Product Code Date of Issue...

Отзывы: