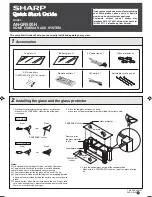
background image

FIGURE 11.1

FIGURE 11.2

3/8" CARRIAGE BOLT 1" LONG

3/8" FLANGE NUT

FIGURE 11.3

FIGURE 11.4

3/8" FLANGE NUT

3/8" CARRIAGE BOLT 2.25" LONG

STEP 2

: Find the (4) Vertical Supports, there will be uppers, lowers and left and rights. Connect the upper and 

lower sections together with the (8) 3/8-16 x .1" Carriage Bolts as shown in Figure 11.2. There will be (4) bolts on 

each Vertical Support. With the flange on the outside, place the bottom of the porch support behind the top 

perimeter rail, see Figure 11.3. With the bottom of the Porch Support attached, secure the top of the porch 

support with the 2.25" carriage bolt as shown in Figure 11.4. Repeat these steps for the other side. Once 

everything is in place tighten down all the bolts. 

-4-

Содержание RD-STD68BR

Страница 1: ... at 877 523 9986 for replacement of missing or defective parts NOTE Some parts of this product are manufactured to be universal in use so there may be some parts containing holes that will not be used in the assembly of this particular model To minimize confusion in the assembly process please read these instructions in their entirety before beginning Should you have any questions about the assemb...

Страница 2: ...PORT LOWER LEFT 2 CC VERTICAL SUPPORT UPPER LEFT 2 DD VERTICAL SUPPORT LOWER RIGHT 2 EE VERTICAL SUPPORT UPPER RIGHT 1 3 8 16 X 2 LONG HEX BOLT 2 3 8 WASHER 2 O D 2 3 8 FLAT WASHER 2 3 8 LOCK WASHER 2 3 8 16 HEX NUT 2 3 8 16 X 2 25 LONG CARRIAGE BOLT 4 3 8 16 X 1 LONG CARRIAGE BOLT 12 3 8 16 LOCKING FLANGE NUT 16 TOOLS REQUIRED NOT INCLUDED 2 9 16 SOCKETS OR WRENCHES DRILL WITH 3 8 DRILL BIT 2 ...

Страница 3: ...ushed all the way in place the cross bar should hit with the front of the stand With the Support in place secure it with a 3 8 x 2 25 long carriage bolt you will use one of the 2 holes as shown in Figure 10 2 If your stand has a channel across the front you will use the farther one and if your stand has a tube at the end of it you will use the closer one Install the bolt going from the top down an...

Страница 4: ...ether with the 8 3 8 16 x 1 Carriage Bolts as shown in Figure 11 2 There will be 4 bolts on each Vertical Support With the flange on the outside place the bottom of the porch support behind the top perimeter rail see Figure 11 3 With the bottom of the Porch Support attached secure the top of the porch support with the 2 25 carriage bolt as shown in Figure 11 4 Repeat these steps for the other side...

Страница 5: ...nt of the 6x8 Support as shown in Figure 12 2 Take your drill and 3 8 drill bit and drill through the bottom of the floor up through the top of the floor making sure to stay centered between the slot Once both holes are drilled insert the 3 8 bolt and large washer down trough the floor Secure on the bottom side of the stand with the 3 8 washer lock washer and nut Once both are in place make sure t...

Отзывы: