


15. Pour approximately 3 liters of seawater into the skimmer chamber
of the rear sump to ensure that all of the pipe joins are watertight.
Check for leaks inside the cabinet.
16. Remove the black sponge from above the circulation pump/s and
replace the closed grill plugs with the open grill plugs that are
supplied with the pipe kit.
17. Open the main flow valve (rotate anti-clockwise) to maximum.
18. Plug the return pump into one of the auxiliary outlets on the power
center.
19. Place the RO reservoir in position, connect the outlet to the float
valve and fill with RO water but close the flow valve on the outlet of
the reservoir.
20. Install your protein skimmer and any other equipment that will be in
the sump. Please note that at this point the water height in the sump
is still much higher than normal.
21. Add approximately 40 liters (10 gallons) of new seawater to the
aquarium.
22. Switch on the return pump, the circulation pumps and any equipment
you have added to the sump. Add more water as required to
maintain 15cm/6" of water in the return pump compartment.
23. Allow the system to run for a few minutes and adjust the flow valve
(as described below) so that the water level in the rear sump is
between the main downpipe and the overflow bypass and there is
no noise. Add/remove water to/from the system and adjust the flow
valve until the water levels in the system stabilize.
Main downpipe valve adjustment
To raise the water level in the rear sump, rotate the valve clockwise.
To lower the water level in the rear sump, rotate the valve anti-clockwise.
The main downpipe flow valve provides a very fine control of the flow
rate however after making adjustments it takes the system a few
minutes to stabilize at the new setting.
Once you have established the approximate setting for the valve make
very small adjustments and wait for a few minutes each time. It may take
a number of occasional adjustments to reach a stable level. When set
properly this system removes all of the noise of water flowing down to
the sump.
ATO:
On initial set-up, wait until the saltwater system is stable before using the
ATO.
Disconnect the top-up flow valve from the float valve and slowly open the
flow valve until the top-up water drips at a rate of approximately 1 drop
per second. Reconnect the flow valve to the float valve.
Adjust the angle of the float so that the valve is closed when the water
level is above the inlet of the pump but below the top of the bubble trap.
Power-out test:
After completing the upgrade and after adding any new equipment to the
sump, make any adjustments necessary to the main valve to stabilize the
system and perform a “power-out” test to check that water does not rise
above the rim of the sump.
MSK 900 Protein Skimmer:
The MSK900 protein skimmer is designed specifically for a rear sump
application with a high water level.
The MSK900 will operate with full reef spec performance if used inside
the in-cabinet sump however there will be excessive noise due to the
approximately 20cm 8" of height difference between the skimmer outlet
and the water level in the skimmer chamber. Attaching sponge to the side
of the skimmer will effectively cancel the noise.
Maintenance
For continuous smooth operation of the water management system make
regular checks of the following:
Water level in the rear sump - adjust the flow valve as required.
Water level in the reservoir – top up with RO water as required.
Water level in the sump, check that the top-up float valve is operating
correctly.
Micron Filter Bags – check that water is flowing through the bags and
replace as required.
Surface skimmer combs – remove any deposits that reduce water flow.
Pump outlet nozzle – check for blockages and build-up of algae.
Micron Filter bags
It is recommended to have at least 3 sets of filter bags.
There are a few options for cleaning the filter bags:
Quick and effective – Spray the outside of the bags with a powerful water
jet such as a garden hose to back-flush the detritus from the felt.
More thorough – soak the bags in bleach or diluted vinegar for 24 hours
prior to spraying as above. Rinse well to remove all chemicals before
returning to sump.
The filter bags can also be put in a cold wash in a washing machine with
regular detergent or with vinegar (may require approval from a higher
authority).
WARNING
: Overfilling the sump with equipment may cause a
flood in the event of an interruption of electric power.
NOTE
: It is recommended to close the valve on the outlet of the
reservoir whenever doing maintenance in the sump.
Red Sea MAX
®
E-Series | In-Cabinet Sump Upgrade Manual
ENG
Содержание Complete Plug & Play MAX E Series
Страница 2: ......
Страница 3: ...Red Sea MAX E Series In Cabinet Sump Upgrade Manual...
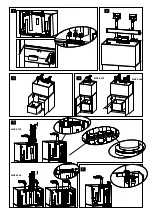
Страница 4: ...1 3 4 2 5 6 MAX E 170 MAX E 170 MAX E 260 MAX E 260 30 mm 30 mm...
Страница 5: ...7 8 9 10 MAX E 170 MAX E 260...
Страница 12: ......
Страница 13: ......
Страница 15: ...ATO ATO 1 MSK 900 MSK 900 MSK 900 REEF SPEC 20cm RO 3 24 MAX E CHN...


