background image

19

6. Operation & Planer Thicknesser Practice 

- cont.

6.4 Planing

Fix the extraction port in position as shown in 

Section


6.1

This operation is carried out for straightening 
a workpiece and for trimming the long side of 
panels. Place workpiece flush on to in-feed table, 
with your left hand set the cutter guard to the 
required height (workpiece should be run clear 
of the guard). Start the machine and push timber 
slowly and steadily against the cutterblock, 
moving hands over the cutter guard as the 
timber is pushed under it, see 

Fig.6.5A

.

The depth of cut can be altered by setting the 
infeed table to line up with the marking on the 
scale. The top line is zero and the bottom line is 
a 3 mm cut. It is not advised to take the deepest 
cut, a shallow cut will give better results and put 
less strain on the machine 

Fig.6.5B 

.

To increase the depth of cut simply rotate the 
infeed adjustment knob anti clockwise 

Fig.6.5C

6.5 Jointing

For planing the narrow sides of a workpiece, 
release the cutter guard's lock lever and set the 
cutter guard to the width of the workpiece. The 
spring on the end of the cutter guard should 
exert a slight pressure against the workpiece. 
Lock blade guard in place and start the machine. 
Push workpiece slowly and steadily against 
cutter block. Ensure that fence is set at the 
required angle and the workpiece is kept flush 
against the fence 

Fig.6.6

.

This gives you 2 datum surfaces; explanation 
below 

Fig.6.7A

.

After straightening 

side 1

, turn the workpiece 

90º so that 

side 1

 now lines up along the fence. 

Surface 

side 2

 at 90° in order to carry out 

thicknessing: this way it is possible to obtain a 
finished piece planed on all 4 sides.

When 

side 1

 is positioned flat against the 

thicknessing bed, 

side 3

 is cut exactly square 

Fig.6.7B

. Likewise when 

side 2

 is positioned 

flat against the thicknessing bed, 

side 4

 is cut 

square the end result is a completely square 
piece of timber 

Fig.6.7C

.

Before proceeding with thicknessing, carefully 
read the advice on safety and planer-protection 
adjustment on the following pages.

Fig.6.5A

Fig.6.6

Fig.6.5B

Depth Scale

Fig.6.5C

Adjustment Knob

90º

Fig.6.7A

Thicknessing 
bed

1

3

2

Fig.6.7B

Cutterblock

Thicknessing 
bed

2

1

4

3

Fig.6.7C

Side 1

Fence

Surface 

planing table

Surface 

planing table

Side 1

Side 2

Side 1

Side 3

Side 2

Side 4

Side 1

Side 3

Side 4

Side 2

Plastic spring

Содержание PT260

Страница 1: ...ister this product please visit www recordpower info It is important to register your product as soon as possible in order to receive efficient after sales support and be entitled to the full 5 year guarantee Your statutory rights are not affected Please see back cover for contact details Important For your safety read instructions carefully before assembling or using this product Save this manual...

Страница 2: ... Up 6 Operation Planer Thicknesser Practice 7 Dust Extraction 8 Maintenance 9 Electrical Connection Wiring Diagram 10 Trouble Shooting 11 Parts Diagrams 12 Parts List EU Declaration Of Conformity Consumable Spare Parts Quick Find Part Description Part Number Lock bar screw M6 x 11mm SRSPT260 101 Set screw M6 x 8mm SRSPT260 104 RSPT260A Planer blade Pair SRSPT260 105 Extraction port SRSPT260 174 Fe...

Страница 3: ...or blades Gloves should NOT be worn when using the machine as they can be caught in moving parts of the machine Non slip safety footwear is recommended when using the machine and handling large work pieces 2 Dress appropriately Do not wear loose clothing neckties or jewellery they can be caught in moving parts of the machine Roll up long sleeves above the elbow Wear protective hair covering to con...

Страница 4: ...a working position that allows your body to remain balanced and feed the work piece in to the machine without overreaching Keep proper footing and balance at all times 15 Electrical supply Electrical circuits should be dedicated to each machine or large enough to handle combined motor amp loads Power outlets should be located near each machine so that power or extension cables are not obstructing ...

Страница 5: ...ables Do not use compressed air to clean the machine Always use a brush to dislodge dust in places that are awkward to reach and a dust extractor to collect the waste Inspect electric cables periodically and if damaged have them replaced by an authorised service facility or qualified electrician Inspect extension cables if used periodically and replace if damaged 28 Keep cutting tools sharp and cl...

Страница 6: ...t to finish 4 Whilst planing Never remove any of the safety guards Keep guards operational at all times Use extra caution with large very small or irregularly shaped work pieces Use extra supports roller support stands etc for any work pieces large enough to tip when not held down to the table top Do not use another person as a substitute for a table extension or as additional support for a work p...

Страница 7: ...been purchased from a retailer the 5 year guarantee is transferable and begins on the date of the first purchase of the Product and in the event of a claim under this guarantee proof of the original purchase date will be required to validate the warranty period 2 Claims Procedure 2 1 In the first instance please contact the Authorised Dealer who supplied the Product to you In our experience many i...

Страница 8: ...Motor rating plate Thicknesser Feed Rate 5 Metres Minutes Cutter Block Diameter 63 mm Maximum Thicknessing Width 260 mm Maximum Planing Width 260 mm Planing Table Length 1000 mm Weight 80 kg Cutter Block Knives 2 Maximum Thicknessing Height 150 mm Maximum Thicknesser Depth of Cut 3 mm Maximum Planer Depth of Cut 3 mm Motor Input 2 kW Output 1 4 kW Size H914 x W280 x D1200 mm Thicknessing Sound Pow...

Страница 9: ...rt will be required for lifting the machine onto the stand The stand and wheel kit comes as a self assembly unit Fig 3 1 Stand 1 4 x stand legs 2 16 x nuts bolts and washers each Wheel Kit 3 1 release catch 4 4 x fixing Pins 5 2 x axles 6 2 x brace support bars 7 7 x nuts bolts and washers 8 Operating frame pedal 9 Operating frame 10 2 x castors 11 2 x fixed wheels 1 2 3 4 5 6 7 8 9 10 Fig 3 1 11 ...

Страница 10: ...ributed equally across the main frame 3 With the machine on its side secure one of the legs to the main frame of the machine using the nuts bolts and washers provided Fig 3 3A Fig 3 3B and Fig 3 3C 4 In the same way attach the second leg to the main frame Fig 3 4 5 Continue the same process until legs three and four have been secured to the main frame Fig 3 5 However it may not be possible to fix ...

Страница 11: ...operating frame to the stand 8 Feed the second axle through the holes in the brace support bars and legs at the other side of the stand and secure it using the fixing pins Fig 3 12 9 At this point it is important to ensure that the operating frame sits below the operating frame pedal and that the release catch hooks under the operating frame pedal Fig 3 13 It is possible to adjust the operating fr...

Страница 12: ... wrenches 8 2x Hex wrenches 9 Crank Handle 10 4x Pan head self tapping screw 4 8 x 13mm and washers 11 Blade setting gauge 12 Switch screws 1 3 4 2 5 6 7 10 12 8 9 1 3 4 5 6 8 9 10 2 7 11 Stand Wheel Kit Stand 1 4 x stand legs 2 16 x nuts bolts and washers Wheel Kit 3 1 release catch 4 4 x fixing pins 5 2 x axles 6 2 x brace support bars 7 7 x nuts bolts and washers 8 Operating frame pedal 9 Opera...

Страница 13: ...o slide up and down in order to adjust the depth of cut As a guide fully tighten the socket head cap screws then unscrew by 1 4 turn 4 2 Fixing the thicknessing dust extraction outlet Moving round to the opposite side of the machine locate the slotted extrusion and place the extraction outlet into position Fig 4 7 Secure this outlet into slot using 4 self tapping screws and washers Fig 4 8 4 3 Fix...

Страница 14: ... tighten the upper ratchet handle to secure the position Now adjust the 90º stop screw against the registration point to ensure that the fence always returns to 90º Fig 4 12 This same operation should also be carried out using a mitre square for the 45º stop screw 4 7 Switch box Fit the switch box to the side of the machine Fig 4 13 4 8 Thicknesser handle The thicknesser handle should now be attac...

Страница 15: ...ts into the wedge Fig 5 3 so it all moves freely inside the cutter block Now ease the knife off of the front of the wedge Fig 5 4 and remove from the block The wedge can now be removed as well Clean both parts thoroughly with white spirit Even the smallest amount of swarf or timber resin can prevent the knife from seating properly Also give the slot in the cutter block a wipe down with white spiri...

Страница 16: ...ner knives if they have been held by magnets when being ground When tightening the jacking screws do so very delicately even a tiny fraction of a turn can make a big difference as the jacking points are very sensitive When slackening the jacking screws it may be necessary to tap the top of the hex key to get this point to seat and lower the knife Fig 5 9 If the jacking screw becomes difficult to t...

Страница 17: ...edge move less than 2mm or doesn t move at all Fig 5 14 the knives are set too low If it moves further than 3mm they are set too high Fig 5 15 To set the knife projection slacken the lock nuts and turn the grub screws in the planer knife lock bar with a 3mm allen key as required Once the centre is set lock the two centre locking nuts to secure the setting Now check and adjust the knife at both end...

Страница 18: ...tter guard clear of table and set guard to highest position Swing chip ejection hood over the cutterblock and secure in place with the lock levers as well as lowering the guard on to it Fig 6 2 Thicknessing with a dust collector Bring chip ejection hood into position as shown then place the suction connector on to it Fig 6 3 Secure with lock levers and guard Note The chip ejection hood acts as a c...

Страница 19: ...e spring on the end of the cutter guard should exert a slight pressure against the workpiece Lock blade guard in place and start the machine Push workpiece slowly and steadily against cutter block Ensure that fence is set at the required angle and the workpiece is kept flush against the fence Fig 6 6 This gives you 2 datum surfaces explanation below Fig 6 7A After straightening side 1 turn the wor...

Страница 20: ...llows power to run to the machine Fig 6 11 3 Also when planing the micro switch beneath the cutterblock must register that the dust extraction port is in place before the machine will start Fig 6 12 Fig 6 8 Fig 6 9 Thicknessing Bed Fig 6 10 Fig 6 11 Fig 6 12 i Restarting In the Event of a Blockage or if the Machine Stalls If the machine stalls due to the work piece becoming trapped in the cutter b...

Страница 21: ... motors can be used simultaneously giving maximum suction but in this mode the extractor must be switched off for 20 minutes every hour 0 5 micron filtration DX5000 High Filtration Dust Extractor Bag type extractor 200 litre capacity Twin 1 kW motor suitable for heavy usage ie if one motor is switched off for 20 minutes then the other can be used thus enabling continuous usage Or both motors can b...

Страница 22: ...g power cable should not be used Parts that are broken missing plainly worn distorted or contaminated should be replaced immediately Should such repair or replacement become necessary it is recommended that they be carried out by qualified persons This machine or any of its parts should not be altered or changed from standard specifications The user of this machine shall have the sole responsibili...

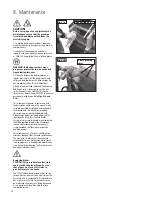
Страница 23: ...t such as silicone Check the operation of the jacking mechanism in the wedge Fig 8 5 and clean and lubricate this as well 8 Now re fit into the cutter block Place the wedge in first then fit the knife on to the wedge ensuring the pins seat into the location holes in the knife Fig 8 6 9 Turn the four locking nuts anti clockwise Fig 8 7 and tighten enough to hold the knife but not so hard that it ca...

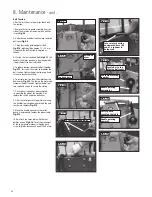
Страница 24: ...the motor and increases the belt tension Tighten the bottom two cap head screws to secure the setting 7 Once correct tension has been achieved re assemble the side of the machine First replace the switch and drive belt cover 8 Offer the cutter guard into position ensuring the handle is pointing downwards and the end teeth mesh together Fig 8 14 9 Move the handle upwards so the cutter guard is lowe...

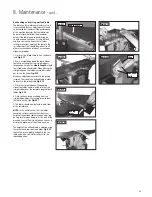
Страница 25: ... 18 Make any adjustment necessary to the jacking screw on this side of the outfeed table in order to level it to the infeed table Fig 8 19 3 Place the straight edge on the opposing side of the tables again making sure that the straight edge spans the complete length of both tables Fig 8 20 4 Once you have taken a reading from the straight edge adjust the jacking screw to level the tables on this s...

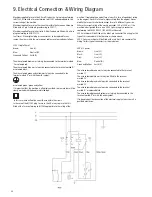
Страница 26: ...3 plug for use in the UK always ensure that it is fitted with a fuse conforming to BS1362 appropriate to the rating of the machine If replacing the original fuse always fit a fuse of equivalent rating to the original Never fit a fuse of a higher rating than the original Never modify the fuse or fuse holder to accept fuses of a different type or size Where the current rating of the machine exceeds ...

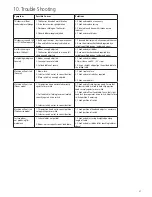
Страница 27: ... 90 45 stops 3 Using a straight edge align the outfeed table to the infeed table Machine will not start General 1 Blown fuse 2 Selector switch not set to correct function 3 Micro switch es wrongly adjusted 1 Check replace fuse 2 Check and reset switch as required 3 Check and re adjust Machine will not start Planer mode 1 Chip ejection hood not located correctly against micro switch 2 Out feed tabl...

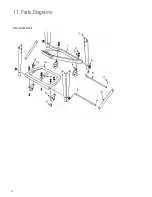
Страница 28: ...28 11 Parts Diagrams Stand Wheel Kit ...

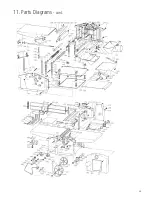
Страница 29: ...29 11 Parts Diagrams cont ...

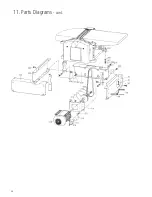
Страница 30: ...30 11 Parts Diagrams cont ...

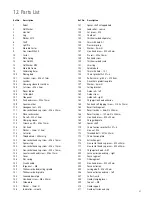
Страница 31: ...6 Feed roller smooth 137 Spacer shaft w tapped hole 138 Feed roller coarse 140 Set screw M5 141 Check nut 142 Thicknesser bed w pointer 144 Shim with hole 8 1 145 Pressure spring 146 Washer 8mm Ø 147 Hex head screw M8 x 80mm 148 Pin roll M8 x 16mm 149 Pan head screw 150 Thicknesser bed scale 151 Shim ring 152 Spindle bush 153 Shim with hole 12 1 154 Chain sprocket Z 15 T 6 155 Roller chain pitch 6...

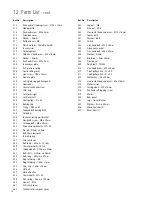
Страница 32: ... Bolt chain tensioner 246 Torsion spring 247 Cain tensioner 248 Roll chain pitch 8 74 links 249 Chain sprocket Z 10 T 8 250 Threaded bolt Ø14mm x 20mm 251 Bolt short Ø20mm x 64 5mm 252 Bolt long Ø20mm x 87mm 253 Ring retaining Ø8 254 Ring retaining 16mm x 1mm 255 Shim ring 16mm x 22mm 256 Flat belt 257 Flat belt pulley 258 Cam wheel Z 25 T 38 259 Disk spring 34mm x 12 3mm 260 Hex nut M12 261 Drill...

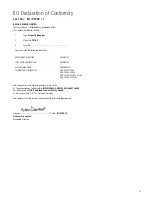
Страница 33: ...RECTIVE 2006 95 EC ELECTROMAGNETIC 2004 108 EC COMPATIBILITY DIRECTIVE EN 55014 1 2006 EN 61000 3 2 2006 EN 61000 3 3 1995 A1 A2 EN 55014 2 1997 A1 and conforms to the machinery example for which the EC Type Examination Certificate No BM50168849 AN50168850 AE50136036 has been issued by TUV Rheinland Product Safety GmbH at Am Grauen Stein D 51105 Cologne Germany and complies with the relevant essen...

Страница 34: ...34 ...

Страница 35: ...35 ...

Страница 36: ...k Eire Record Power Ltd Centenary House 11 Midland Way Barlborough Links Chesterfield Derbyshire S43 4XA Telephone 01246 571 020 www recordpower co uk Australia Tools 4 Industry Po Box 3844 Parramatta 2124 Tel 1300 124 422 Fax 1800 262 725 www recordpower com au New Zealand Tools 4 Industry Po Box 276079 Manukau City 2241 Tel 0800 142 326 Fax 09 2717 237 www recordpower co nz Made in China ...

Отзывы: