


2
FEATURES
• Built-in professional Bluetooth
®
signal processor module
• Accepts both Bluetooth
®
audio signal and RCA input
• Intelligent switching between Bluetooth
®
and RCA signal
• Automatic Bluetooth
®
on and off
• Bluetooth
®
audio signal and remote turn on signal can be
passed to other amplifers
• SMD dedicated audio chip device
• Full MOSFET DC-DC PWM power supply
• Overload, shortcircuit, overheat, under voltage protection
• ROHS compliant production technique
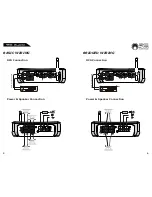
INSTALLATION
• Please choose a mounting place without any direct weather influences.
• Note that the amplifier generates heat so a well ventilated place is
necessary.
• Use at least 8-gauge wire for power and ground connections
• Use at least 12-gauge wire for speaker connections
• Use at least 16-gauge wire for remote connection
• Keep the wire connections as short as possible in order to minimize
power loss and provide a higher audio out quality
• Use the shortest ground connection to the chassis of the vehicle and
make sure that the paint is removed at the connection point
• Connect the remote input to the remote/antenna output of the head unit
• Mount the fuse holder within 200mm(8”) of the vehicle’s battery. Use a
fuse equal to that specified for your amplifier if a large, 12V line
is run which feeds more than one amplifier add up all required fuse
ratings and use the total rating for the fuse
• Connect the speaker to the amplifier observing the correct phasing.
• Make sure that none of the speaker connections can touch the vehicle
chassis
• Connect the RCA inputs to the appropriate signal source using only the
highest quality RCA cables
• Make sure that the RCA and speaker cables do not run parallel to the
+12V wiring
9
TROUBLESHOOTING
Before removing your amplifier, refer to the list below
and follow the suggested procedures. Always test the
speakers and their wires first.
• Make sure you have a good ground connection
• Check that battery is connected to (+) terminal
• Check all fuses. Replace it if necessary
• Make sure the protection LED is not illuminated
No Power
• Check for short circuits on speaker leads
• Check the speaker load if it’s not below the minimum load
• Remove speakers and reset the amplifier
• If the protection LED is still on, the amplifier needs servicing
Protection LED is on
• Check that the RCA audio cables are correctly plugged in
• Check all the speaker load wiring
• Check the headunit output and the amplifier level setting
No Output
• Check that the RCA audio cables are correctly plugged in
• Check all the speaker load wiring
• Check the headunit output and the amplifier input level setting
Low Output
• Check the RCA cables if they are not shorted to power ground at the
amplifier side
High “Hissing” Sound
• Check that the input level control is set to match the signal level of the head
unit. Always try to set the input level as low as possible.
• Check all the crossover frequencies are properly set
• Check for short circuits on the speaker leads
Distorted Sound
• Check that the minimum load impedance is correct
• Check that there is good air circulation around the amplifier. In some cases,
it may be necessary to add an external cooling fan
Overheat
If the above steps fail to remedy the situation, the system should be checked by
an authorized RE Audio Dealer.
Содержание BT-900.4
Страница 1: ...900 4 4 channel amplifier Owner s Manual...


