


- 7 -
OPERATING THE
OMEGA-3v6s
ESC
.
THE THROTTLE KNOB
MUST
BE AT MIN i.e. ALL THE WAY CCW, BEFORE TURNING THE SYSTEM ON.
Unless binding, always turn the TX on first. Then turn the loco ON. The loco will give a slight jerk (See page # 8) & the
ESC & loco lights will stay OFF. After between 2 - 8 seconds the TX & RX will recognise each other. The RX LED and
both ESC LED’s will come ON & not blink. After another 6 seconds both ESC LED’s & both front & rear loco lights (if
fitted) will blink three times & then all lights will go to solid ON.
N.B. In order to select a direction the throttle knob must be at MIN and the system must be in neutral.
4.1
FORWARDS.
To select forwards:
TX-20 & TX-21+, push the Direction switch fully forwards once & then release it. OR:
The Red LED on ESC & rear loco light will go out. The green LED on the
ESC pcb & the front loco light will stay ON.
If the
OMEGA-3v6s
ESC default motor & lights direction is incorrect please see Page # 6 PROGRAMMING of the full
instructions. Use the 3.4 DEFAULT DIRECTION feature to make changes.
4.2 SPEEDING UP. Gently twist the knob clockwise (CW). The loco will accelerate away after slightly turning the knob.
The speed is proportional to the knob position with a small amount of momentum built in to prevent sudden jerky
movements. Let the knob go once the desired speed has been reached. The speed will stay the same until the knob is
rotated CW or CCW. Min - Max speed takes 2 x seconds.
4.3 SLOWING DOWN. Turn the knob CCW back to the desired speed. Max - Min speed takes 2 x seconds.
4.4 STOPPING. Turn the knob completely CCW back all the way to stop. The ESC LED & front light will be ON.
4.5
REVERSE.
You must completely stop the loco first. The Throttle knob must be at Min. (i.e. fully CCW).
TX-20 & TX-21+, then pull the direction switch fully back once for a full second & release it to return the system to neutral.
Both ESC LED’s & both front & rear loco lights (if fitted) will go to solid ON.
To select reverse:
TX-20 & TX-21+ pull the direction switch again & release it.
The Green LED on ESC & front light will go out. The Red LED on the
ESC pcb & the rear light will stay ON.
To speed up, slow down & stop in reverse see 4.2 SPEEDING UP, 4.3 SLOWING DOWN & 4.4 STOPPING above.
CAUTION!!!
During use, if the battery voltage drops below 12 volts measured at the ESC ”IN” terminals, loss of control may
occur. The ESC may even suddenly reverse without warning.
CONTROLLING SOUND TRIGGERS.
SOUND SYSTEM TRIGGERS.
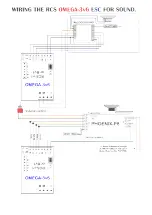
For the sound triggers to work there MUST be a common ground (-) connection between the ESC and sound system.
1. Sound powered by a separate battery. Connect the grounds on both the ESC and sound system.
2. Sound powered by ESC. Already has a common ground.
The
#
OMEGA-3v6s
ESC
has 4 x sound triggers controlled by the four small push buttons on the TX-21+ handpiece.
The Ch # 2 servo lead must go to Ch # 2 on the RX.
The Ch # 4 servo lead must go to Ch # 4 on the RX.
The two LH pushbuttons F1 (top) and F2 (bottom) control terminals # 1 (Green) & terminal # 2 (Purple)
The two RH pushbuttons F3 (top) and F4 (bottom) control terminals # 3 (Brown) & terminal # 4 (Grey)
You can activate any sound with any trigger depending on which pushbutton you want to operate the sound with.
The default for each is Momentary. F2, F3 & F4 are programmable for latch ON – OFF instead. See page # 6. 3.6/7/8/9.
When using with Momentary function, press the button until the sound is activated. Release button to turn sound OFF.
When using with a Latch ON – OFF function, press and hold the button for one second until the sound is activated. Then
release the button and the sound will stay ON. Press the same button for one second & release to turn the sound OFF.
They can be used as is with most sound systems such as Sierra
®
, Phoenix
®
, Dallee
®
& MyLocosound
®
.
Sierra will require the additional purchase of one # SSI-12v5 so that Sierra can function correctly.
USING PUSHBUTTONS FOR SERVO FUNCTIONS.
With
#
OMEGA-3v6s
ESC
the TX-20+ pushbuttons can be used to control servos instead of sound triggers.
F1 & F2 give half servo movements from neutral on Ch # 2. Plug servo into appropriate channel on the RX.
F3 & F4 give half servo movements from neutral on Ch # 4. Plug servo into appropriate channel on the RX.
Ch # 5 SERVO FUNCTION.
The
#
OMEGA-3v6s
ESC
has 1 x output for a mechanical servo function such as Kadee servo uncoupler.
Simply plug the Kadee into the Ch # 5 terminal on the RX. Activate with the large red pushbutton top right on TX. Servo
goes from one extreme of travel to the other. Servo goes back to start position when button is released.


