


- 6 -
3. PROGRAMMING.
Operating features of t
he
#
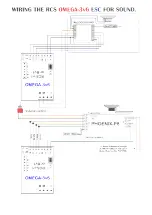
OMEGA-3v6s
system can be programmed from the TX using the ESC pushbutton.
Programming can only take place when the system is in neutral.
3.1 START VOLTAGE. This feature is designed to equalise the starting voltage of dissimilar locos.
3.2 TOP SPEED VOLTAGE. This can limit the top speed available. Either for speed matching locos or, for limiting the
top speed of one loco, say, when the system is being operated by children.
3.3 MOMENTUM. Toggle momentum control ON or OFF.
3.4 DEFAULT DIRECTION. Re-set the direction of a loco when it is to run back to back with another loco.
3.5 SYSTEM RESET. This takes # 1 & # 2 back to the factory default if incorrectly set.
3.6/7/8/9 SET SOUND TRIGGERS 1, 2, 3 & 4 from MOM (Default) to Latch ON - OFF.
HOW TO USE THE PROGRAMMING FEATURE.
Turn the TX & Loco ON. The RX & loco lights will stay OFF until the TX & RX are linked. Then blink 3 x times & go solid
ON. The system will then be, & must stay, in neutral. Or, if you have been running, return to neutral before programming.
Then press the pcb pushbutton once & the lights will go out. The system is now in Programming Mode.
SPEED MATCHING.
If you have two or more locos that have dissimilar starting and top speeds, you can adjust those voltages so the locos will
be fairly accurately speed matched across the speed range. It has been our experience that absolutely accurate
matching is not really needed for smooth performance. The trade off is, the top speed of a consist of locos controlled by
one TX will be limited to the top speed of the slowest loco.
3.1 START VOLTAGE. We suggest you test the locos you wish to match one at a time to find out and note the knob
setting at which the slowest starting locos begin to move.
Then, with the slowest loco stopped and the direction set to neutral:
Move the throttle knob to the loco start speed desired. i.e. to the knob position where the loco started moving.
TX-20 or TX-20+,
push the direction switch forwards & back again
ONCE
only. The lights will blink
ONCE
with the push.
Wait a couple of seconds for the lights to blink
ONCE
again indicating the new start voltage setting has been stored in the
system memory.
Then move the large throttle knob back to zero (OFF) position. i.e. knob is fully CCW.
Then press and release the pushbutton on ESC. The lights will blink three times and then go to all solid ON. i.e. Neutral.
Repeat the procedure if the setting is incorrect.
3.2 TOP SPEED VOLTAGE. If speed matching, we suggest you test the locos you wish to match one at a time to find
out the knob setting at which the fastest loco matches the top speed of the slowest loco.
Then, with the fastest loco stopped and the direction set to neutral:
Move the throttle knob to the lower top speed desired for the loco. i.e. to the knob position where the fastest loco
matched the top speed of the slowest loco.
TX-20 or TX-20+,
push the direction switch forwards & back again
TWICE
only. Lights will blink
TWICE
with the push.
Wait a couple of seconds for the lights to blink
TWICE
again indicating the new top speed voltage setting has been stored
in the system memory.
Then move the throttle knob back to zero (OFF) position. i.e. knob is fully CCW.
Then press and release the pushbutton on ESC. The lights will blink three times and then go to all solid ON. i.e. Neutral.
Repeat the procedure if the setting is incorrect.
OR: When children are using the loco, you can follow the same steps to limit the top speed of any loco.
3.3 MOMENTUM. Toggle momentum control ON or OFF.
Use
TX-20 or TX21+
direction control
THREE
times.
Then press and release the pushbutton on ESC. The lights will blink three times and then go to all solid ON. i.e. Neutral.
3.4 DEFAULT DIRECTION. To re-set the default direction of a loco to run back to back with another loco:
Use
TX-20 or TX21+
direction control
FOUR
times.
Then press and release the pushbutton on ESC. The lights will blink three times and then go to all solid ON. i.e. Neutral.
3.5 SYSTEM RESET. To take # 3.1 & # 3.2 back to the factory default if incorrectly set:
Use
TX-20 or TX21+
direction control
FIVE
times.
Then press and release the pushbutton on ESC. The lights will blink three times and then go to all solid ON. i.e. Neutral.
3. 6/7/8/9 SET SOUND TRIGGERS F2, F3 & F4 from MOM (Default) to Latch ON - OFF.
# F1 cannot be changed.
# F2,
Use
TX-20 or TX21+
direction control
SEVEN
times.
# F3 Use TX-20 or TX21+
direction control
EIGHT
times.
# F4 Use TX-20 or TX21+
direction control
NINE
times.
Repeat procedure to change either of these 3 x triggers back to MOMENTARY from Latch ON – OFF.


