RCS bb-bk1810. Скачать руководство пользователя страница 62

Book PC 


lxii 

This chapter contains documentation for the WinDVD application. InterVideo Inc.'s 
WinDVD is a simple-to-use DVD player with all the features you would expect to find in a 
standard consumer DVD player, in addition to some very advanced functionality, such as 
full VCD 2.0 support, full precision video decode, a choice of user interfaces, and video 
display options. You can play DVD titles or Video CDs - WinDVD automatically 
determines the type of disk in the DVD drive and uses the correct playback method.  

Each DVD (Digital Video Disk or Digital Versatile Disk) is designed by the a different  
author, who can create different features for each disk. WinDVD handles all features 
commonly used today. Most DVD disks have menus, which you can navigate. WinDVD 
recognizes these features and lets you access them through the WinDVD user interface. 

The WinDVD Controls 

Once WinDVD is launched and active, use the controls on the WinDVD panel to navigate 
through the DVD Title. The WinDVD controls are designed to look like a standalone DVD 
player, so they may already look familiar to you. Keep in mind that not all options are 
available with all DVD Titles. If a feature is not available with a particular title, it will be 
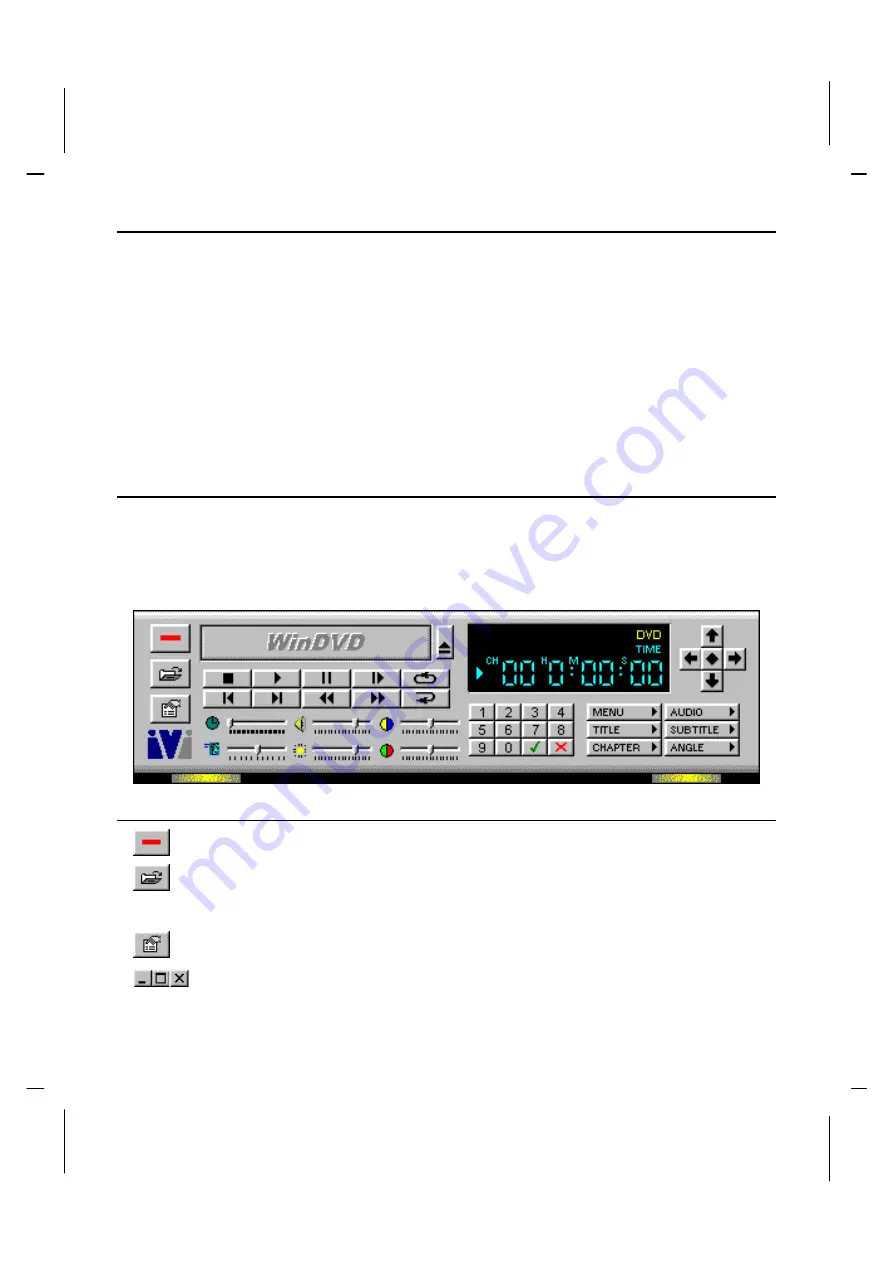
grayed out. Below is a description of each section of the full WinDVD control panel.  


Start/Eject 


Power off, closes the WinDVD application. 


Opens the Playlist window, letting you select a specific order and group of 
files. Select from .vob, .dat, .mpg, and .ac3 files. You cannot select a file 
while a movie is playing. 


Opens the Properties window. 


Minimizes, maximizes, and closes the WinDVD video window. 

Содержание bb-bk1810.

Страница 1: ...turer to notify any person of such revision or changes Trademarks VGA and PS 2 are registered trademarks of International Business Machines Intel Pentium Pentium II MMX and Celeron are registered trad...

Страница 2: ...ration between the equipment and the receiver q Connect the equipment onto an outlet on a circuit different from that to which the receiver is connected q Consult the dealer or an experienced radio TV...

Страница 3: ...stem 1 4 Backups 1 5 Shock Precautions 1 5 Care of the Computer 1 5 Unpacking 1 6 Checklist 1 6 Installing the System 1 7 Introducing the System 1 8 Looking at the Front 1 9 Looking at the Back 1 10 C...

Страница 4: ...ning and Closing the Unit Case 4 3 To Open the System Unit Case 4 3 To Close the System Unit Case 4 4 Inside the System 4 5 Removing the Drive Cage 4 5 Mainboard Items 4 6 Upgrading 4 7 Changing the C...

Страница 5: ...6 Play MIDI files Use Midier B 7 Regulate the audio sources Use Mixer B 7 Recording audio data Use Voice Catcher B 8 Appendix C WINDVD Documentation C 1 The WinDVD Controls C 2 Start Eject C 2 Naviga...

Страница 6: ...Book PC vi Understanding the DVD System C 10 Region Codes C 10 NTSC and PAL C 11 Aspect Ratios C 11 DVD Audio C 11 Parental Control Properties C 12 Quality Setting C 12...

Страница 7: ...Fehler Formatvorlage nicht definiert vii C Ch ha ap pt te er r 1 1 G Ge et tt ti in ng g S St ta ar rt te ed d...

Страница 8: ...ound 3D and A3D compatible interface and support for Four Channel Speakers 2 Optional Digital Audio Interface SPDIF In Out with 24 bit stereo 44KHz sampling rate and measured 120dB audio quality 3 Opt...

Страница 9: ...sbehave Dampness causes oxidation and dryness causes static electricity Heat is probably the single most damaging environmental element to a computer Because of this never push the rear of the unit ag...

Страница 10: ...ly follow the instructions supplied with the cleaning kit you use Subjecting a system to a dusty or smoky environment significantly shortens its life and increases the probability of failure If you us...

Страница 11: ...as Unplug all power cords from their power sources if severe weather threatens When you disconnect a cable always pull on the plug or connector not on the cable itself Know the static electricity prec...

Страница 12: ...drink while using the computer Unpacking If your system arrives in very cold or damp weather you should not apply power to the system unit until it has reached room temperature and no condensation is...

Страница 13: ...can reach to the appropriate connectors Be sure there is a wall outlet close to the table or desk Installing the System Most of the work of setting up your system computer is already done Before ship...

Страница 14: ...the System Before you actually set up your system and plug everything in it s a good idea to locate all its features switches and controls The next few illustrations familiarize you with the system co...

Страница 15: ...ain to turn your computer off Reset switch Use this switch to reboot the system instead of using the power switch button Indicator LEDs The front panel has three indicator lights The indicator LEDs tu...

Страница 16: ...video files that require a lot of capacity You can play audio and video files using the supplied Gamut audio player or the optional WINDVD software Looking at the Back The back of the system is where...

Страница 17: ...system Video Connector The RCA video jack can be used to output video to devices that use RCA plugs such as most TV receivers S Video Connector The S video jack can be used to output video to devices...

Страница 18: ...can begin using the system The procedure is straightforward and easy to do however be sure to follow each step carefully and don t leave any steps out 1 Connect a keyboard and pointing device through...

Страница 19: ...ert xix 3 Connect a computer monitor to the VGA connector 4 Connect phone lines to the Line Phone jacks 5 Connect any USB devices you want to use with your system USB Connector VGA Connector RJ 11 Pho...

Страница 20: ...ght want to use to the Parallel port 7 Connect a TV receiver to the Video or S Video Connectors 8 Connect a network cable to the LAN connector http www ccift org tw taiwan econ html Video Connector S...

Страница 21: ...er source if they do not draw their power from the system You are now ready to start up your system Check Chapter 2 for detailed information on starting up your system for the first time Game MIDI Por...

Страница 22: ...Book PC xxii C Ch ha ap pt te er r 2 2 U Us si in ng g t th he e s sy ys st te em m...

Страница 23: ...uble check to see all the cables are still securely attached to the appropriate connectors 5 The hard disk and other drive indicators will blink briefly as the system checks them quickly 6 Various mes...

Страница 24: ...less you activate it again later 14 Next you will be asked to setup your printer If you do not have a printer you can skip this step If you are familiar with the process of setting up your printer you...

Страница 25: ...m If you purchased any other additional software with your system you will need to install that software yourself before you can use it which is discussed below The installation of software can be don...

Страница 26: ...can find out the capacity used space and available space on the C drive by right clicking on the C icon and then selecting properties The Windows Explorer Start Programs Windows Explorer provides an a...

Страница 27: ...rive module The diskette ejects and you can pull it out of the drive When the system is reading from or writing to a diskette the light underneath the diskette drive will turn on Do not try to eject t...

Страница 28: ...e disk into the tray Hold disks by the edge so that you don t smear the storage surface Normally the disks install with the label side facing upwards The disk fits into the circular depression in the...

Страница 29: ...e standard Windows Media Player which has similar but somewhat limited functions as the software applications mentioned above 1 In Windows Start menu point to the Programs Accessories and Entertainmen...

Страница 30: ...ld consider upgrading the total amount of memory in your system This will optimize the performance of system See chapter 4 of this user s manual for information on upgrading your Book PC s memory Abou...

Страница 31: ...may not permit the use of the fax modem that is designed for this system The fax modem is capable of running in two modes both as a fax and as a modem which can be used to connect to other computers T...

Страница 32: ...Book PC xxxii C Ch ha ap pt te er r 3 3 I In ns st ta al ll li in ng g t th he e S So of ft tw wa ar re e...

Страница 33: ...d with your system contains an original copy of all the software that was preinstalled on the hard disk drive including all the drivers and the application software You can use it to restore the Book...

Страница 34: ...Audio Player Graphics Drivers and Software Find the Graphics drivers and software here D VGA BKI810 Win9xGraphics SETUP EXE Fax Modem Drivers and Software Find the fax modem drivers and software here...

Страница 35: ...means you might have to manually install some driver software in order for all your hardware to be recognized and work properly together Adding updating a driver To install a driver follow these instr...

Страница 36: ...k on Install in the Install Remove menu and follow the instructions Another way of installing software is through the Run option in the Start menu After you click Run a small window pops up and you ca...

Страница 37: ...Fehler Formatvorlage nicht definiert xxxvii C Ch ha ap pt te er r 4 4 G Go oi in ng g i in ns si id de e...

Страница 38: ...techniques reduce the possibility of damaging components with electrostatic discharge or static Before handling any components or touching anything inside the system unit discharge your body s static...

Страница 39: ...jumper settings or just want to have a look inside you can open the case without breaking your warranty To Open the System Unit Case 1 Power down the system 2 Disconnect the power cable 3 Observe the...

Страница 40: ...Set it aside Look inside the unit and find the components labeled in the illustrations below To Close the System Unit Case 1 Replace the front cover by first fixing the latches at the bottom of the ch...

Страница 41: ...Supply Mainboard Chassis Removing the Drive Cage 1 Use a Philips head screwdriver to remove the screws on each side of the chassis 2 Disconnect all the connectors and power supply cables from the driv...

Страница 42: ...With the drive cage removed use the pictures below to locate the labeled mainboard items Processor Socket System Memory Power Supply Connector to Mainboard Power Supply FDD Connector IDE Connector Po...

Страница 43: ...on Force Socket 370 on the mainboard 1 Locate the Socket 370 on the motherboard 2 Pull the locking lever out from the socket and swing it to the upright position 3 On the Celeron processor identify th...

Страница 44: ...ots which can be installed with SDRAM Synchronous Dynamic Random Access Memory memory modules You can use either 66 or 100 MHz memory modules You must install at least one memory module in order to us...

Страница 45: ...e Hard Disk Drive Front Connectors The connectors for the drives are located on the mainboard Changing the Hard Disk Drive Locate the IDE connector on the mainboard A single IDE cable is provided with...

Страница 46: ...supply connector to the hard disk drive Changing the CD ROM DVD Drive Locate the IDE connector on the mainboard A single IDE cable is provided with the mainboard Connect the cable to the IDE connector...

Страница 47: ...ive Note The most common setup of this system will include a CD ROM drive but this slot in the drive cage can also hold alternative devices such as a DVD player Changing the Diskette Drive Locate the...

Страница 48: ...Book PC xlviii 3 Connect the diskette drive connector cable to the mainboard 4 Connect a power supply connector to the diskette drive...

Страница 49: ...Fehler Formatvorlage nicht definiert xlix A Ap pp pe en nd di ix x A A P Pr ro ob bl le em m S So ol lv vi in ng g...

Страница 50: ...ing device The Mouse doesn t work Make sure that the mouse is firmly and securely connected to the proper connector on the rear side of your computer Do not plug it into the designated PS 2 port for t...

Страница 51: ...display devices are properly connected to the system power up the system and the Book PC will automatically detect the connected devices and distribute the video display to them If both a monitor and...

Страница 52: ...skette drive 3 Copy the downloaded files to the diskette 4 Next copy the BIOS flash utility program Awdfl711 exe for Award BIOS from the support CD to the diskette 5 At the DOS prompt generate the aut...

Страница 53: ...mu ut t D Do oc cu um me en nt ta at ti io on n Copyright 1999 Formosoft International Inc All rights reserved The contents of the associated Gamut software are the property and copyright of Formosoft...

Страница 54: ...control center of your home audio equipment With high compression rate MP3 technology GAMUT performs efficiently on storing and managing music on your PC Designed to exploit the latest MP3 technology...

Страница 55: ...igh quality digital technology If the CD ROM drive doesn t provide CDDA audio track capture function select Analog recording from Audio CD to record MP3 files with analog technology However analog tec...

Страница 56: ...Book PC lvi Variable bit rate Encode 6 Next a window will appear that allows you to track the encoding progress...

Страница 57: ...llows you to set up sound effects 1 Press the Open File button to select MP3 files 2 After selecting the MP3 files Musician will start playing the music automatically You can read the track progress f...

Страница 58: ...3 Click on the Effect enable button to select simulation effects After the effect is enabled you can click on the surrounding effect in the Play Function area to enable it 4 On the right side of the m...

Страница 59: ...easy to add or delete tracks or to change the order Regulate the audio sources Use Mixer Start Mixer from the GAMUT Menu Bar or click Start Program GAMUT Mixer Mixer is used to control the audio sourc...

Страница 60: ...ile or browse to find an existing file 4 Select the recording source and adjust the volume then select the desired recording mode and compression ratio Note Normally when recording vocal audio select...

Страница 61: ...oc cu um me en nt ta at ti io on n Copyright 1998 Intervideo Inc All rights reserved The contents of the associated WINDVD software are the property and copyright of Intervideo Inc Any reproduction i...

Страница 62: ...Most DVD disks have menus which you can navigate WinDVD recognizes these features and lets you access them through the WinDVD user interface The WinDVD Controls Once WinDVD is launched and active use...

Страница 63: ...sk in fast forward mode Restarts the same chapter Opens the Audio and Video adjustment window Opens the online help system Sliders Moves to a specific time in the title Increases or decreases the brig...

Страница 64: ...and then click the green checkmark to accept that number Menu Items Displays all of the menus available Root Audio Language Subtitles etc on the DVD disk currently being played and allows you to selec...

Страница 65: ...y after a pause Stop stops the current playback Pause pauses the current playback Fast Forward plays the disk in fast forward mode Fast Backward plays the disk in fast reverse mode Previous Chapter ju...

Страница 66: ...as many files as you want Remember that these files will now play in the order in which they appear Delete and replace files to create the correct order if needed 4 Click Save to save your playlist f...

Страница 67: ...ified form to allow different ratings for the same movie To set movie rating limits on your WinDVD 1 Launch WinDVD and view the main control panel 2 Click the Properties icon The Properties window app...

Страница 68: ...selected feature Viewing a DVD Movie or Video CD Insert the Title into the CD ROM DVD Drive WinDVD reads the format of the disk and starts automatically Playing a DVD Interactive Title Interactive DVD...

Страница 69: ...m the Parental Control window click Change Password 2 Type your current password in the Old Password text area 3 Type your desired password directly into the New Password text area 4 Type the same pas...

Страница 70: ...t languages for a single movie In addition the format supports 32 closed caption tracks Region Codes Motion picture studios want to control the home release of movies in different countries because th...

Страница 71: ...e in order to fit into a standard size display DVD Audio A DVD Video disk can have up to 8 audio tracks with each track being PCM MPEG 2 or Dolby Digital PCM is uncompressed digital audio the same for...

Страница 72: ...abled all features displayed in Custom Quality settings are turned on Custom Unlocks the Custom Quality section of Display Properties Select the specific features such as smooth scaling or software de...

Отзывы: